A Laminated Bent Chair Leg
Furniture makers take a close look at the concept of building a bent chair leg by laminating cross-grain thin sawn layers into a thicker member. May 18, 2010
Question
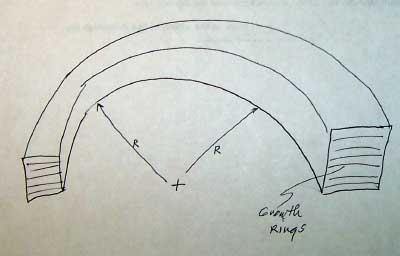
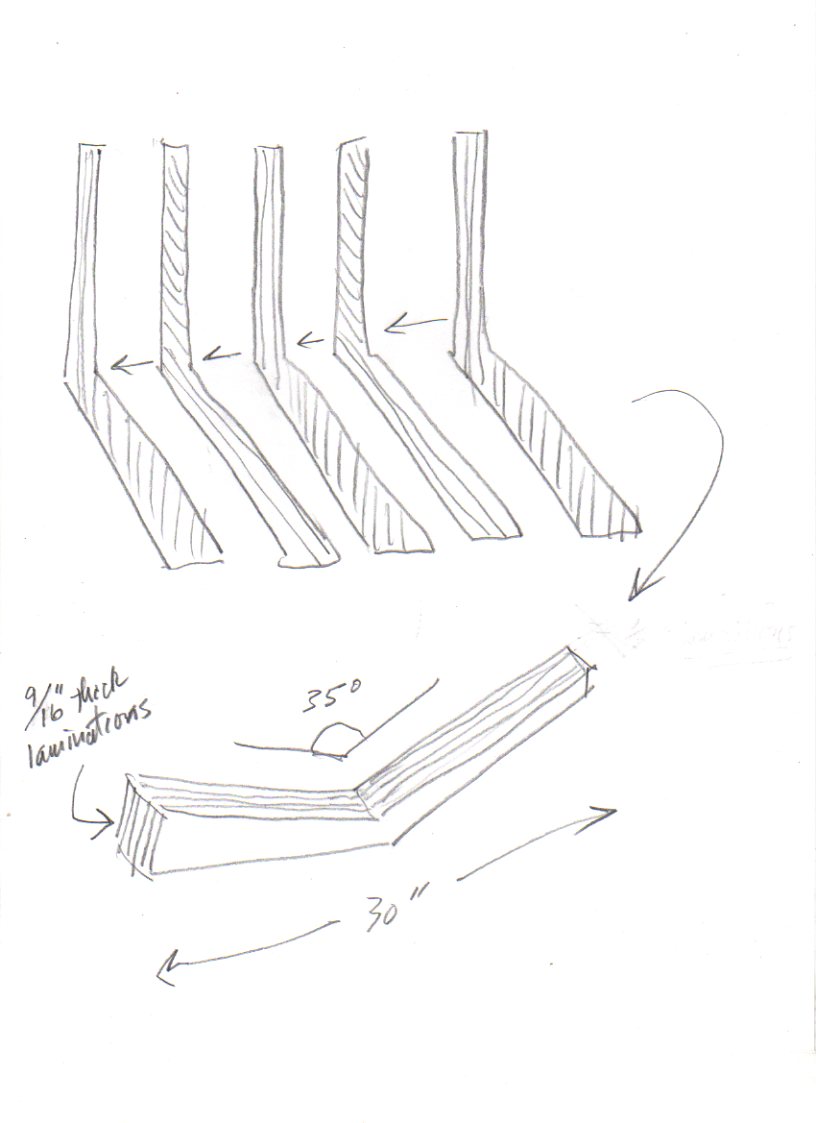
I am building a chair which requires a bent (145�) rear leg/stile. This design yields short grain on about half the part. By cross laminating four slices of hardwood (walnut) each 9/16" thick, and alternating the grain direction 35�, I have a part with impressive strength. I cut out one leg in which the grain is aligned with the bottom half (short grain on top) and another in which the grain aligns with the top (short grain on bottom). Then I sliced each into 5/8" slabs, thicknessed to 9/16" then shuffled the parts, glued with yellow glue and clamped. Will time tear it apart? Is epoxy a better choice?
Click here for higher quality, full size image
Forum Responses
(Furniture Making Forum)
From contributor G:
You may experience joint creep with yellow glue. I used to use resorcinol for stacked laminations - that glue never moves. I am not crazy about epoxy - it does adhere nicely and moves enough to allow wood to move. I use it for filling cracks and holes, but have not used it for laminating.
From contributor W:
I have done similar laminations but have used Titebond II Extend. It was recommended by the Franklin folk. The Extend allows more time to align the parts and the 'II' gets some improvement in creep that yellow glue has besides wetness protection. I now use it for most of my chair glue ups and all of my bent laminations of rocker skids. No problems at all.
From contributor J:
You'd probably be better off with more thin layers than with fewer thick layers, but the basic idea is good. I would expect a lamination of 9/16" layers to last for quite a while, but these are not veneers and they will move somewhat. I'd prefer to shoot for layers in the neighborhood of 1/8" - 3/16", but that's just an intuition; I can't defend this idea with the confidence an engineer would have.
From contributor W:
I agree with contributor J on more lams being better. I use 1/4" lams on my bent rocker skids. As you go thinner you approach making plywood. On my bent back chairs, similar to your design, I only use 5-10 degrees of bend and no problems with solid wood - thus no experience on your problem. However, 9/16 inch lams shouldn't be a huge movement with moisture changes.
From the original questioner:
Aside from the glue choice, I wonder what the practical limit of lamination thickness is? I'm told by the folks at west system that boat builders routinely join thick cross grain parts for stiffness in rudders and such. Any experience out there?
From contributor J:
A lot depends on the stability of the finished part, which in turn depends on the finish you use. Boat parts that get bathed in a heavy layer of epoxy may be very stable because moisture can't get through the finish. Furniture finishes are typically much more permeable.
From contributor M:
Cold molding, generally done with epoxy, is made of thin laminates, like what we're talking about here. This process is used to create monocoque hulls, cabin tops, and even rudders, and does utilize cross graining. In more traditional boatbuilding, I wouldn't be surprised to see large section cross-grained elements, like rudders especially, but these would be mechanically fastened, not glued. I know of at least one successful contemporary builder who double-planks his boats with thick planking (in the neighborhood of two layers of 3/4" planking) and epoxies the two layers together. The grain in this scenario however is parallel. I can't be sure, but it seems that your epoxy rep is just being a salesperson.
From contributor T:
Don't over think this. Glue creep? It's not a bent lamination so has no built in stress. Wood strips that narrow will have nearly zero movement to stress the joints in any normal environment. You might have an appearance issue (striping). Glue? Any commonly used wood glue! As an aside, it was common practice for production pedestal table legs to be laminated with two thick sections (at somewhat differentiated grain directions) glued with a thin layer of stock sandwiched between. Proceed with confidence.
From contributor D:
I veneer a lot of parts everyday for architectural millwork applications. The above advice on thinner laminates is spot on in my opinion. Thicker laminates are stiffer individually, but if/when it warps it will do so with more force. Veneers less than 3/16" bend with your fingers, thicker ones might need a vice to flatten out a warp, if it doesn't crack first. This is what the glue would have to overcome with thick laminations.
From contributor K:
I don't think much of your process, no matter how many plys you use. I don't think it will look much different than looking at the edge of plywood that needs a veneer. You don't show how wide you want to end up, but I think I would think about getting a finger joint cutter for a router table, or shaper. You can then just miter it, with the fingers running through the miter. The rest will just look like solid wood. For that matter, you could set up and do finger joints in solid wood, mitered like this.
From the original questioner:
I thought about a finger joint, but decided that cutting 50% of the long grain would be considerably weaker than what I have. Also it would have the identical cross grain issue, with a lot less glue surface.
From contributor K:
You can make the fingers as wide or thin as you wish, which could be exactly the same amount as you are proposing to use with your other method, but you will have a nice looking solid wood member away from the joint. The downside of what you are proposing is that you will have a bad looking plywood edge look by laminating it all. Also those glue-lines will be working against plys which are thick enough in cross section, that the wood will be able to break them apart with very little MC change. I am just trying to help, but it is your call. I try to never build something that self-destructs.
From the original questioner:
What will prevent the finger joint from self destructing? Are the same forces (mc) not at work?
From contributor K:
I don't think there is much difference in the corner. My concern is the 15" up and out each arm, where you have thick plys with the grain opposing, which will potentially be a problem.
From contributor K:
I may not have made the second part of my suggestion very clear. Have you ever cut box joints on a TS? If you have a sled, you can put the two 1/8" blades of you dado set for 1/4", set to the height of the thickness of the part. Then set a 35� wedge out in front of the fence for a sub-fence. I usually make this as part of a sub-base. Before I join the two parts, I make a pass on the fence, then shift that part to the right the thickness of the finger width. I then insert a ripping in that gap, which I sand a tapper into the top, so slipping the part over with each pass is easy to start, then tight at the bottom. Once you have it set up, you can cut the parts pretty quickly, and they should be able to fit together without much clamping, and may not need any clamps once they are together. This should give you nine fingers. Five on one part and four on the other. None of the fingers will show on the inside of this obtuse angle, and only for the thickness of the opposite part on the outside of the angle, which won't look too bad, compared to the stripes that your method will show. Once you get this set up, you will be surprised at how fast you can cut the fingers. If you are doing a set, this will be faster, with less waste than what you were thinking.
From the original questioner:
I want to try your finger joint jig, but can�t quite see the set up. It�s the repeatability that is essential, I get that. A tapered guide stick to register the next notch I kind of understand but where does the stick mount - glue it into the jig? Also, will the taper alone keep such a long part parallel to the fence? I will cut a couple and test for strength (compared to the lam) and report back.
From contributor M:
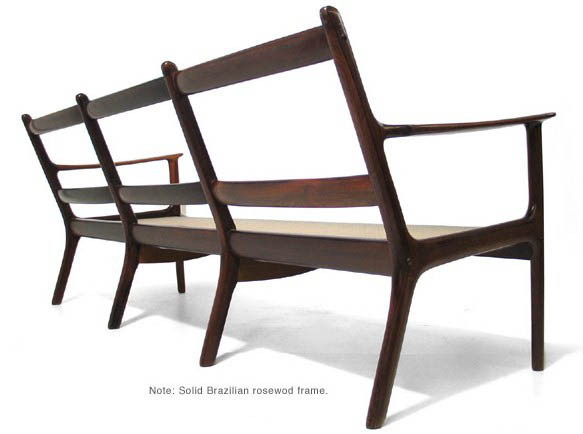
This is an Ole Wanscher design built in the 60's (I believe). The joint in question is assembled like contributor K suggests.
Click here for higher quality, full size image
From the original questioner:
Can you see the nature of the joint? The angle looks roughly like what I�m doing. How old is it?
From contributor M:
My guess is that it was built in the 60's. It's solid. The joint for the outer legs are mitered finger joints; the miters form a Mercedes symbol inside elevation, and the fingers are visible from the edge of the frame. The center legs are very close to your scenario (including the angle, to my eye) and are also mitered finger joint construction. Personally, I'm not adverse to the look of laminations or multiply edges, but I would still build this with finger joints. I would, however, run the joints on a shaper with simply a miter gauge to hold the angle; put the frames together of square edged stock, then shape the molded form out of this glue-up.
From contributor M:
Wow, I've impressed myself with my inventive memory yet again. Sometime after my previous posting, I realized the impossibility of my description of this joint, and walked the ten feet over to the piece to take a look. Here's how it goes for all those still interested: the seat back piece and rear leg piece are mitered, likely with a floating tenon. The seat piece joins this assembly with an arched finger joint, approximately 8" radius, the apex being about an inch forward of the visible plug. The plug conceals a screw that attaches the rear seat rail, which is also likely secured by dowels that pass through the floating tenon.
From contributor W:
As with memories, I did make a few chairs with laminations you are talking about. More because I had 5/4 stock and wanted a 1 3/8 legs. Back in a sculpture class we had to do some stack lams to brick build a rough shape to work. I was using mahogany so glued in maple veneer between two of the blocks. Instead of hiding the glue line, celebrate it. In the chair, I glued the walnut planks with maple veneer in the glue line. On purpose I offset the line to the outside of the chair on the back as well as the front legs.
From the original questioner:
Doesn�t sound like the seat piece joint ads much to the strength of the rear leg miter? Floating tenon sounds like a fair guess but I'm surprised it has held up so well. What is the primary wood?
From the original questioner:
To contributor W: do you still have any of these pieces? I�d love to know what time has done to them. Did you cross the grain in the lams? This is really my biggest concern.
From contributor W:
I did cross the grain as it was walnut. Once I finished the piece the cross grain wasn't noticeable. I see the customer yearly at a show I do and they still talk about the chair. It is six-seven years old now. No problems. They talked last year about a dining set of six chairs but reverse using maple with walnut veneer.