Question
What is the best way to get an even tone when staining recess panel cherry doors? This is a large kitchen (76) doors, all stained with a custom blend stain, and CV topcoat. This customer wants as even a tone as possible. Of course the doors are overall fairly even in raw wood, but there are a lot with pinker rails than stiles, plus the difference in the veneer center panel. Also even though the raw wood color is close, the soft/hard difference is a challenge too. My tests on the back sides of door fronts bring out the orange cast - brown on some rails versus the grayer brown of the stiles. I went over the rails after sealing with a dark walnut stain (green-gray cast), then resealed. That knocked the orange down fairly well. But is there an easier way? When the grain stains with a yellow cast, what will bring the yellow over to the gray-green cast of the brown? I can't get the color too dark. My first step is using clear stain base as a wood toner, then wiping stain, seal. This does help get more even color and darkness, I just need a little guidance on my steps and I can nail this.
Would I be better off spraying dye on all the faces to bring everything up to similar tone? Will that be easier than toning after sealer? My experience spraying dye is that it is very tricky getting even tones - slower passes, wetter passes, more passes all affect the result. What do furniture finishers do to get the nice even tones? I realize these are just cabinets, but a 43K kitchen gets some TLC. Any recommendations or help would be much appreciated.
Forum Responses
(Finishing Forum)
From contributor A:
The way I have done it on a large entertainment center was by using toner coats. Like you, I applied a conditioning coat (clear stain base) to all of my cherry surfaces. I let that dry an hour or so. It seems the longer you let it dry the easier the evenness of color will happen, overnight being best. After the condition coat dries I apply my stain - this is a sprayed on and wiped off stain. Make sure the stain is not darker than the final color. You can tone it darker but you can't tone it lighter. At this point, while wiping off you can do some adjusting of tone. Wipe harder and longer on the darker areas and shorter and lighter on the lighter areas, starting with the dark areas first. Do small areas, like one side of a cabinet at a time so your stain doesn't soak in too much in the more porous areas. After you wipe down and let dry according to the instructions, mix up your toner coats. This would be a mixture of dye(s) with thinner and lacquer or sealer. I usually use 2 oz dye 8 oz thinner and 4-8 oz of lacquer, depending on how many coats I am planning on applying (find out by doing samples). This is where you can adjust your evenness, spraying more where it is lighter and less (or none) where it is darker. After you get the color you�re looking for, spray your topcoats. This is the way I have been doing it and I get pretty good results. One thing that I did notice is that the toner coats, as they flash off seem to get darker than when they are wet. Be aware of this so you don't make things darker than expected. Go slow until you figure out the schedule you need.
Take the time to hit that color on the bare wood if at all possible and save time going simple clears the rest of the way. Not that I'm opposed to adding a glazing step in there if you can get paid for it because this adds nice depth - but 76 doors and associated casework and trim is a lot of surface. A little spot toning is fine where you need it, but I don't see building color this way on a big job.
For a Cherry, I use a flesh colored toner. I start with a white lacquer, then add some Burnt Sienna - this like a terra cotta color. I then add a little Van Dyke Brown, and once I get the right color, I then add the proper thinner and reduce the color strength. I then make some passes - I want the toner to remain translucent - I don't want to block out the wood.
You could also make up a toner without the white lacquer. You could use these same colors and make up a stain, and use some of your clear coat, or use a drying oil as the binder. Remember, it�s the finisher who paints the wood, it's not the toner.
Always, make up start to finish samples. That's how we learn to do it right. We get to know if all the components are compatible with each other, and if needed, we can make adjustments before we start the projects.
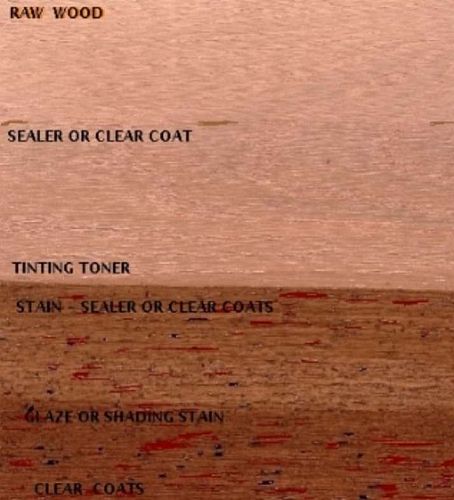
This is one way of doing it. Please note the translucency during each step, and at the end of the process. I want to note, that pigmented toners are not intended to paint the wood. If you want to paint the wood, then you use a base colored coating. If you thin out a base colored coating, you can make your own translucent toners.
When the raw color is fleshy gray on the stiles, and pink on the rails with gray in the veneer center panel, I see I have no choice but to tone the grain first, I did mix up a small amount of gray-flesh dye, lightly sprayed, then wiping stain cut 1/3 with clear stain base to allow the added color of the dye, and two seal coats. The colors blended together nicely and came out perfect except for the center panel (which is not sanded on the back as good as the front).
To contributor D: I never thought of making a starting toner from the stain itself. My only worry with that is the ticking in the grain on some cherry boards is quite heavy and the black can overpower and take the piece too dark.
I'm going to have to note which backs do go dark and stain those fronts diluted to be safe. I see I will need step boards to verify each sprayed piece comes up to the target at each step. At this point I think I'll set it up this way: 1. Clear stain base for grain conditioner. 2. Light spray of fleshy-gray dye, or diluted pigment toner. 3. Seal and test color tones. 4. Toner/sealer if needed. 5. Topcoats. If I have wild doors they may need special attention.
To contributor D: With your base toners made of the wiping stain, thinned way out this way does it still need wiping? There wouldn't be very much pigment left but the Sherwood wiping stains definitely have to be wiped or I can get lifting. Also, getting out the yellow without going too red or green - what is the best color toner?