Basics of Furniture Stripping
A newcomer to refinishing learns some early lessons. March 9, 2010
Question
From contributor A:
So after two failed attempts at removing old finishes on some of my older furniture (for practice) I'm starting to think that either I'm using the wrong tools/technique or I'm simply using the wrong products.
After having so much trouble, I watched an educational video on finish removal - and the guy made it look so simple. I should note here that I've been doing finishing on new wood for over 11 years, but have only recently found myself in the refinishing business recently due to market demand for remodeling.
I started my practice run on a cherry magazine stand that I had kicking around using circa 1850 heavy bodied stripper. No deal. Even after leaving it on for 25 minutes and keeping it wet with fresh applications every ten minutes or so plus covering with plastic sheeting the finish still wouldn't come off easily like I saw in that video.
The second piece I tried on was a two door night stand (again, another random piece I own but only keep because I don't want to throw it away, it's teak). This time I tried sanding the surface off with progressively finer sandpapers, only to burn through the veneer on the side (such a disappointment). For the legs, I tried the Behr spray stripper.
The only other stripper I can think of that is readily available are heirloom by Recordsol. I haven't checked with my Acroma or Richelieu suppliers yet for what they carry (30 mile drive to get to them).
So what am I doing wrong then? Are the strippers I've tried substandard? I use Scotch-Brite pads, steel wool, plastic scrapers, steel scrapers, even a Richard�s finish scraper and it isn't working for me.
Now I know this shouldn't be so difficult, so it's either just because I'm ridiculously inexperienced at finish stripping or because I'm doing something wrong. I'm just going to keep on watching those videos, reading those books and going to garage sales to pick up old furniture to practice on, because I've got to learn how to get this right.
Forum Responses
(Finishing Forum)
From contributor J:
Check out Benco they supply pro grade strippers to the trade.
From contributor K:
Agreed about Benco strippers, but part of your problem is technique. You need to put the stripper and leave it alone until the paint is softened completely. Covering with wax paper or plastic works well to retard evaporation but don't keep re-applying it. Paint stripper's are like the strippers that take their clothes off for a living. You get what you pay for.
From contributor R:
First and foremost, let the stripper do the work for you. I like to use a Methelene chloride based stripper - the thin type. The paste type removers are just too messy to work with in my opinion. Most of the semi paste removers I�ve used mention in the instructions to leave the remover alone and to not apply more of the stripper until you have scraped off the softened finish. Then add more remover. Try the thin stuff, like Greens or Jasco or US Cellulose (AMT) and you might look at stripping in a whole different light. Usually the stripped piece is washed down with Acetone or lacquer thinner as that removes the wax that�s in the strippers (the wax is put into the stripper to prevent it from evaporating too quickly). The wax must be removed prior to applying the finish or the newer finish won�t dry properly. Keep the item wet with the remover and if you see any dry areas, pour on some more remover.
From contributor D:
Paste removers require a little finesse to make them work. The most important technique, if applying with a brush, is to only brush the remover on in one direction. Do not brush the remover back and forth as if you are painting a house, and leave it alone. The chemical reaction between the remover and the finish is almost immediate, brushing back and forth breaks the chemical reaction. Wait for the finish to wrinkle and remove with the tool of choice. I also prefer MC removers and thin solutions are my preference, but using thin removers without the appropriate flow over table and pumping equipment can be challenging. I have used Hood stripping products for years. If you choose to use an over the counter product look for Rock Miracle stripper. One last note - if you have an old spray gun you can load it with stripper and shoot away. It will eliminate the brushing issue and clean your gun at the same time.
From the original questioner:
Interesting, I never thought to spray the stripper with my HVLP - that would definitely save some time, and I could get an even wet coat of the stuff on. One question though, will it damage my gun/needles? Or would cleaning thoroughly with mineral spirits afterwards make it safe to use the gun for spraying finish after having used it to spray stripper? I only have the one HVLP gun, but three other sprayers as well. Maybe I should go buy a cheap cup gun and dedicate it for spraying strippers.
From contributor K:
I would not want to reuse the gun for finish spraying. It�s not worth the risk. I use a flow over system but if I'm just doing a small piece I'll use a coffee can to pour the stripper over the piece.
From contributor J:
Atomizing an already volatile solution just loads the air with stripper rather than the piece. Skinning agents are added to the stripper to retard evaporation, atomizing the stripper enhances evaporation. The PPM of dichloromethane in the air is a definite hazard - chlorinated solvents pass through skin like it isn't there. Forget the spray gun, they cost $29, your health is far more precious than that.
From contributor S:
Many, many years ago I dedicated my first HVLP gun and turbine unit to stripping. Use an extra large cap and needle and it will work like a charm. It doesn't really atomize the stripper if it is paste type but rather fans it out and flows/throws it on in a perfect film. Fumes are actually less than pouring and brushing it on. Makes stripping almost painless. My guns are always stainless steel parts but MC shouldn't harm brass. A friend of mine borrowed my unit once to spray a CV job on site and did not have any problems associated with the prior chemistry. Although, I am a nut case about cleaning my guns immediately after use and I would recommend you do the same before spraying a coating with the same gun.
From the original questioner:
Thanks for the advice guys. I really like the spraying idea. I actually have an old airless sprayer that at one time was used for lacquer spraying exclusively (before I bucked up and got pro equipment like HVLP and Graco AAA). Will MC stripper damage an airless hose? Graco hose and Graco gun, and the pump is SprayTech (if that matters). Also, could someone post a photo of a flow over system so I can visualize what you guys mean? I've seen pictures of the big dipping tanks, but I'm at a bit of a loss when you all say flow-over.
From contributor J:
Basically it�s as described above. We used one of these systems for five years before replacing the pump. For flammable type removers (ATM) you can get an air driven pump. A variety of brushes, Scotch-Brite scrubbing pads and vapor-proof glove liners help, as do splash-proof face shields, aprons, longer chem tubing.
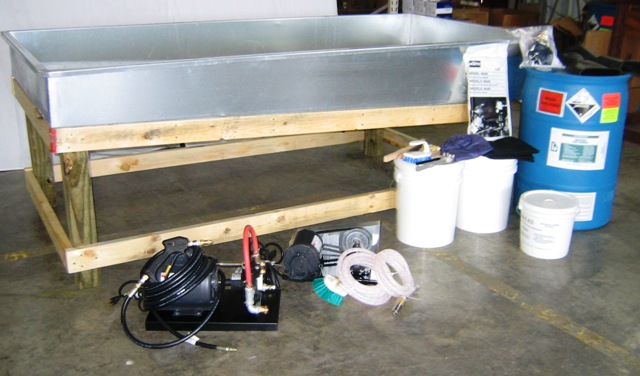
Click here for higher quality, full size image
From contributor S:
There are exceptions but many plastics and rubber would be a no-go with MC. Remember MC melts most epoxies. Cup gun works, all metal. Test it out first.
From the original questioner:
Thanks for posting the picture, now I understand how it works. I imagine I could just put a drain in the bottom of a pan like that and have all the stripper flow back into a second five gallon pail under the plug, avoiding the necessity of a pump. I do, however, understand how a pump would make life much easier!
From the original questioner:
Well I finally have some measure of success in refinishing! This is what this thing used to look like - I'd been using it as a storage dresser for my chemicals in my shop for eons.
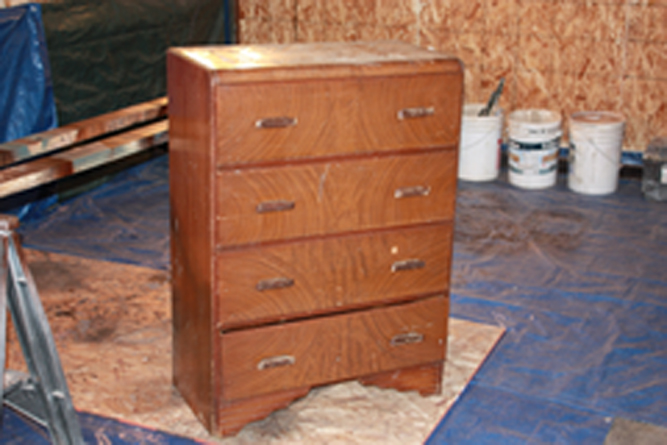
Click here for higher quality, full size image
Here's what it looks like now! It took a total of nine hours of hands on time. Completely stripped old finish, sanded to raw wood from 60 to 220, pre-stain conditioner, sprayed dye stain, three tone coats, two finish coats. This will still be my chemical storage dresser, but it sure is a nice one now! It's all about the learning .
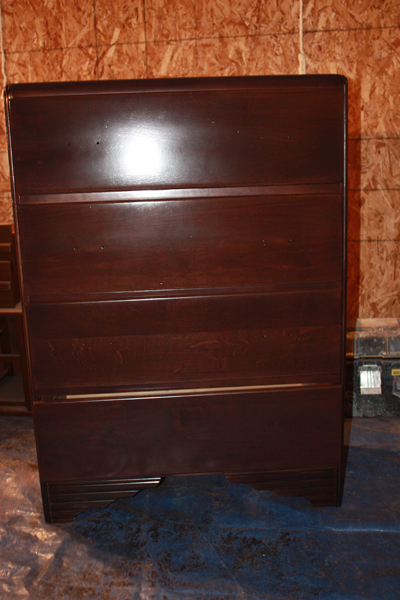
Click here for higher quality, full size image
