Clamping Laminate Bevel Edges
Illustrated commentary on clamping and gluing beveled edge material to laminate tops. March 30, 2008
Question
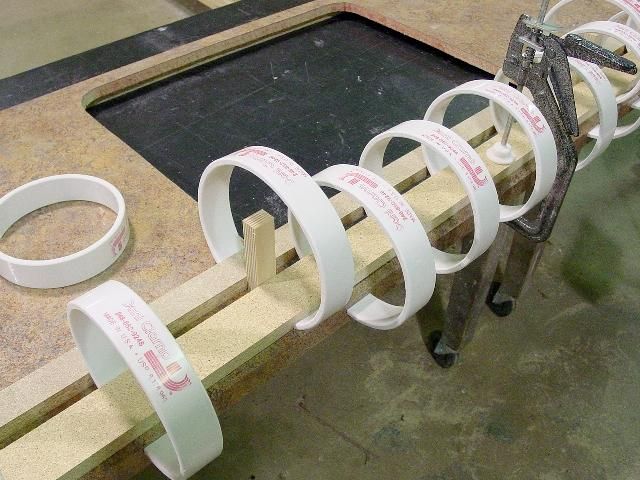
A clamping method for laminate bevel edges... A picture says a thousand words.
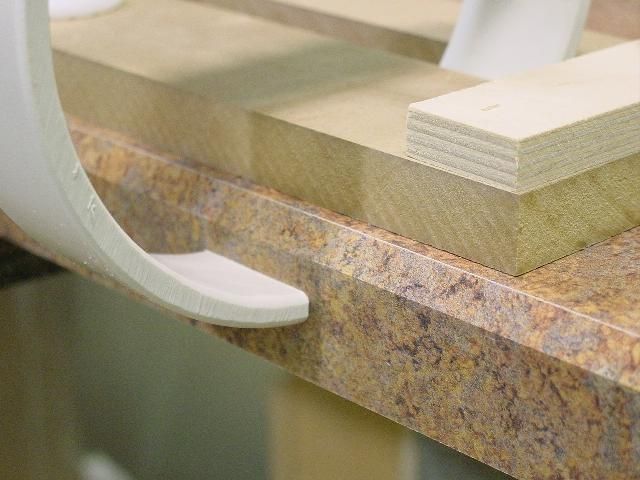
Click here for higher quality, full size image
Click here for higher quality, full size image
Forum Responses
(Laminate and Solid Surface Forum)
From contributor H:
If you want to use this type of clamp - we do, and they work well in numbers - make your own. Buy a ten foot length of 3" or 4" CPVC DWV pipe. Cut to desired width on saw. Wide = stronger clamping. Route small bevel edges using table mounted router. Split ring on band saw. You can make them for a fraction of the price in the size you need.
From contributor A:
I lose count of the number of miles of bevel edge I have put on in my time. But in my opinion, packing tape is still the fastest. The above clamps are great, I am sure, but seem cumbersome to set up.
From contributor H:
We don't use them for bevel edge either. We use them for SS edges.
From contributor G:
Tried using edge clamps and what not before. Just too big of a pain to use, and to buy them as advertised... whoooeee! I'll stick with using tape.
From contributor K:
Be careful! I made fun of Dani Clamps for years believing, as most people wrongly do, that they are made from a Std PVC pipe. At one point I was forced to use some from someone else to do an emergency repair (a whole other story). I was stunned by their performance! Then I began to research the whole matter. I tested PVC pipe vs. Dani Clamp. Immediately the differences were obvious. The PVC was inconsistent in performance (foot #'s), with poor memory. I found Dani to be the exact opposite. Next, a check to OSHA. If you are not set up to work with PVC in your shop and have an injury or FED visit, you're screwed. There are a lot of guidelines to working with PVC, which have just been recently tightened again, that are both health and safety driven. My shop insurance does not need to be raised. Check the differences before you speak. I know I'm still eating Crow.
From contributor M:
How do you apply the tape? Wrap around the countertop? It seems it would want to push the edge up. If you don't get a perfect glue-up, any trick to smoothing the edge? I just received my first Kuehn bevel edge and will be assembling it day after tomorrow, so any tips are appreciated.
From contributor A:
The way I like to do it is to put a strip of tape running along the edge of the top. This way, when it is time to remove all of the little strips of tape, I just pull this one long one and it takes the rest with it. Use good quality tape. That cheap crap tears and this method, then, is actually more work. The other option is to leave a little tail to grab onto on each individual piece.
As far as the edge riding up, for about every 5 or so pieces, I will put one piece running under the countertop. This helps to keep the edging down as well as ensuring a good bond along the bottom edge.
To smooth, take a short drop off and rub the corners with it pretty hard. Some of the print from the scrap will rub into the gap along the top filling it in and evening it out. This, of course, doesn't work for glossy laminates or the new Wilsonart HD series. Actually, I guess it isn't all that new anymore.
From contributor U:
I use the flat back edge and tape it every few inches with strapping tape (the one with strings in it). When you apply it, try to pull the tape straight toward the countertop. If you tape the bottom and then pull it up, the edge tends to want to creep up from the tension. After taping, wipe all the glue squeeze out off with a wet rag (the glue under the tape will not dry fast and can be wiped off after you remove the tape). Next I rub some Seamfil along the edge and in the joints, and without cleaning it off, I smooth the edge. To smooth the edge I use a piece of bevel edge scrap or the round shank of a screwdriver to burnish it. My thinking is this sort of rolls the edge over and traps the Seamfil in the joint. It also smoothes it out. Then I clean it with lacquer thinner and do any final touch-ups. I sometimes use some real fine sandpaper about 400 grit to smooth any sharp edges that are left. Do not use your laminate file to smooth the edges, it is too aggressive and you will file through the laminate color very quickly.
From contributor V:
Set your router correctly and the packing tape works fine. We have done miles of the stuff this way. Don't forget to get a few packages of Band-Aids because that stuff is sharp.
The comments below were added after this Forum discussion was archived as a Knowledge Base article (add your comment).
Comment from contributor S:
If your build-up is no wider than 2 1/4 to 2 1/2 wide, you can use the 3" wide opening spring clamps. This holds the bevel edge (with tongue) down and against the front while drying, plus you won�t have any tape across your glue line. I use a 12" piece of 3/8" chrome supply line and run it across a fine wire wheel to rough it up. This heats the plastic as you burnish it across the top edge.