Coding Curves along the Z-Axis on a CNC
Three-dimensional coding is a special challenge. Here, CNC owners discuss how to achieve curves along the third dimension. October 26, 2013
Question
I've got a Cosmec nr32 machine. I want to cut a straight line in the x direction but vary the depth in the z in a radius oriented vertically.
For example… The bit starts at x2, y2, z1 and moves to x4, y2, z1 but as the bit moves forward, z moves deeper and then returns to z1 by following a radius (pick one... say 10).
What would be a typical command line to move the x from 2 to 4 and vary the z depth in the process? Anyone got a quickie line that would work on their machine?
Forum Responses
(CNC Forum)
From contributor R:
Almost the same question. My machine and software are slightly different but my lack of Z-axis control is similar, so I'm tagging along here with your question.
I do know that you're not going to write that code. In twenty years working CNC, I've only written one page of code manually and it was tedious! And yes, I've forgotten what G90 is. What we both need is a program or an app that assigns the g-code to the drawn line from a dxf file.
From contributor Z:
Not sure what software you are using but in Alpha Cam you would just machine a 3D Poly-line. If your software won't do this, you could (with extreme caution) change from a XY (G17) plane to a XZ (G18) plane in your g-code and trick the system. The caution I'm talking about is about your tool offsets.
From contributor B:
In WinCNC control xy arcs are defined by I & J references on G2 and G3 command lines. This applies only to the X and Y axis. It has always been my understanding that these definitions cannot be applied to the Z-axis. From my experience Z-axis arcs can only be accomplished via small changes in Z height while stepping in X and Y. I will be very interested to hear other input on this topic.
From contributor J:
Not really smart enough to understand it in code, but could this be done in a fluting toolpath in vectric? With it I can follow a vector over a prescribed length and depth in a Z cut.
From contributor B:
It occurred to me that there should be no reason an arc command using I/J coordinates could not be applied to the Z-axis and one other axis. As long as the referenced I/J coordinates were within the reference frame of the Z-axis it should work. The G-code is just making a stepper or servo motor turn - it doesn't need to know where that motor is on the machine.
As such it would seem that code could be generated for an arc in the X/Y plane and then simply replace X or Y with Z.
However, assuming this works, it would only work with an arc going straight along either X or Y. While traveling in X or Y the Z-axis could be following a vertical arc. Since the I/J coordinates only apply to 2 axis at a time, though, you couldn't run an arc in Z while traveling at a diagonal across the table. Does this make sense to anyone else?
From contributor R:
That makes sense; not to me, but it makes sense. It also makes the questioner write a single line of code, try it, fail, rewrite it, crash… Just describing the process is too tedious for me knowing there's an automated method out there. Somebody already figured this out, did it twice, wrote a code, and put it out there. I use WinCNC at work and Vectric Aspire to make the code and yes, we can cut 3D shapes either by going around with a stable Z height or back and forth with Z rising or falling to trace the shape. Thing is the code is many pages long! On a different thread I was advised to try the Vectric free download and I will and get back with y'all.
From contributor B:
My point is only that I think theoretically it can be done. From my experience any 3D cutting, at least using Enroute and WinCNC, is going to get done with arcs as needed in X/Y and small vertical steps in Z. What I described is my thinking on forcing the router to do a true arc in Z even if only in the X or Y direction.
I have actually had a couple occasions over the years when this would have been handy. It would have saved me extruding the arc in Enroute and applying a tool path to that surface. In those cases it would have been a time saver, as you are only talking about a few lines of code to force the Z-axis arc, if indeed it would work. Just draw the arc in X/Y, generate the code, change X or Y to Z (Edit, Replace all) and you are done.
From contributor R:
I hope my comment didn't come off as snarky; your reply is helpful and any boost we can get adds to our knowledge. Vectric Aspire runs a post processor that my ancient Shopbot can read (it's grumbling away in the next room, music to my ears). Again the code is thousands of lines. For the questioner, the answer may be a different program or pair of programs, but try the Aspire download and see if that gets you a Z path.
From contributor R:
I haven't used Enroute but my co-worker tells us we should switch to it. If you can extrude an arc in the vertical plane, you may be way ahead of the questioner. To the questioner: what are you making you original drawing with?
From the original questioner:
Well, I thought this would be an easy question to answer. From your responses and some additional looking it seems gcode doesn't allow for a simple line of code to make it happen.
I have Alphacam. As suggested I figured out how to make it work with a polyline. Pain in the butt, as I don't find Alphacam to be overly easy to work with in 3D, but it seems to be getting the job done. Thanks for all your suggestions. If anyone wants to suggest a couple of code lines that may work I'll give it a shot and let ya'll know what happens.
From contributor B:
Here's code for an arc approximately 18" long x 2 1/4" high.
G0 X-0.0584 z0.1105
F50
G2 X18.6392 z0.1105 I9.3488 J-17.7076
First line is the start point.
Second line is speed rate.
Third line is the X/Z arc.
Your machine would have to run with I/J coordinates for this to have a hope of working. I just drew it in X/Y and changed "Y" to "Z".
From contributor M:
I suppose it depends on the controller. On mine, an industry standard controller, G17 is XY plane and G18 is XZ plane and G19 is YZ plane. This is necessary for routing circles or arcs on the edge of a panel or door with an aggregate, or as mentioned in an earlier post with just running a vertical tool, but cutting an arc along a single linear axis plus the Z axis. My code looks like this.
G18G03X41.469Z1.177I-0.6119K-9.4043F200.
Since the tool was moving in X,Z the plane was defined as G18. If you want to make an arc in x,y,and z, you would need a control that can do 3d arcs. Most of us don't have one of those.
From contributor T:
That is correct that most controllers use a G18 or G19 depending on orientation of the arc and on mine M12 turns on 3D. It looks like this for an arc in the YZ direction:
N100 M90
N102 G90
N104 G70
N106 G75
N108 G97 S10000
N110 G00 T1
N112 G00 Z-.25
N114 G00 X1. Y1.
N116 M12
N118 G00 Z-.1
N120 G01 Z0. F.11
N122 G19 G02 Y4. J2.5 K2.
N124 G01 Z-.1
N126 G00 Z-.25
N128 M22
N130 G00 X0. Y0.
N132 M02
From contributor S:
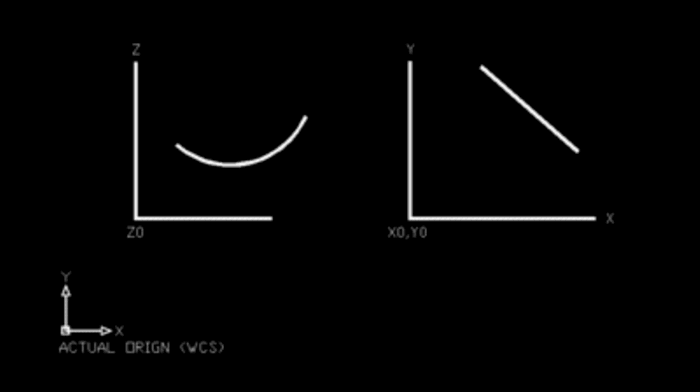
If you have AutoCad you could do something like this -
(DEFUN C:VARC(/)
(SETVAR "CMDECHO" 0)
(SETVAR "MENUECHO" 1)
(COMMAND "UCS" "W")
(COMMAND "ORTHO" "OFF")
(SETVAR "OSMODE" 0)
(SETVAR "PICKBOX" 1)
(SETQ INC 0.01)
(SETQ CNCFILE "C:\\CNC\\VARC.TXT")
(SETQ TOOLLEN (GETREAL "Enter Tool Length: "))
(SETQ FEED (GETREAL "Enter Feed Rate: "))
(COMMAND "OSNAP" "INT")
(SETQ PTZ (GETPOINT "\nPick Z0 on ELEVATION path: "))
(SETQ ZADJ (CADR PTZ));****Y VALUE OF PTZ****
(COMMAND "OSNAP" "ENDP")
(SETQ PTELV (GETPOINT "\nPick start point on ELEVATION path: "))
(SETQ SS (SSGET "C" PTELV PTELV))
(SETQ ENT (SSNAME SS 0))
(SETQ EL (ENTGET ENT))
(SETQ PTCEN (CDR(ASSOC 10 EL)))
(SETQ PTCENX (CAR PTCEN))
(SETQ PTCENY (CADR PTCEN))
(SETQ RAD (CDR(ASSOC 40 EL)))
(SETQ ANGA (CDR(ASSOC 50 EL)));****START ANGLE****
(SETQ ANGB (CDR(ASSOC 51 EL)));****END ANGLE****
(SETQ ANGTOT (- ANGB ANGA))
(IF (EQUAL (POLAR PTCEN ANGA RAD) PTELV 0.0001)
(SETQ ANGSTART ANGA)
(SETQ ANGSTART ANGB)
)
(COMMAND "OSNAP" "INT")
(SETQ PTXY (GETPOINT "\nPick X0,Y0 on ELEVATION path: "))
(COMMAND "OSNAP" "ENDP")
(SETQ PTPLN (GETPOINT "\nPick start point on PLAN path: "))
(COMMAND "OSNAP" "NONE")
(SETQ SS (SSGET "C" PTPLN PTPLN))
(SETQ ENT (SSNAME SS 0))
(SETQ EL (ENTGET ENT))
(SETQ PTA (CDR(ASSOC 10 EL)))
(SETQ PTB (CDR(ASSOC 11 EL)))
(IF(EQUAL PTB PTPLN 0.0001)(PROGN
(SETQ TMP PTA)
(SETQ PTA PTB)
(SETQ PTB TMP)
))
(SETQ ANGP (ANGLE PTA PTB))
;********SET INCREMENT NEAREST TO ANGINC THAT DIVIDES EVEN INTO ANGTOT********
(SETQ SEGNO (/ (ABS ANGTOT) INC))
(IF(>(- SEGNO (FIX SEGNO)) 0)(SETQ SEGNO (+(FIX SEGNO)1)))
(SETQ ANGINC (/ ANGTOT SEGNO))
(IF (EQUAL ANGSTART ANGB 0.0001)(SETQ ANGINC (* ANGINC -1)))
(SETQ PTCEN (LIST (CAR PTCEN) (+(-(CADR PTCEN)ZADJ)TOOLLEN) 0))
(SETQ PTELV (POLAR PTCEN ANGSTART RAD))
(SETQ PTPLN (LIST (- (CAR PTPLN) (CAR PTXY)) (- (CADR PTPLN) (CADR PTXY)) 0))
(SETQ PTCNCX (CAR PTPLN))
(SETQ PTCNCY (CADR PTPLN))
(SETQ PTCNCZ (CADR PTELV))
(SETQ FP (OPEN CNCFILE "w"))
(SETQ TXT (STRCAT "G0 X" (RTOS PTCNCX 2 4)" Y" (RTOS PTCNCY 2 4)))
(WRITE-LINE TXT FP)
(SETQ TXT (STRCAT "G1 Z" (RTOS PTCNCZ 2 4) " F" (RTOS FEED 2 4)))
(WRITE-LINE TXT FP)
(SETQ ANG ANGSTART)
(REPEAT SEGNO
(SETQ ANG (+ ANG ANGINC))
(SETQ PTARC (POLAR PTCEN ANG RAD))
(SETQ DST (ABS(- (CAR PTARC) (CAR PTELV))))
(SETQ PTLINE (POLAR PTPLN ANGP DST))
(SETQ PTCNCX (CAR PTLINE))
(SETQ PTCNCY (CADR PTLINE))
(SETQ PTCNCZ (CADR PTARC))
(SETQ TXT (STRCAT "G1 X" (RTOS PTCNCX 2 4)" Y" (RTOS PTCNCY 2 4) " Z" (RTOS PTCNCZ)))
(WRITE-LINE TXT FP)
)
(CLOSE FP)
(SETVAR "CMDECHO" 1)
(SETVAR "MENUECHO" 0)
)

Click here for higher quality, full size image
From contributor G:
When you do an arc in the XZ or YZ plane, you replace the I or J with a K. IJ arcs are actually IJK arcs, but you only use 2 at a time, typically I and J. I is the X coordinate, J is the Y, and K is the Z. Depending on control, of course.
From contributor B:
Contributor G, thanks for the information. I forwarded your text to Kelly at WinCNC and here's his response:
"Yes, WinCNC supports IJK parameters on G2 and G3 arc commands. This is something that was added probably somewhere between 1 and 2 years ago. However, I am not sure if any of the standard post-processors that we have for products like Enroute, Visual Mill, BobCAD, etc. support generating GCode this way. Normally any 3D moves are created using a series of tiny G1 move segments. The IJK method should produce slightly smoother motion though, so using it when possible is a good idea."

