Color-Matching Cocoa Melamine with Finish on Solid Cherry
Advice on how to sneak up on a commercially produced melamine's hue, using custom finish on real Cherry. February 17, 2014
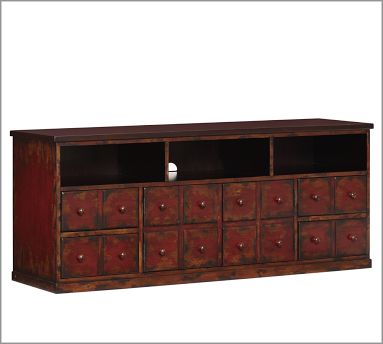
Question
I'm trying to match this cocoa melamine using a piece of cherry solid. I think I'm in the correct color tones, as I just need a way to push back the yellow creeping out of the wiping stain before I applied my alcohol dye.
Click here for higher quality, full size image
Forum Responses
(Finishing Forum)
From contributor L:
If you want to kill yellow, you need to add a bit of purple.
From contributor S:
Start with a warm tone dye base. Your formula will depend on whether you apply a sealer wash coat prior to the wipe. Your final product will have more depth and impart a richer look. And being cherry, it will oxidize/age beautifully. Or you could adjust your wipe to accommodate the missing warmth, and then do a final toner blending as needed.
From the original questioner:
Thanks. We currently buy our doors, fronts and molding finished from Walzcraft. I work for a company in the engineering department and I'd like to start doing a lot of our finishing work, but I'm struggling with how they achieved that filled look just like the melamine. I'm getting more of an open look. I'm sanding with 220, staining, sealing with a coat of Magnamax, sand with 320, spraying dyes, then first coat. What am I doing wrong?
From contributor R:
There is too much burn in the cherry grain from the wiping stain for my taste. I think a mild wash coat of sealer would help a lot. As far as the yellow, like contributor L says, purple cancels yellow, but be careful - a small amount of complementary color goes a long way.
From the original questioner:
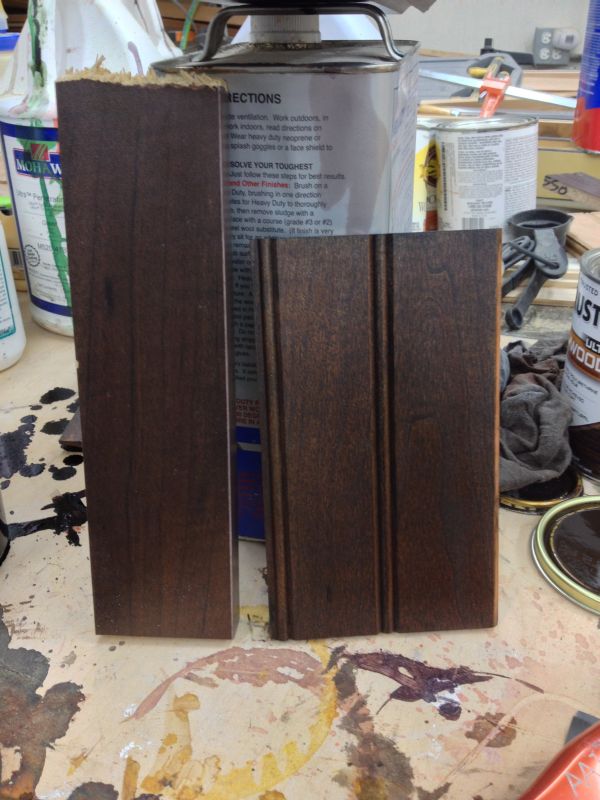
Thanks. Since blue and red make purple, would you suggest equal amounts of each? Here's a sample piece of what Walzcraft does. It almost looks plastic like melamine, as I'm just not sure how to get that type of smooth finish. Any suggestions?
Click here for higher quality, full size image
From contributor O:
The filled look on cherry: seal with MagnaSand and body up with Magnasand (spray another coat after the seal coat). Then sand, 280 or so. If still too porous, more MagnaSand, cutting back aggressively each coat until filled. Then dye toner and MagnaMax topcoat. The MagnaSand as supplied is thinner solids than MagnaMax with a greater tendency to flow into the pores and easier to cut than MagnaMax.
From the original questioner:
What's Magnasand? Is that a sealer? So you're saying use base stain, use Magnasand in a few light coats, sand with 280, then dye, then Magnamax?
From contributor O:
Yes. Magnasand is a sealer to use under pre-cat finishes like MagnaMax. It dries faster and sands easier than self-sealing with MagnaMax. A few coats well sanded back over the stain are usually enough to clog the pores of cherry. When you said you were using dye over the seal of MagnaMax, I assumed you were toning as well. So, yes, stain, seal, seal, sand, seal, sand, (repeat if needed), tone, topcoat. You gotta get some bulk in the pores - sanding it back to level the surface and to avoid too many dry mils.
From contributor R:
You should be applying your dye stain first, wash coat of sealer and then your wiping stain.
From contributor K:
I don't see any reason why that couldn't be achieved with a simple dye, seal, topcoat. Try Sherwin Williams S64 dye concentrates, seal with their vinyl sealer (T67 F 7) then topcoat with their conversion varnish (T77 F 83). If the build is not enough after the first topcoat, sand and re-topcoat.