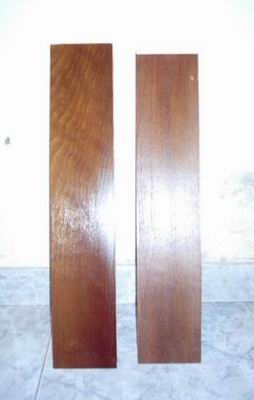
Color Burnthrough Sample
Finishers share images of burnthrough effects created during the finishing process. February 8, 2005
(Finishing Forum)
From contributor R:
Here is a sample of a latex paint sanded through, glazed and finished with a precat lacquer. I have a few other samples of this technique, including a crackle finish that I do with latex paint.
From contributor J:
Why latex? A lacquer pigmented paint would be so much more efficient! Nice job, though - beautiful.
From contributor L:
I understand why he uses the latex. Lacquer is just very hard to sand through. It is hard to get a thin enough coat with full coverage, whereas the latex is very easy to get a thin, full coverage coat and it is very easy to sand through. The pre-cat topcoat will protect the colors with the toughness of lacquer for a long time to come. Also, you can get latex paints for about $15 a gallon and they go farther than the equivalent amount of lacquer base colored paint. Nice looking work.
From contributor R:
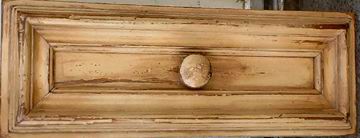
Right on. Actually, it all started with the crackle finish, as shown in the picture. I needed to use latex to get the effect and the adhesion was just so good compared to other methods, I used it on other finishes. Also, there are hundreds of colors available with formulas already that don't have to be custom matched.
Click here to view full size image
From contributor J:
Are you saying that a coat of latex is thinner than a coat of lacquer pigmented coating? I'm trying to come up with any plus of latex as base coats under a solvent system, but I can't. Just a thought� If latex is easy to sand through to reveal previous color as opposed to lacquer, which system do you feel is the weakest link? I'm also thinking that the hot solvent on latex has to give you some sort of color change, and I'm not even mentioning yellowing of the latex due to it being thrown out of suspension. The samples look beautiful and if this works, what the heck do I know?
From contributor L:
I'm not saying that the latex (32oz paint to 2oz water) is thinner (in mils), just that it had a much more even coverage as compared with the ultra thinned out lacquer (50-50), which went on spotty. These are the proportions I needed to use to get any ease of workability out of it.
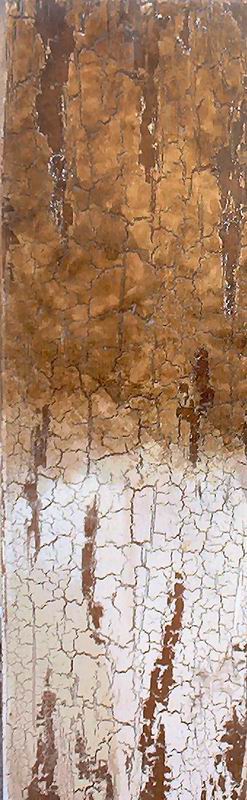
When I was doing my burnthrough samples, I started with a post cat Clawlock primer, then a black latex undercoat, then a green overcoat. I used steel wool dipped in a clear glaze (varnish base) to rub through to the color below. After two days of drying I did two coats of a dull sheen Magna Max Pre-cat. It has had no ill effects in the month and a half since it was finished.
Then I did an all-lacquer rub-through. Black Clawlock post-cat primer, then the green pre-cat over color. Then I tried to sand through. What took me minutes to do now took me almost an hour (a one square foot raised panel door). Then I did another mockup. This time I thinned the color coat 50-50. It did not go on smoothly and with an even coverage. The latex had no problem with coverage and smoothness. It still took a great deal more work to sand through to the undercolor. Granted, this is a much tougher coating, but the amount of work that has to be put into it isn't worth the time. After I put the lacquer coat over the latex, it will have all the toughness of the all lacquer mockup. So it just works out to a lot more work for the same effect.
One thing you mentioned was the color change. And indeed, you are correct. When using the latexes, you will notice a darkening of the color when you apply the clearcoat. Same goes with a flat oil base paint with a clear glaze coat, while the lacquer system remained the same color after the clearcoat was applied. You just need to account for it.
From the contributor R:
I can't think of a single time where I would use this schedule if I just wanted a basic color. I would just spray a pigmented lacquer and be done with it. These finishes usually require multiple glazes and shading, so you always start with a lighter color than you want to end up with.
From contributor J:
I think you covered just about all coatings on the market to achieve your desired color. I feel you are setting yourself up for disaster.
From contributor S:
I have finished almost the same way as contributor R and have never had a problem, and neither has my father (who has been finishing for over 50 years).
From contributor R:
It really isn't working with non-compatible materials. If you have some latex paint laying around your shop, spray some on a piece of scrap wood and let it dry. Now take a rag soaked with lacquer thinner and rub the latex. You will see that the paint is dissolved just as if it were a pigmented lacquer. This is why you get excellent adhesion, plus the fact that you are spraying it on thin. I never would suggest that someone do any of these things on a job without doing samples and adhesion tests. I have done many jobs using this technique, even a couple of kitchens, and never have had a callback or problem. As a matter of fact, the crackle is so much better at adhesion that I wouldn't do it any other way.
From contributor O:
Beautiful work! One reason I use a latex is that I found it feathers and distresses much better than a regular lacquer. The subtleness of rub-throughs looks quite natural and the texture of a latex takes a glaze coat that has more character than a solvent coating. Another reason I like to incorporate a latex into a "novelty" type finish is because it doesn't smell so bad. If you're ever faced with replicating an old world Mexican painted finish that has blues or greens in it, latex paint works wonders.
From contributor J:
Contributor L is using a post cat lacquer primer followed up with two different applications of latex. Next step is a varnish-based glaze applied and topcoated to protect with yet again a different type of lacquer (precat)! Also, his main problems were coverage and not being able to burn through to reveal underlying colors. I believe he was doing himself an injustice using a 50/50 thinned mix of pigmented (pre-cat) color coat over a post cat primer. He mentions using an unthinned try at this, but either way the time to work this setup wasn't what he needed.
My question is a) Why do you feel comfortable mixing pre and post cat lacquers together? I would never travel down that path for a finish schedule. b) Why not utilize a pigmented shellac to sand/burn through and maybe use a precat black primer to reduce this mixing of materials? c) A finish is only as strong as the weakest link in the process� Latex comparable to a lacquer as far as durability?! Yes, I did understand that you topcoated with lacquer to protect the latex, but coat for coat, an all-lacquer procedure is more stable and durable in the long run.
Finally, contributor O's post that latex feathers out better than a lacquer is ridiculous!
From contributor R:
The latex in my example is applied thin over raw wood, making it more of a stain than a paint. Lacquer also bites into latex paint and creates excellent adhesion, or I wouldn't do it. Latex paint costs me $1/gal as opposed to $30/lacquer or more, and is available in many colors without jumping through hoops. I only use this technique on a distressed paint type finish. Everything else would be compliant, same-brand materials only. Give it a try and see what you think. Do an adhesion test and let me know if you agree. I believe we can never have too many techniques for accomplishing our goals.
From contributor O:
I also have applied the latexes over raw wood and the latexes I use are a flat or eggshell. They are real easy to sand.
From contributor S:
Contributor R, I've been wanting to try this type of schedule. What equipment are you using to spray the latex? I know paints vary, but approximately how much are you thinning yours?
I have conventional cups, HVLP gravity, pressure pot, aaAirless, and even a cheap airless rig I used to blow paint on my house.
From contributor L:
I have a cheap gun made by Husky (Home Depot brand) that is a pressurized cup. I usually thin my latex paint at about 2 oz water to 32 oz paint. Then I set the pressure at 60 psi and use the gun in the pressurized mode. Then I set the trigger stop to limit the paint flow to a light coat.
From contributor R:
I use a gravity feed cup usually, and I thin my paint about 15 - 25% with water.