Corner Cabinet Miter Joint Options
Cabinetmakers discuss various ways of making a nice 45-degree joint when constructing face-frame corner cabinets. March 9, 2008
Question
Has anybody ever fabricated a corner bumpout like the top one? I do mine like the bottom one. I never look forward to corner bumpouts and I've tried many methods of referencing, but end up leaving the stiles usually too proud and use a hand plane and sander to flush up. I'm always looking for faster and better.
Click here for higher quality, full size image
Forum Responses
(Cabinetmaking Forum)
From contributor J:
I've always built corner cabinets like the top picture with the mitered face frame stiles. I cut the shelves first, then measure to get accurate dimensions for the face frame rails. If you typically build the same size corner cabs, you will soon know what size these rails need to be. I miter the face frame stiles before the face frame is assembled. I find it easier to get the long miter accurately cut this way. After assembly it gets sanded, which will change the width of the inside as well as the outside. Remember that the difference between the inside width and the outside width is dependent of the face frame thickness, i.e. it needs to be the same thickness as the sides. My cabinet sides are all 3/4 ply so my face frame needs to be 3/4 or a little less. If it ends up a little thick, it's not a big problem as long as the back side of the frame is the correct length. The outside will be a little long, but can easily be sanded off. I know this may be a little hard to follow, but if you build one, you'll see what I mean. I think building this way looks better as the frame is mitered into the side creating a nearly invisible seam.
From contributor V:
I put the miters on the case parts at a 45* angle, unless there are other faces butting up to the face of the corner cabinet, then I put the miters on the faces. Putting the miters on the case parts means that I have a tiny bit of fudge-ability in lining up the parts. If I am long, I can cut the parts down until they line up. If they are slightly too short, I can use my hand plane on the corner of the face. I usually take a piece of the off-fall and fill the gap at the bottom where the miter meets the face and sand smooth.
From contributor L:
Here is a picture of the way I do it when I need the mitered look. I wouldn't call it quick, though. But it is easier to clamp up when you use the correct jigging.
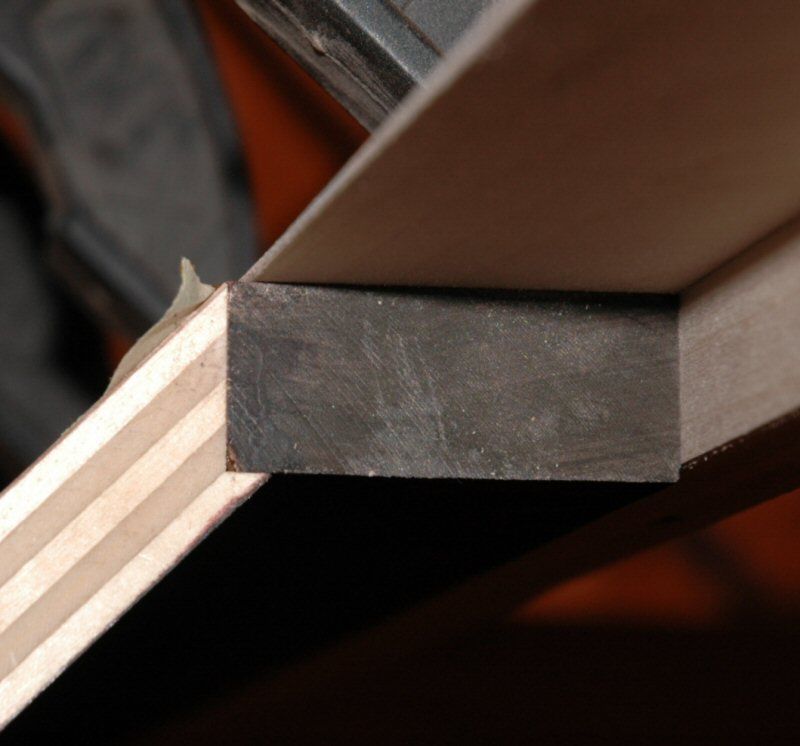
Click here for higher quality, full size image
From the original questioner:
Contributor J, I do mine exactly the same way you do yours. I've used biscuits, pocketholes on the inside, and brads, but I still would like a better way of aligning to reduce sanding/planing. Contributor V, your way sounds interesting too. Contributor L, yours is a method I haven't seen or thought about, and I thought I was imaginative. Could you elaborate on your jigging? I have some jigs made to clamp mine to, and they don't work too badly with biscuits. However, your method looks good in that one could eliminate the biscuits because you're registering against the plywood, but it looks like you have to be pretty exacting, or run the risk of sanding through the ply to flush up.
From contributor M:
I miter the face frame at 45 and leave the carcass or return at 90, then pockethole the carcass/return and screw them together so that the inside angles meet. This gives you an overhang on the face frame that can be block planed and sanded. Works well as most people are looking for the joint at the outside corner and it is actually back a bit. Pocket holes also help to pull this joint up tight and avoid clamping problems. Also gives you clean lines inside and out of box.
From contributor T:
Contributor M has got it right on the head. If done this way correctly, you'll almost never see the miter - no clamps, tight joint, what else could you ask for?!
From the original questioner:
I hadn't thought of your way either, contributor M, but it sounds much quicker than mine and I'm sure a block plane makes short work of the protrusion. Can you use a 1 1/4" pocket screw, or do you drop down to 1"?
From contributor M:
You know, I have not done one myself for several years. But I don't remember using a shorter pocket hole screw, and I don't buy 1" for the shop, so they must be using the 1 1/4". I do remember the first few I did this way, and I remember backing out the screw, after the glue was dry and before I hit it with the hand plane, just to make sure.
From contributor L:
The plywood cuts were done on the tablesaw. Just 45* angles. To make sure you don't burn through, you just leave the solid stock slightly proud of the plywood and sand the wood down until it's nice. Less than a 64th inch is fine.
From contributor D:
I cut my sides the depth of the adjoining cabinets, and instead of planing off the overhang, tack a strip behind it and leave it. When you install, remove strips and the uppers on either side will slip behind the mitre. Leaves a very good line, and if a stile (or side) has a bow to it, you'll never see it. Also give you about 5/16" play on each side of your run.