Corner Cabinet Tips and Ideas
Suggestions for a cabinetmaker getting into building his first corner sink base. January 13, 2009
Question
I’ve been doing this for quite a few years and this will be my first corner sink base. I think we’re leaning towards an inset base style and would like to use a full size sink. I can think of several ways to build a corner sink base, but I’m looking for the best way. Would you share your construction methods and especially how you do your stiles for the inset portion?
Forum Responses
(Cabinetmaking Forum)
From contributor J:
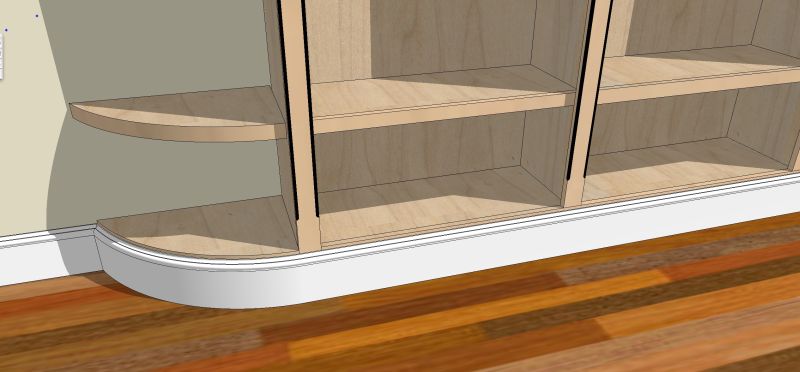
I've only done one corner sink on a face frame inset door cabinet and I actually built it a bit different. Instead of making a box which would have been huge (45" out from the corner) for the size we needed, I built the face frame and then assembled the interior on site. I installed the flanking cabinets and the face frame at the same time and then added a bottom panel and counter supports at the back afterward. It worked out well and I didn't have to build a monster sized box to do it. Here's a photo, as it may be easier to see it than explain it fully.
From the original questioner:
Thanks, and nice work. I thought about your method too, but I won't be doing the install, it's for a contractor. Yes, I was trying to avoid a huge corner base also and was hoping somebody had already addressed that.
From contributor M:
I've got one out on the shop floor right now - although it's still a pretty large corner base, it's nothing ridiculous. It's going to go in a corner with windows above on either side of the corner. Opposite corner has double ovens, which was much more difficult to do without making a "cluster*&%^." Ends were kept angled for tall pull-outs on both side walls (eliminating the homeowner's desire to put cheesy Lowe's organizers on the inside of the door).
The back's 44 5/8" to the outside, front's 26 15/16" with the miters. Other than that, it's a standard depth base cab. Stiles and rails are 1 11/16" with a 5/16" bead (2" total), and the door (couldn't tell you if it's been fitted yet, so may have been made a smidge bigger) is 19 13/16" x 18 11/16". There's approximately 8 3/4" inside clearance at the back where her pull-outs will be there on the side before the miter comes back.
Making the miters on the frame is important, and the easiest way I've found to transition. It causes a nice even flow between frames and installs essentially the same as the rest of the cabs.
Would you like to add information to this article? Interested in writing or submitting an article? Have a question about this article?
Have you reviewed the related Knowledge Base areas below? KnowledgeBase: Knowledge Base

KnowledgeBase: Cabinetmaking

KnowledgeBase: Cabinetmaking: General

Would you like to add information to this article? ...
Click Here
If you have a question regarding a Knowledge Base article, your best chance at uncovering an answer is to search the entire Knowledge Base for related articles or to post your question at the appropriate WOODWEB Forum. Before posting your message, be sure to review our Forum Guidelines.
Questions entered in the Knowledge Base Article comment form will not generate responses! A list of WOODWEB Forums can be found at WOODWEB's Site Map.
When you post your question at the Forum, be sure to include references to the Knowledge Base article that inspired your question. The more information you provide with your question, the better your chances are of receiving responses.
Return to beginning of article.
|