Crown Moulding for Crazy Angles
How to figure and fit inside miter cuts for oddball intersections and radius curves. June 17, 2005
Question
How do you deal with radius corners when installing crown molding?
Forum Responses
(Cabinet and Millwork Installation Forum)
From contributor R:
What size radius are we talking about? This will have an impact on the approach taken. I have used one piece mitered at 45 degrees for those small 1" radius drywall corners, up to making custom curved crown to match. I would find the inside radius to be the toughest to solve, if it is too small. For that, you could use an inside corner block to fill the radius area, then simply stop the crown into it.
From the original questioner:
I have no idea what the radius is or how to figure it out. The crown I used is 7 3/8", 52/38 poplar. It seems that each corner was different. Do I need to gather some more information for you to help?
From contributor R:
Generally, the smaller the radius, the fewer mitered pieces you would use to complete the turn around the radius. If you are working around one of those 1" radius drywall corners, miter in only one piece at 45 degrees. With a larger radius you might use two mitered pieces. After that, it starts to look ugly with all of those mitered pieces and I would then make a curved piece to fit. Yes, more info would help. If you have basically a 90 degree wall corner, then you should be able to lay a straightedge flat on one wall and measure from that to where the radius becomes straight (the tangent point) on the perpendicular wall. This is the radius of the corner.
From contributor G:
If you're talking about an inside 135 degree corner, where the drywall mud is floated out and the angle isn't sharp, we just cut the drywall and bury the crown in the wall a little. If you're talking about true radius corners, then the previous post was right on... you'll either have to get custom radius corner pieces (like you'd get for outside corners, though I've never had the need for this), or you'll have to turn the radius yourself using several pieces of crown, and pre-assemble them using fast-acting glue (2P-10 works good for this sort of thing, if you're quick), etc. If you're talking about an outside corner, we turn those all the time with a 5/8" long third piece, and cut the miters at 22 1/2 (67 1/2 degrees).
From the original questioner:
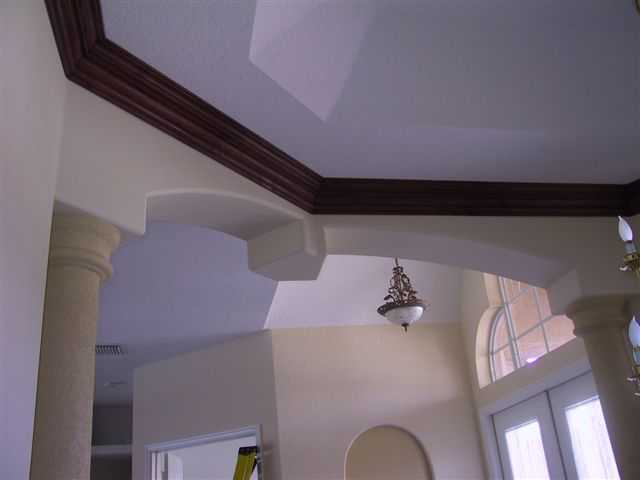
Here are some of my rounded inside corners. I go nuts trying to get the correct bevel and miters. What's the answer?
Click here for full size image
From contributor G:
I can't see the middle corner very well, the one above the keystone. It looks like it might have a 2-4 inch radius. Does it? Maybe that's just a shadow? If it's that big of a radius, you'll have to get a piece milled. But if it's not, you've got the same situation I always face and have to bury the bottom of the molding into the wall a little. I lay out the crown, scribe a line across the bottom, and slice out the corner.
To get the miter/bevel angles, get yourself a Tru-Angle Protractor. With that, you can read the angle of the wall (get three of them in the longer/thicker size, and cut one down to twelve inches, cut the other so one leg is long and one short, about 6 in., for short return walls, and leave the last one virgin).
Then get a crown chart. Joe Fusco's is best, as it goes down to 0 degrees and up to 180:
http://www.josephfusco.org/Articles/Crown_Moulding/CrownChart.html
From the original questioner:
This view might show the rounded corners a little better. I used poplar 7 3/8" 52/38 crown. They are all quite different.

Click here for full size image
From contributor G:
Yeah, those are just lazy drywaller's corners, the kind we run into in every house now. I always feel that if the builders are willing to accept those lazy corners, then they can also accept it when we have to bury the crown.
A crown chart is set up for the two primary types of crown, one with a 38 degree and the other with a 45 degree spring angle. You have the former. Reading the chart is easier than using a Bosch Angle Finder: read the corner angle that you're working on; find that corner angle in the first column, then go to the columns under 38 degree crown and you'll find the miter and bevel angles.
Cut some short pieces of crown at the right angles (a foot or so long), check that they fit perfectly, then cut them off at 10" or 5" or whatever and glue them together with hot glue or 2P-10. Stick the mockup in those inside corners. Trace a line across the back edge that you've cut square, then measure from that pencil line to the next and add the length of the mockup twice... know what I mean? I bet you do. It's pretty simple and beats cutting the stuff several times. I don't know why it is, but getting something right the first time always feels better.
From the original questioner:
Here is another crazy wall without any round corners this time. The other 3 walls are normal. How do I do this with the same 7 3/8" crown 52/38?

Click here for full size image
From the original questioner:
I'm having some difficulty in totally understanding your directions. And I want to follow them. Give me a little more on how to accomplish getting those angle cuts correct in order to glue up. Also, can you please expand on "burying the crown" a little. Just one piece that is straight cut? Many thanks.
From contributor L:
I think contributor G wants you to treat the smaller radius as if they were a small flat. For the large radius, I've turned bottles (round pieces with a large hole in center), glued-up 8/4 pieces cut 22.5* across the grain.
From contributor D:
I hope not to offend anyone, but that picture screams contemporary style. Wide crown is, of course, traditional. This job should be a challenge - it's a screwy idea. If the customer must have something around the ceiling, how about a more contemporary look, like a simple 2x6 laid up flat and a 2x2 square or maybe ripped diagonal into a chamfer piece to finish against the ceiling? You could back cut the corner that touches the ceiling with a 1/4" chamfer for a shadow line and blow off caulking, too.
From contributor H:
Pardon the picture quality. This is a similar situation. I would return around the corners with a 45, then make a transition angle cut. Of course, your transition angles will cut to zero.
