Crown on face-frame cabinets
An alternative to notching stiles when applying crown moulding. May 15, 2002
Q.
When applying crown molding to face frame cabinets, has anyone come up with an alternative to notching the stiles to avoid the gap between crown and cabinet side?
Forum Responses
I have made small 1/8" pre-finished pieces usually left over from fillers and tacked these on first to keep the side flush. It's a little more work, but it does look the best. I have seen many installations where they didn't even notch the side and just ran the crown with a gap underneath. The customer didn't complain, but most of mine would.
I notch using a 1" wide sharp chisel after marking. It doesn't take but 10 minutes to do the whole cabinet job. My stiles only hang over 1/16", though, usually 10 or less notches - looks better than a "filler". I used to hang over 1/8" and would cut using a small Japanese backsaw, but still did not take much time to notch. I would resist the urge to not notch or use a filler, though. It does look unprofessional to have that gap between the side and the crown.
From contributor C:
I agree with the above post... that's not to say I wouldn't like hearing of a time-saving alternative (that is visually acceptable). I just haven't found or heard of any.
One note - I'm always *very* careful to measure twice before making that first notch with the chisel - it's a pretty sickening feeling to chop out the face frame and then discover that you were using the wrong piece of crown as a gauge.
Finally - I've found that I can absorb a very minor amount of out-of-level ceiling conditions by fudging the notch distance. Not a lot, but if the crown is being fastened to the ceiling, it's always a hairy situation.
For what it's worth, here's the crown detail that I've installed the most often - it employs a plywood top that makes a nice detail, and also provides a working shelf (unlike the crater that results if it's a crown only install).
The plywood top gets installed first, followed by the 3/4 x 3/4 wood edge, followed by the crown. The reveals between the wood edge and crown make this a very forgiving approach.
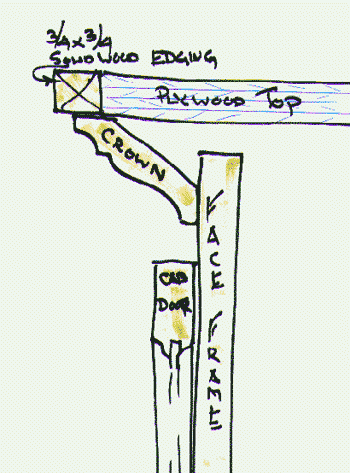
How many of you install the crown as contributor C has it drawn and how many of you consider his upside down?
From contributor C:
Sorry folks - I show the crown upside down from how I typically install it.
It might be simpler to notch the back of the crown instead of the frame. Would that work?
I would notch the crown as it would allow for some up/down adjustment when gluing up the corner.
Never thought to notch the crown, and don't know if it would be easier, but it's worth a try. And contributor C, I like the shelf idea, but how do you match the wood edging with the factory finish of the crown and cabinets?
From contributor C:
The wood edging in my case is supplied by the cabinet guy (pre-finished). It's in a far-enough-out-of-the-way spot that I think it could probably be finished "in house" - there isn't a whole lot of it that shows.
As for notching the crown, that's an interesting idea. I guess a lot would depend on the profile. If the crown has a very thin bottom shoulder, then I could see the notch being problematic. Next time out, I'm going to check this idea out more closely.
I never have to worry about this problem, because I only install my own cabinets. These are built with flush face frames as all high quality customs are. If I had to install around those things, I would notch crown for sure - much safer, not to mention much easier.
If the crown does not go to the ceiling, I've nailed down a 3/4 nailer strip flush along the cabinet top sides and all along the front. The crown, which gets nailed to it, actually sits on top of the protruding face frame. It also uses the top of the cabinets as a reference line to hang the crown. No notch necessary.
I assume you are working with pre-fab cabinets. I build my own and always rout the face frame flush. The bit I use also puts a small v groove where the face frame and the plywood side meet. That puts the inevitable crack in the finish down in the shadow where it is not noticeable. Amana sells the bit.
In reference to the upside down crown molding, I suppose it is upside down. But I had a fellow cabinetmaker jump up and down telling me the arch went to the bottom. I told him no way because I was using rope molding glued to the flat area of the crown molding. He tried to convince me the rope could face the floor, which would have been the case if I installed upside down. The rope has to face the wall or I would be laughed out or fired. This guy could mathematically figure out how to cut any crown molding laying down. He could crunch the numbers but I stuck to my guns. I cut my crown molding standing straight up if it is not too wide.