Question (WOODWEB Member) :
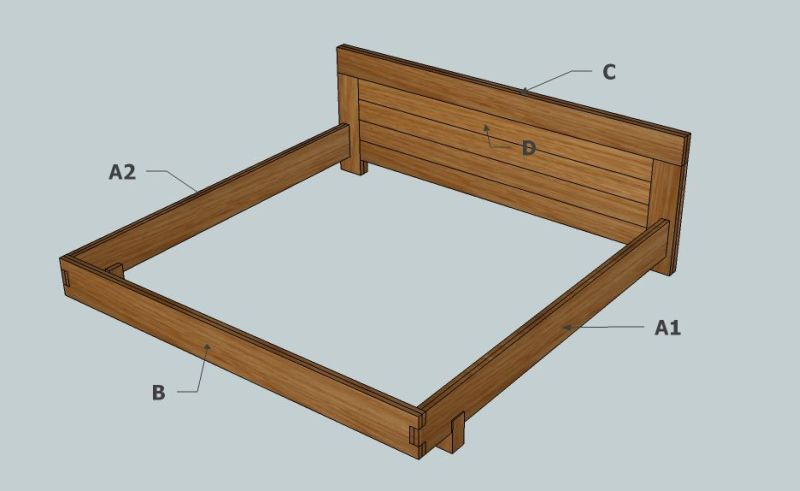
I have a question on preventing cupping and bending on a solid wood beam. I realize that this is one of the "standards" of woodworking, but please bear with me. We are working on a bedframe in solid walnut. A simple drawing is below and the beams labeled A1, A2, B and C are the points of concern. Our raw material consists of walnut lumbers 100" long, approx. 7" x 2" in crossection, plain-sawn, kiln-dried.
In their raw form they are quite straight, so they look quite usable as they are after planing one side and sending them through the thicknesser. However, especially for the beam labeled C I am afraid of experiencing cupping along the short edge and bending along the long one, since its top side and both ends are open and it is only attached to the rest of the frame at the bottom edge, with the beams labeled D only half as thick (approx. 3/4").
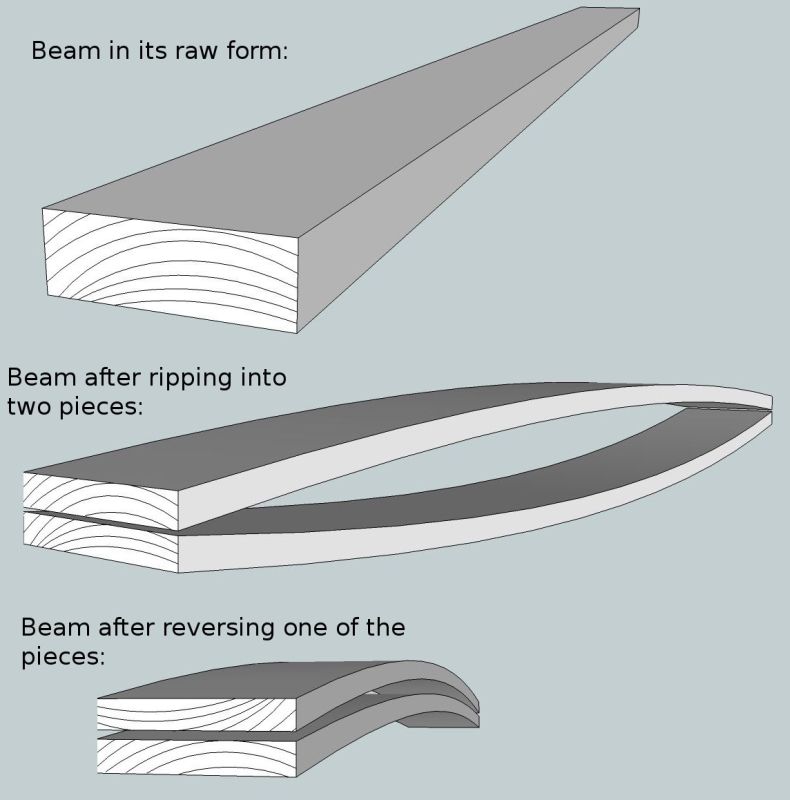
As a remedy, we first thought that we should rip the beam to two pieces and glue them back together after reversing one of the pieces. The two pieces we got after ripping look like shown in the middle drawing in beam.jpg: They bent away from each other in the middle - as expected.
Now, if we reverse one of them and glue together, we will obtain a beam that probably will not have a cupping problem, but will no longer be straight (bottom drawing in beam.jpg). If we glue them back together either on the rip faces or on the outer faces, we believe it will not help with the cupping problem (since the age rings will still be parallel to each other), and we will have essentially re-created the beam we started with (only a little thinner).
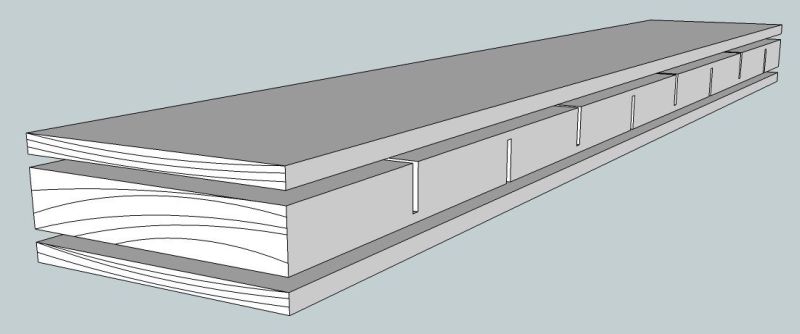
So, we are a little lost here. Are these concerns valid? Are there other procedures like using three layers instead of two and cross-cutting (without cutting through) the middle layer every two-four inches to introduce cuts in the fibers, which a friend suggested, so obtaining a beam like the one in the images?
Forum Responses
(Furniture Making Forum)
From contributor F:
If your wood is properly dried and then milled flat it should for the most part stay that way. Once it's been milled and is flat the only reason for it to move is changes in the woods moisture content - usually due to seasonal, or location specific changes in humidity. So ideally you want your shop conditions as close to the final location for your product as possible. All the other ideas you posted will do little to stop the wood from moving. At best it will slightly minimize the appearance of the movement while lessening, (in my opinion), the appearance of the finished product. If you want a product that remains absolutely flat regardless of conditions don't use solid wood! Otherwise learn how it moves and why and you'll be better equipped to design and build with it.
1. If wood is dried properly and the finished furniture does not experience serious variations in surrounding climate, one should not worry about using a thick beam in one piece.
2. If any of the above conditions is not true, then the 3-tear lamination could help (and I will use a spline-and-groove or rabbet joint on that edge joint - was just too much concentrated on wood movement and left this out in the original post - thanks for the warning)
The behavior I experienced with this walnut after re-sawing is actually standard behavior for any wood I have bought from this supplier (and they are one of the best two here). Can it be that I am moving the pieces too slow, or using a too high RPM for the blade, causing the wood to heat-up? If the drying process was not proper, would I not see some internal cracks too? This never happened.
"If the drying process was not proper, would I not see some internal cracks too?" That would be a different problem. There's more than one wrong way to do things.
Splitting 8/4 stock to get two pieces of 4/4 is not the best way to go for several reasons. First, you�re paying more for the thicker stock. Second, you�re having to do more work to get something you could have pulled off-the-shelf. Third, you�re going to have a tough time splitting it and getting it to stay straight. So my advice would be to buy the stock you need at the thickness you need whenever possible and avoid a lot of potential headaches.
Also, I'll just mention that when re-sawing, I'll always re-stack the pack flat, well supported, and weighed down for a day or two to help avoid cupping after the saw. This goes against the collective wisdom showing up here, but I've seen my fair share of moving around of re-sawn material, and can't attribute it completely to supplier error. My shop is not climate controlled (Southeast USA) so the relative humidity in the shop will generally be higher than the material's equilibrium moisture content when it comes in. It takes in a little moisture after the kiln, but thick material takes a while to reach a new equilibrium. This is fine, because the two "wet" faces balance each other. Once you re-saw (in half) you have one wet face and one dry face on each board: not good.
1. Longitudinal drying stress (also called casehardening) which should have been removed during drying. This stress will show up immediately when you re-saw the piece into two pieces. So, it is a drying problem.
2. Higher core moisture than the shell and then the air. This will occur with time and not immediately when sawing. The wet core will dry and shrink, causing this warp. Again, it is a drying problem.
You mention that you want kiln dried lumber. Be aware that the term "kiln dried" is not very precise. It does not include a moisture content and does not include stress relief. You need to tighten up your specifications. Then you need to check the moisture and stress in the incoming lumber, with the ability to return it for full credit when it is not right. If the pieces are straight and then the warp, there is only one reason why this happens and that reason is that the moisture content is changing. Most of the time, this means that the wood was too wet for its environment. Minimize moisture change and you minimize warping.
What I try to do to limit the bow/cup and warp from my lumber is:
1. Try to purchase lumber closest to the thickness I need.
2. Joint and thickness plane the lumber in pieces only slightly larger than your final size needed.
3. Thickness plane both faces evenly.
4. Do a test to see what the properties of the lumber you have purchased are:
a. Moister test.
b. Or moister content test.
c. Case hardening test.
If you aren't purchasing large amounts of lumber for many projects skip the testing and proceed carefully with manufacturing. If your lumber comes in wet and you use a lot of that species, purchase some and keep it around for a while. This is good advice whenever you purchase lumber because you just can't tell in what environment it was stored prior to its arrival in your area. I buy "kiln dried" lumber that has sat the dry season out and is still at 10% moister. Even plywood should be tested to see where problems may occur and what the relative moister levels are when you receive goods and when manufacturing.
Take the piece to the bandsaw and set it up on end grain and saw into the edge 1/4" from the face of the part. Go nearly through to the other side, stopping about 1/2" from the other end. Do the same on the other edge. Then remove the middle so you have a 'C' shaped opening about 1-1/2" x 7-1/2" in your 2" piece. If the two long legs stay parallel, then the wood (that piece) is not case hardened and should re-saw just fine. If the two ends bow towards each other, then it is casehardened and you have a legitimate complaint to your dealer. I have seen wood so badly dried that it was hard to get the piece sawn as I describe since it pinched the blade so badly.
Here's what I do:
1. Select straight lumber.
2. If it isn't straight, flatten it on the jointer but be careful not to lose too much thickness.
3. Take equal amounts off both sides when planing, so as not to cause the bowing problems discussed at length above.
4. Anchor the longest boards to the decking of the bed to stabilize them if necessary (A1 and A2).
5. Join board C to D with a spline or similar, so that they will only warp together. Any decent surfacing will eliminate cupping in board C. If it has been reasonably dried, it won't cup afterwards.
What is decently dried? What is your customer's relative humidity? If it's 50%, try about 9% MC. There are tables for MC by relative humidity both online and in woodworking books.