Diamond-Shaped Wine Rack Construction
Cabinetmakers discuss workable structural details for a large diamond-shaped wine rack job. October 22, 2005
Question
I�m pondering a new job. I've got to make up several of the grids shown below. This is a stain grade project made from 3/4" maple ply. I was thinking of doing this as a 1/2 lap kind of like doing a box joint with a dado blade on the table saw and the boards vertical against the fence. However, my dado blade won�t cut the 6 1/2" dado height if I do it this way. A friend at another shop has a CNC setup but I�m not sure if that would work for ply � it�s a LOT of routing. Does anyone have any ideas on how you'd go about this?
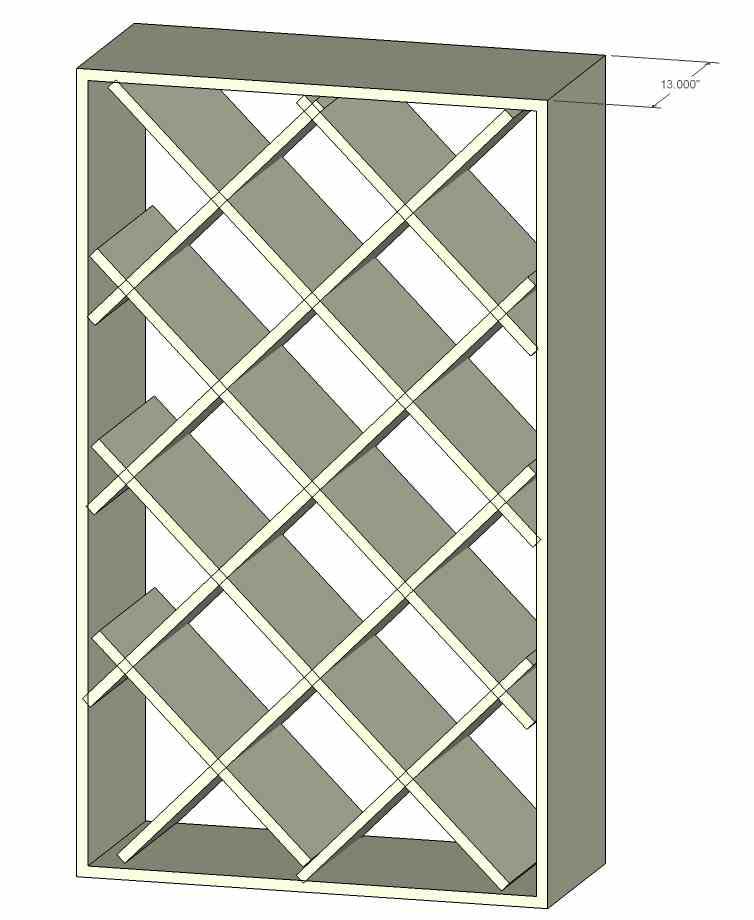
Click here for full size image
Forum Responses
(Cabinetmaking Forum)
From contributor G:
Have you considered using a dado on your RA? Simple indexing and when slipped together, the nasty cuts aren�t exposed.
From contributor W:
How about a router table and an index block to give you the correct distance?
From contributor S:
How about a dado-less solution? Run all the parts in one direction full length, and then a bunch of shorts going the other way. Two 1/2" dowels from one short through the long parts and into the next short will tie it all together. The indexing is boring and careful layout is required.
If you really want to rev up that dado set, you can do a shallow - 1/8" dado on each side of the longer parts, then cut the shorts to fit. If strength is an issue (wine bottles), then add a 1/4" edgeband of solid tying the short parts to each other.
Whenever I've tried to do these things with a cross lap dado, I've struggled and struggled - more cussing than gluing - and was never happy with the result or the time involved.
From the original questioner:
Yes it's for a custom wine grid. We make these up all the time in semi-singles for our cellars but this client wants an entire wall of the things.
From contributor Z:
I have not had the pleasure of building one yet, but what about "mortise and tenon" type joints? Make through mortises in long pieces, and the half length tongues on the shorts. Full length solid banding should help. Make them all the same size then you can do full bore production with one setup.
From contributor P:
Your best bet is to use your friend's CNC router if you have a bunch to do. We do mostly school projects where we do this to make mail slots and cubby holes using laidup P Lam. Once your friend's router is programmed with your particular dimensional specification, he should be able to nest cut all that you need in a matter of an hour. Depending on your friend's machine setup, you can even set it up to parametrically re-size parts as you need them. With respect to your material, I would stay away from plywood core material in favor of MDF core hardwood ply.
From contributor L:
Have you considered a totally different type of wine rack (such as the cradle type)?
From the original questioner:
To contributor P: Is there any specific reason you suggest the MDF core? Is this because of the way MDF is favored for CNC work or another reason? It seems that it would add a lot of weight.
Contributor L - I've been consulting on wine cellar design and installation for close to 30 years so I am running out of new ideas. However this is the look the restaurant wants. In reality, diamond style storage is both the most inefficient and inherently dangerous (due to bottle slippage) of most of the designs.
From contributor N:
I have built these before as Contributor S suggests, running one diagonal full length and the other diagonal as shorts and I also biscuited them for indexing. Glue-up was made manageable by doing it in stages; I clamped up one diagonal at a time. I made a full-sized drawing that I laid the pieces on as I went to make sure things were staying square.
It was a pain, but the finished result was good. If I had to do it again, I would probably half-lap them. I think it would be easier to handle, as long as layout was careful. And you could assemble the whole thing in one go.
From contributor P:
MDF or PB will stay flat and stick to spoil board as small parts are cut. Plywood core is lighter but will not stay flat enough for vacuum holding.
From contributor T:
I would definitely use 1/2 lap joinery and I would tape 6 together, bore 1/2" through at the bottom of the cuts and cut them on a bandsaw . I would probably file or chisel out the curved edges, or maybe bore them first with my mortiser.
From contributor E:
The ones that I have done like this, I used a dado blade on the TS going all of the way through, and half of the way across - coke crate style. Dry-run assembly over the back will give the cut length for the miters. After assembling I faced the fronts with the trim crossing the PW joints
opposite of the way the other joint were.
You may want to re-draw that design. I would get rid of the little short pieces on the outside corners, and have the diagonal parts ending just short meeting at the miter. This uses fewer joints, and will make it easier to join to the sides.
From contributor R:
I just built one and I used my router to cut half laps. I spent a little time to build a jig using a collet.
From contributor O:
I recently did half slots for a really complicated project, drew the pieces in ACAD, emailed it to a CNC guy, got it back and it went together exactly as expected. MDF will have better thickness tolerances than ply. You will get better joints. You need to know the exact thickness for the CNC to rout them right, but that�s my suggestion as the way to go. The project we did was in plywood and came out beautifully however.
From contributor H:
I agree with dadoing each side of the long ones and slipping in short pieces in each dado. I think you can be much more precise doing this but you will need a good jig for gluing up.
From contributor F:
I suggest going the CNC Route with the half laps. If the CNC is set up correctly, with the right pump and spoilboard (you need a flat table machine for this), it should hold and cut the plywood with no problems.
One of my customers cut over 1,500 sheets of plywood for a trade show display on their new flat table nested base router. They started the job the day the router was installed and it was completed that day as well. They had no holding problems, and everything was cut perfectly.
From contributor V:
Is there a reason to have the rack solid ? What about front and rear lattice made from 3/4" x 3/4" hardwood stock, pre-finished, 1/2 lapped and dadoed, and glued? It�s lightweight, aesthetically pleasing, and there is good air circulation all around.
From the original questioner:
I've seen many of these lattice designs and as a wine collector I really dislike them. Perhaps for just a few bottles they might look nice but they are dangerous in that it is quite easy to have a bottle slip and come crashing down onto lower bottles.