Duplicating a Ceruse Finish
A finisher tries to figure out how to copy the finish in a photo — but then he gets the answer. April 18, 2015
Question (WOODWEB Member) :
I'm trying unsuccessfully to duplicate the sample on the left in the image below. I'm finishing red oak and using off white oil paint. I've experimented with the paint thinned 1:1, 2:1. I've brushed it, wiped it like stain, and sprayed it. No matter how thin, the paint is filling the pores so the color all looks uniform. Of course you still see the texture of the oak, but I'm trying to get it so the paint doesn't fill the grain so it still looks red/brown/highlighted. When I try wiping it like stain I get the opposite effect so the grain has paint in it but it's wiped off everything else. I'm guessing I need pore filler or glaze to achieve this effect, but what would the finishing schedule be to get this look?
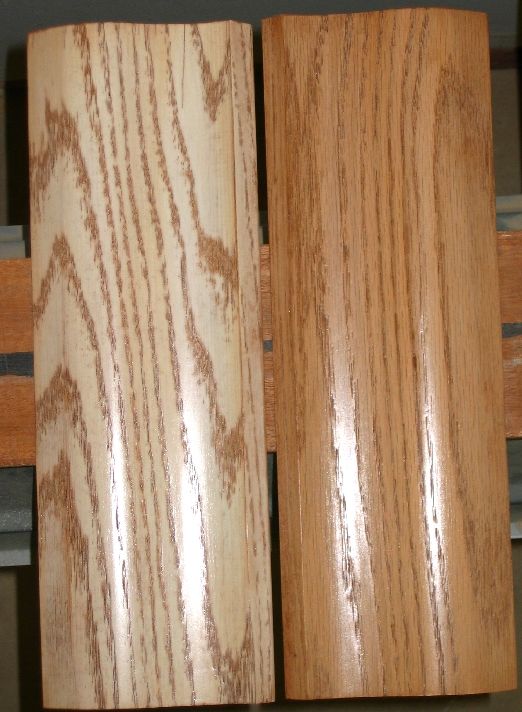
Click here for higher quality, full size image
Forum Responses
(Finishing Forum)
From Contributor C:
If I had to do this I would try this first: light coat (barely wet) of white fast dry primer sprayed. If not white enough, do it again, but keep it dry to not drop into the pores. Scotch-Brite scuff and use a light coat of clear sealer. Scotch-Brite scuff and use wiping stain of the right color, wiped off hard (maybe back-wiped with a solvent rag if too much hang-up on the white). Clear coat, etc. The stain is only needed if the primer coat(s) dropped into the pores. Truthfully, your sample looks very much like what we get routinely after the first piss coat of primer (sanding sealer tinted white) when 'painting' oak white.
From contributor X:
Maybe it's too late, but it seems like using ash would make it a lot easier. It’s the same grain pattern without all the red to fight against.
From contributor M:
You should be able to just mix a touch of white paint in with your clear, and spray very light coats. Most likely the finish that lays over the pores won't have nearly as pronounced of a white film as what's on the smooth portions. Just be sure you're using compatible paints and clears obviously. I'd start with one part white and ten parts clear, and move up from there in white content.
From Contributor R:
That is basically a ceruse finish. You need to match the two colors, apply the base color and then wipe the filler in the pores.
From the original questioner:
I tried spraying the paint on very lightly and heavily thinned, but it's still coloring the entire piece evenly or at least not the dramatic contrast I'm looking for so this technique seems like it should work. Any reason not to do this with red oak wood filler I have on hand for a small sample?
From Contributor R:
It should work but without knowing what type of finishes you're using it would be hard to make specific recommendations on a schedule or even products. One thing you may want to do is wire brush the oak to open the pores up a little more before putting any finish or color on.
From the original questioner:
Contributor R - the process I'm thinking to create a sample based on what I have on hand is this:
Sand piece to 120.
Wire brush to open pores.
Spray light coat of off white oil paint thinned 50%.
Seal with shellac rattle can when dry.
Sand lightly with 000 steel wool.
Blow out pores with compressed air.
Thin red oak wood filler with paint thinner and wipe into piece; let dry.
Wipe off excess filler with paint thinner.
Top coat with NC lacquer.
From Contributor R:
Sounds like it should work.
From contributor I:
I do a filled finish on some of my wood turnings. I paint the entire piece, no thinning to the paint. Then when dry, sand back heavily with 220. It takes the paint off the hard sections, leaves the pores filled. It's hard on sand paper as it fills fairly quickly, but leaves a great filled look.
From contributor M:
You will find a powder glaze to be far more helpful than thinning wood putty. The powder glaze won't actually give you a perfectly level surface, but it will definitely put the color into the grain, especially if you bust the pores open with a wire brush. I prefer a "medium" steel bristle brush instead of a brass, but that's just my preference.
From Contributor O:
If you’re finishing red oak and applying something that's white (like your thinned oil based paint) aren't you ending up with something that has a pink cast to it. Does anyone else think the red oak could use a bit of bleaching prior to attempting any color?
From Paul Snyder, forum technical advisor::
That was one a series of color samples I made with variations on pickled and cerused type finishes. Here's the schedule I used to make that sample:
Sand the red oak to 150.
Spray a light wet coat of thinned primer. You can use a white spray stain with a strong binder if you prefer.
Sand smooth with a fine sanding sponge (150 grit - worn).
Wet wipe with a warm brown glaze.
Seal with water white vinyl sealer.
Scuff sand.
Topcoat with non-yellowing finish.
Practice on scraps to get the look you want.

Click here for higher quality, full size image
From the original questioner:
Thanks Paul. I had hoped the person who posted that picture would find this thread. Thanks to everyone who responded I'm now on the right track.
