Question
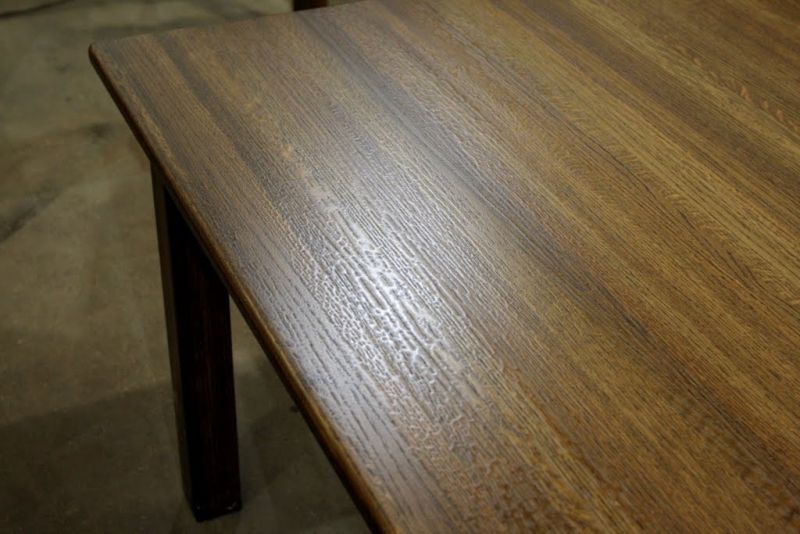
I'm a little soft on finishing so any input will be appreciated. I have been experimenting with various finishes for some maple cabinetry. I achieved the desired look by applying a water base chocolate stain from the home store then an oil base dark walnut. I've tried applying similar colors using only water base but have been unable to get the deep rich opaque finish that I get with the oil base for a second coat. Seems like the second coat of water base washes out the first. I really like the way the raised grain from the initial water base application picks up the dark pigment in the walnut stain. The result is extremely rich and exactly what I�m looking for. Is there any reason that this won't work or is there something that I should apply between coats? Thanks for any input.
Forum Responses
(Finishing Forum)
From contributor Y:
No worries, oil will go over dry water stain/dyes very well been done for over a century, to rid yourself of the grain raising - wet your wood with water before your last sand, this will minimize the RG.
Applying and wiping another stain will find the pores already filled and resisting new pigments. Therefore, only the dye components will still soak into the fibers, which is why first-stage stains (toners) are mostly spray stains. If the first stain is a waterbase, it doesn�t matter if there are pigments filling the pores because the water-popping raised grain effect allows the pigments from the solvent-base wipe stain a place to lodge.
Double-staining with solvent-resin wipe stain is not very effective, due to the wood being already saturated - similar to the way clear stain base acts as conditioner. Sealing between stains just adds to the resistance to the second stain. Am I mistaken here?
Applying an oil-base stain over a waterborne stain may work fine as far as the color goes. They are not automatically incompatible. But both coats of stain are acting to seal the wood and prevent the finish from attaching to the wood itself. If the binder in either stain is relatively weak, you've weakened the finish overall.
You used the word "opaque" to describe the look you've achieved with the two coats of stain. Does the stain mask the grain of the wood completely or is it more of a semi-transparent effect? If it is opaque, that's also called paint, and you could just use a pigmented finish (paint) to get the same results. If it's semi-transparent and that's the look you want, then you may want to consider using a stain on the bare wood, sealing it with a coat of finish, and then using a sprayed pigmented toner to get the final color and mask the grain of the wood. That will give you the color you want without laying the stain on too thick.
As to surface application of "dye staining": this was used mainly by the early turners and some cabinet makers/finishers on solid woods not veneers and was only a lightly absorbed means of coloration - thus "staining" rather than a true through dyed material.
Contributor G says - "But double-staining with solvent-resin wipe stain is not very effective, due to the wood being already saturated - similar to the way clear stain base acts as conditioner. Sealing between stains just adds to the resistance to the second stain.
Am I mistaken here? "
Not all stain solutions that contain pigment or dye have any resin solutions or "binders" to act as a sealer to coat the wood and form a barrier. For instance from 1948 to 1970 my father, who taught me how to mix stains/dyes/glazes/ etc., used only mineral spirits and color to make stains with or secondly - dye and water. This was pretty much a standard procedure back then.
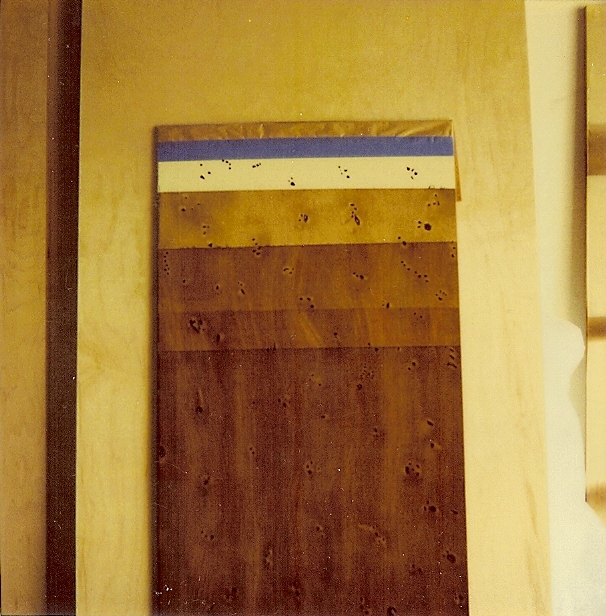
With glazing materials some boiled linseed oil would be added as a retarder to give more time to brush or work the glaze out for desired affects especially on larger panels or jobs. Faux bois (fake wood grains) like in my sample on here, also used BLO as a retarder and most other oil based glaze affects. Any time you add a material that has film forming abilities of course that will stop the penetration of later applied stains.
But what you can do is use a pigment or dye and pigment stain a second and third time or even more and instead of it being a wipe on wipe off type you just brush it out instead carefully and quickly so as to not disturb the first dried stain on there.
As I said previously, it�s questionable and not practical unless you have a good reason to do so. In my case I was looking for close to the wood coloration and not wanting any color to be above the wood surface or especially over the seal coat(s).
When that is my goal - I dye the wood to the desired base color (yellow/orange/green/etc.), let it dry and then apply a pigment stain over the dye and work out any highlights or affects desired - this is done with the BLO added or even tung oil. When this is dry the process is repeated as many times as necessary till the final affect is achieved. Then the first clear coat is applied. No other color work is done from that point on. This requires patience and deftness of glazing techniques, etc. and it can blow up in your face if you rush it. With my way I can produce a three tone guitar body or shaded piano or other furniture with all the color on the bare wood or under the clear finish.
These dyes usually fade quickly by themselves. Sometimes when you work on older pieces you will find a vivid color under hardware (e.g., handles) that shows how the piece was originally stained, but all the exposed surface has faded to reveal the natural aged color of the wood. To make the color more lightfast, as well as produce entirely new colors, chemical mordants can be used in combination with the dyes. Dyes made from natural sources (e.g., plants, insects, and animals) have been used for hundreds of years (thousands in a few cases). But these dyes usually fade quickly by themselves.
Sometimes when you work on older pieces you will find a vivid color under hardware (e.g., handles) that shows how the piece was originally stained, but all the exposed surface has faded to reveal the natural aged color of the wood. To make the color more lightfast, as well as produce entirely new colors, chemical mordants can be used in combination with the dyes.
Sam Allen has a book called "Classic Finishing Techniques" that covers these natural dyes and mordants pretty thoroughly along with other historic finishes and finishing techniques. Anyone interested in restoring or reproducing antique furniture or simply learning how to use these materials and techniques would find the book very helpful. Using natural dyes and mordants or chemical stains (e.g., lye on cherry or fuming oak) produces a coloring effect that cannot be reproduced using synthetic dyes or stains. George Frank is another author that has written in this subject area, including a book called "Adventures in Wood Finishing."
As new mordants/dyeing matter were found and introduced, people were also taken by the colors that could be had with them. Though I never got to know my grandfather well my dad kept all of those things, including his notebooks and when I entered into apprenticeship I started experimenting with all of them. This was in the mid 60's long before books you mentioned were available.
The sickly pale colors of antiques so prized by collectors of those items today, to me are a sad example of what was intended by the artisans of centuries gone by. I often wonder what they would think and feel if they saw the long term results of their tireless work to make such colored object fit for a king look so dead and lifeless now. I believe they would be happy to know their cabinet making skill had stood the test of time and shimmered with the outstanding coloration that was first applied, would be saddened by the state of all those magnificent pieces today.