How Not to Sand Through Corners
Advice on avoiding breaking through the stain on the corners of pieces when sanding between coats. March 3, 2006
Question
I'm having a problem with sanding through my stain. I am using MLC Woodsong II, black stain. I put it on with an HVLP and then wipe it off (soft maple). I am putting on a toner coat, 4 parts thinner, 4 parts lacquer and 1 part Microton dye. Then I am sanding with 320 paper to get rid of the nibs. I am constantly sanding through on corners. I am very conscience of what I am doing and I am trying to be as light as possible and taking as few strokes as necessary to get down the roughness (very slight) but I still end up sanding through. Its like the color doesn't event penetrate a few thousands of an inch.
I've had this problem all along with other colors also, it's just that it shows up real bad with a black stain on white wood. Is 320 grit too aggressive? I've tried the Scotch-Brites but they don't take down the little nibs like sandpaper does. Is there anything I need to do or is this just the norm? Do you have to be so careful of this that it is almost impossible not to sand through?
Forum Responses
(Finishing Forum)
From contributor D:
I used to have the same problem. The problem is the stain has no protection from the sand paper. What I do now is stain first then apply a seal coat of reduced lacquer; usually a 50/50 mix. This will bring up the dust nibs and minute wood grain that stands up after sealing it. Then I use a "used" piece of 220 grit sand paper � it�s not as aggressive, and I smooth out the nibs and bumps. Then I apply my toner coat and usually this doesn't require any sanding. Then I proceed with my regular top coats. The corners and profiles are the hardest to sand without rub through. It just takes a steady hand and almost no pressure. You�re right though, Scotch-Brites don't smooth out the bumps very well.
From contributor H:
I seal the stain with a clearcoat, then sand with 400, and then spray a light thinned coat of stain to even it up. 320 is for initial leveling after multiple top coats. Then I sand with 400 again. Also, I don't sand the edges or corners. Door side edges get one pass with my thumb as a pad. Press at the middle of an edge not the corners. Scotch-Brite is good on mouldings with one pass. I do this between every coat of finish. The finish will get smoother each time.
From contributor M:
There is no rule that says you must sand after every coat. If you get no nibs or dry particles, just go straight to your sealer or clear coats. It makes sense to me that if you coat over the stain with most coatings that you are going to "sand through the coating into the stain." So, why do it. Just apply a few more coats over the stain, allow it to dry and then sand down any dried particles, and then complete your clear coats.
From the original questioner:
To contributor M: I've played that game. I have found that the earlier you sand in the process the easier it is to get a smooth finish. After you put a few coats on and then sand, it is a lot harder to get the nibs down and takes a lot more effort when you are doing a big job. For little jobs it is good advice.
From contributor M:
If you�re spraying and there are no problems in the coatings, then there is no need to scuff. Scuffing is to remove the "nibs." No nibs - no sanding or scuffing. It�s your choice, you can sand/scuff and possibly sand through the stain, or you can put on another coat or two and then sand and not sand off the stain. I will go with the second choice. I choose to sand only when it is needed, and I have enough coats on the work so I will not sand off the stain or the glaze in the finish.
Are they telling you that you need to scuff/sand to get a mechanical bond between coatings? If so, do they tell you what sandpaper and what grit should you be using. Are you taking the time to strain all your materials? This may prevent your "nibs" problem.
From the original questioner:
Yes I strain. I use 7% thinner, so I have a mixing cup. It goes from the can through the strainer into the mixing cup. I strain my thinner into the mixing cup then stir then pour it into my cup through a strainer. I have the strainer in the cup (the one that comes with the gun), so in effect I am straining my lacquer 3 times. I wipe my piece down with a cloth while blowing air on it with the exhaust fan going then spray and I still get nibs. Not a lot but enough to make it need sanding.
From contributor C:
I also do the same procedures as the Original Questioner and I've found that the nibs are directly related to the whitewood sanding. To strike home my point, I sealed two doors and showed them to our production coordinator. One was sanded by the cabinetmakers with 100 grit belt sander; the other was done properly by me. The difference was obvious in the amount of time required to sealer sand the cabinetmaker's door compared to mine. So much for cutting labor costs, they just shift it to the finishing department.
From contributor D:
Most of the softer hardwoods will tend to lift the very tiny fibers in the wood as the lacquer starts to dry causing tiny "nibs". I get it almost 95% of the time with poplar, alder and mahogany. But woods like hickory, hard maple and oak never seem to give me much problem with nibs.
I agree with Contributor M. Sanding is unnecessary between coats unless you are shooting a pre-cat lacquer and you have gone past your recoat window. My supplier also claims a scuff coat is needed between coats, but after shooting 30-40 5 gallon buckets of the stuff, I have proved that to be not so correct.
From the original questioner:
I agree that the whitewood sanding is the cause of most of the problems I have with nibs. But my instructions for the lacquer says sand to no more than 150 grit. If I sand to 220 I don't have very many nibs at all, but my staining becomes very light, it won't penetrate into the wood well. I think I'll try to put one coat of lacquer on after the toning coat and then sand. It will be a little tougher, but I shouldn't have much of a sand-through issue.
From contributor M:
This sanding technique below may help prevent sanding through the edges and corners. Like every other new technique, it takes a little practice.
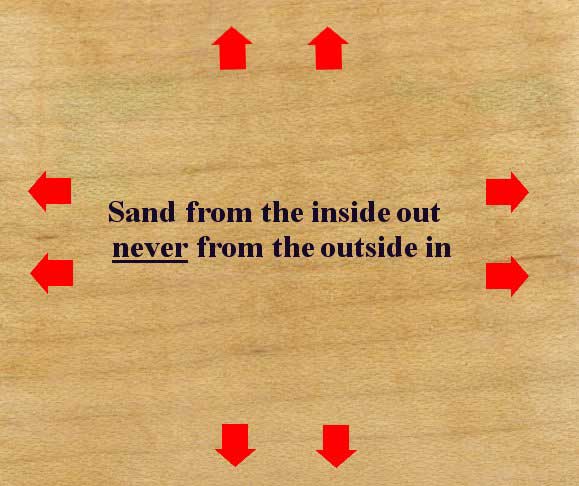
Click here for full size image
From contributor M:
That's pretty unusual, because the majority of finishers and sanders start off the piece, and then end up hitting the edges, and taking off the coating and the stain. You get a better feel on the amount of pressure you are applying when you start sanding inside, and then work off the piece.
Well, maybe some others will learn from this posting.
From contributor T:
What helps me prior to staining a piece is to slightly sand all the sharp corners off sort of soften them that way you are less likely to burn and corners or edges because they are slightly rounded.
From contributor J:
Contributor M and Contributor T have already mentioned this. First, there should not be any sharp corners or edges. Use a backer pad on your sander. Apply at least one full coat of lacquer and scuff after it dries to get rid of the nibs etc. Basically you�re scuffing too soon.
From contributor S:
Something that I have noticed the industry do as special care to not sand color from edges is to use sandpaper and softly sand "up to the edge from the inside not spending much time on the edge with the sandpaper" .
Then use a 3M Maroon Scotch-Brite pad on the edge. The 3M levels the humps and sinks and removes any orange peel that may be there without going through the color. The Scotch-Brite etches the surface enough to promote adhesion of the following coats and it's tender on the edges.
From contributor O:
We use a lot of MLC and one technique they allow for is to shoot a thin coat of Water White Vinyl and then go directly over this with topcoat. After we glaze we need to barrier the oil glaze from the top coat so we mist on the vinyl and without waiting immediately shoot topcoat (we're using two guns).
The reasons are two fold:
1. Instead of shooting 3 mils of vinyl and building something soft into the finish we shoot 1 mil or less.
2. If we need to sand after this point we're sanding Duravar or Krystal and we're less likely to cut through to the glaze layer because they're hard and applied at 4-6 mils.
I wouldn't sand your nibs but rather lock them down with 5 mils of Krysal. Once this has dried you have to really try to sand through. I understand the comment about sanding smooth early on but you'll be able to get the Krystal dead smooth and not cut into your color.
If you want to eliminate your nibs altogether then shoot a 5% solids WW vinyl washcoat (with or without dye in it) at 2-3 wet mils, maroon Scotch-Brite and then stain. There are no nibs and the stain wipes more easily and doesn't blotch. Then proceed with toner and etc.
From contributor E:
Maple is hard to stain black in the first place. I augment with analine dies to get the saturation I need. I would wash coat (50/50) then sand with 220 or finer. Then stain your work. I think you will find your "nub" problem is negligible. Then build your finish - try not to sand that first coat after stain and pay particular attention to your sanding prior to your last coat.
The comments below were added after this Forum discussion was archived as a Knowledge Base article (add your comment).
Comment from contributor A:
I use MLC coatings. I recently switched to Krystal with great results but still have a problem with sanding through corners. However I may have stumbled onto a solution by accident. A bar wall that I did recently was panelized with a very detailed panel moulding. I wanted to do a higher build finish on the area behind the foot rest so I sprayed a good healthy coat of Krystal Sealer as the first coat. While sanding it out I noticed that even though it seemed to sand easy, I wasn't going through to the dark brown stain. I had already used Krystal as the first coat on the doors and when I sanded them I went right through on the corners. It seems that the Krystal Sealer does the trick.