A discussion of principles and techniques for drying cross-cut log slices with limited cracking. July 16, 2009
Question What is the best way to dry rough sawn discs from a walnut log? I'm trying to make a clock face from a disc and it seems to split very easily.
Forum Responses (Sawing and Drying Forum)
From contributor B: The splitting is from the natural effects of drying. I have never run across any crosscut pieces of a log that did not eventually split. With most wood the end grain is not very pretty. Why don't you use the conventional grain orientation? If you are dead set on using this kind of cut then about the only sure way is to cut the "disc" into several wedge pieces, dry, fit back together and glue. The fitting back together will require the use of machine or hand woodworking tools.
From contributor I: If you cut the disc from green wood and immediately soak it in "PEG" (Polyethylene glycol) it will normally prevent the splits. But it must be done as soon as it is cut.
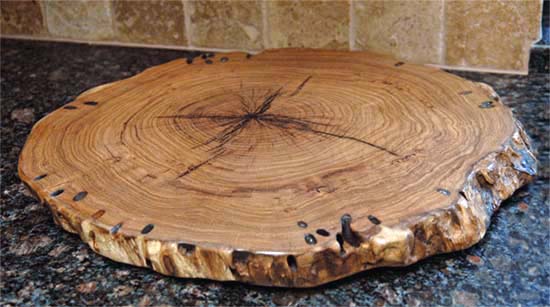
From contributor C: I cut these discs out of mesquite all the time and have never had one fall apart on me on its own. However, mesquite is very stable. It does have some cracks that start at the pith and work toward the outer edge, but rarely do they go all the way to the outside. I simply fill these with epoxy and then sand them flat. Beware of planing this end grain with a hobby grade planer, as it's very easy to jack up the blades. I let my logs sit around for a while so that the bugs eat the sapwood away. I agree with the above post about soaking the discs in PEG. That is the only way I know to do this with woods other than mesquite. A consumer version is sold under the "pentacryl" label and is available from most woodworking catalogs or stores. Below is one of my lazy susan�s made from mesquite.
From contributor J: If you�re cracking of the discs are as posted you might be faced with two problems. The cracks in the photo radiate from the center or the "pith" of the tree. The pith always will crack as it dries at a different rate than the sap or heartwood. Since your purpose is that of a clock you could remove this problem (partially) by drilling your round hole (a round hole) in the center and remove the pith as soon as possible (before the wood dries.) This should not matter as you need to drill this to mount your clock if using through-model workings or you will cover it if mounting on the front side.
Sap and heart wood dry differently and very quickly on thin cuts of wood. As soon as you get your piece home put it in a round container (may have to be a 50-gallon drum cut way down on the sides.) Thin cover the entire piece of wood with denatured alcohol (costs about $15.29 per gallon at the box stores). Let it sit in that for about 4-12 hours (the thicker the piece the longer - if soaked up to 12 hours it will not hurt it even if not needed that long.) The alcohol forces the water out of the piece and replaces it with alcohol.
Once the disc is removed drip-dry it on a screen for about 2-3 hours. Then cover one side of it completely with paper (such as from a brown grocery bag.) Let it sit for a couple of days with the paper down and the open side up. If you have the ability you could weigh the disc after the 2-3 hours of dripping. Then weigh it again every day. When it has stopped losing weight for a few days your wood is dried and you can then make your clock. This later procedure does not remedy the problem above. This is a woodturner�s trick for drying wood so that it does not split. There are other tricks woodturner�s use but this is the best and quickest in my opinion. The alcohol may be reused (strain it like paint). Replace the volume lost due to the process with fresh denatured alcohol.
From contributor I: To contributor J: from what you said, it appears that denatured alcohol works the same as PEG. If so, then it would be much cheaper to use! Does it stop the shrinkage permanently?
From contributor B: The denatured alcohol process used sometimes by turners will not always prevent cracks. The wall thickness of a roughed out bowl that will be soaked in alcohol should be thinner than that of one that will be dried in a paper bag. If the wood is left too thick it is prone to cracking. Denatured alcohol will not affect the finish put on the completed project. It is my understanding that PEG will.
From contributor P: The denatured alcohol is really not all that expensive. Remember most of the alcohol is recovered each time. Only a small amount needs to be replenished. As far as I know the denatured alcohol treatment is the most reliable of all methods and probably the fastest.
From contributor Y: Cut the disc at an angle of 30-45 degrees, and it won't crack as bad as one cut at 90 degrees to the direction of the grain. Painting both surfaces of any disc with endcoat or other wax emulsion will slow down the drying and cracking.
From Gene Wengert, forum technical advisor: Alcohol and PEG are not the same. PEG bulks the wood so it cannot shrink. The PEG stays in the wood (but does ooze out a little bit if the finish is not solid). Alcohol works by replacing the water (no shrinking) and then since alcohol is a non-swelling liquid, when the alcohol is evaporated, the wood does not shrink. If the alcohol wood is exposed to water and then dries, it will shrink the second time, so the reduction in shrinkage is not permanent. Technically, the alcohol can be recovered when it is evaporated from the wood, but it is somewhat complex to do so.
Why does a disk want to crack? Consider a green, circular disk that is 24" in diameter. As this disk dries, the circumference will want to shrink about 8%. So, the original circumference of (24 x pi =) 75.4" wants to shrink 8% down to 69.4". Of course, this cannot happen unless the diameter is reduced to 22.1" (that is, 22.1 x pi = 69.4 circumference). But, the bad news is that the diameter will naturally shrink only about 4% during drying. (Technically speaking, the circumference shrinkage is called tangential shrinkage. The radius shrinkage is called radial shrinkage.) So, the radial shrinkage is not enough to prevent the development of some substantial stress.
To avoid stress development and cracking, we have several options:
A fairly large hole could be cut in the center to allow the radius to shrink more.
Several disks could be cut and then one used for repairing the others. See archives here for more info.
A salt paste could be applied to restrict shrinkage
For thin, porous wood, the disk can be dried in alcohol.
The porous wood can be treated with a chemical that restricts swelling; PEG (polyethylene glycol 300 to 1000) is one such chemical, but it is expensive.
From contributor T: Here are some other end grain methods you can try and still achieve the look you want.
1. On the back side you can make saw kerf cuts in an x pattern with the center of the tree in the center of the x. You do not have to cut the x kerfs to be revealed on the sides if you are careful on a tablesaw jig.
2. After soaking in PEG or Pentacryl allow to surface dry and use a thick epoxy finish to lock in the solution. I have not done this myself but have heard of sucess.
3. Allow to crack and simply put in a butterfly.
4. For the paper bag method on drying woodturnings, I highly recommend and prefer a plastic bag packed with the same woodchips from that exact green woodturning. Take the bag, fill it half way, place in the woodturning, and fill the rest of the bag carefully surrounding the woodturning. This allows less air around the turning itself, and the moisture is released more slowly thus not shocking the wood.
Back when I was just starting to turn wood I was working on a 16" diameter x 8" deep red oak bowl. I was using a friend�s one-way lathe with the large outboard, and I was very fortunate to know him. With only a few hours of time once a week I slowly turned the bowl over the course of a month, and the warpage was very minimal. The piece turned out to be a total success after a month of turning on 16" wide x 8" deep. This is an extreme that proved the method to me. If it was more of a tension wood like burls, crotch grain, or end grain slabs, working more quickly would greatly help.
From Gene Wengert, forum technical advisor: Contributor T makes some good suggestions, but with a bowl, the stresses are relieved partially due to the shape, compared to a flat disk. Note that in his technique #4, I also suggest that one might consider putting in a few moth balls in the bag to act as a deterrent for fungal activity. An alternative to #4 is to put a lot of fresh manure in the plastic bag, which adds moisture and also salt. I am not sure if I the bowl would be smelly or might not be safe to eat out of, but burying wood in manure has been practiced in the past. The salt is the key. Without salt, slow drying of a disk will still result in shrinkage and some (although reduced) cracking.
I do have my doubts about #2, as locking water into the disk will not work well with epoxy. Eventually, if not when the coating is applied there will be an opening allowing a fungus to enter into the wood. I am not sure how a butterfly will close a gap that is wider than an inch in technique #3. Maybe I am missing something about this approach. Likewise, I do not understand how technique #1 is able to prevent the un-sawn surface from shrinking and cracking and the disk will still stay flat.
From contributor T: Gene - I should have made a couple of other points. In #1 the kerfs will cause the piece to warp, but should lessen the risks of cracking. The piece is expected to warp, and will need to be resurfaced flat. I have my doubts about two but I have seen it done and been successful. A butterfly key will not close a gap at all, and if it is applied while the piece is not fully dry, the piece will crack elsewhere to relieve its tension. A butterfly key will just add structure to a large crack and keep it from breaking or opening further. Multiple butterfly�s are also nice and pleasing to the eye.
From contributor G: How about using a trick the flooring people use, it might work. Laminate/glue the disk onto a piece of plywood. Let the plywood provide the stability. I would guess the plywood would need to be twice as thick as the walnut.
From contributor A: Do it all the time with about a 75% success rate. Ovals are easier and do them in walnut and ERC a lot. Basswood and butternut are not hard to do at all.
From contributor Z: To contributor A: does the angle of the cut have anything to do with your success?
From contributor A: The angle on ovals does make them easier to do. You can also run them through the planer. Disks I have to sand.
From Gene Wengert, forum technical advisor: I have heard about people that take disks like contributor A has and putting them in a plastic bag and then putting them in a freezer for a long time until they are fairly dry (freeze drying perhaps)?