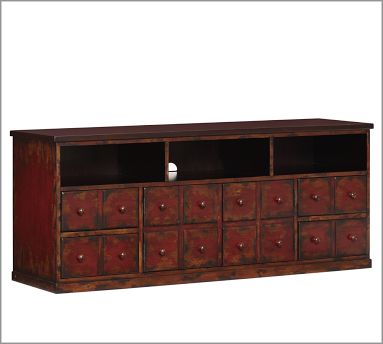
Question
An interior designer has asked me to build a set of built-ins that have a finish that is representative of the photo below. I'm confident right up to the scraped red paint. I have been trying to figure out how to create that look - any ideas?
Forum Responses
(Finishing Forum)
From contributor U:
What's the substrate? What finish are you going to use? Lacquers, latex, H2O, and etc? On site or in shop? How many steps are you getting paid to do? I've matched a variety of Habersham finishes that have this look to them. I use a stain/sealer/glaze/topcoat style system. If it's being done with lacquer, I'll be more than happy to explain what my approach would be.
This next step is not the most efficient as far as time goes, but gives a look very close to your sample pictures. Get a hair dryer, or heat gun and blow the hot air on the areas you want to flake off the paint. Blow it on the spots until it blisters and starts to char with a light brownish color (like a marshmallow browning) � don�t catch your shop on fire though! Do this carefully. If it starts to smoke, back off. The tricky part is getting the blisters crusty enough to remain brittle as they cool back down. If they are not charred enough, they will collapse as they cool, and won't scrub off as easy in the next step. You are not trying to burn anything, just blister the product in spots-enough to lose adhesion. Let this cool. Use a piece of wood, or plastic scraper, or even a wire brush to scrape these areas off. If they crack and bust off easily, you found a good technique with your charring. You'll notice also the Crackle-Lite left behind a grayish chalky look over the areas applied. This will not affect this color, and most of it will scuff off with your next step.
Aggressively remove the charred material, and scuff the entire piece with a Scotch Brite or 220-320 grit paper. Next, use another coat of vinyl sealer tinted to a dirty red. Not too orange, and not too purple (violet). MLC has a color Chelsea Prize or Vibrant Red that would get you close to this (again after the glaze swings the color).
Apply a very inconsistent coat of this red - I wouldn't bother trying to cover the entire piece. Leave areas of the yellow base color exposed, as well as the areas toward the edges where you removed the yellow back to the substrate. This will save you from needing to remove a lot of material and cut down on your labor. It is optional if you want to crackle this particular coat. Most of the crackle from the first coat should transpose into this coat. If not - go ahead and follow the Crackle schedule as listed above.
Again, before it dries more than enough to leave a finger print, spot-charr your red around the edges of the areas you applied it. I wouldn't worry about getting that hard edge flaking look all the way around the red areas. Leave some just as they are, tapering off into the yellow. Let this dry, and again knock off the blistered areas, and aggressively remove any other loose material with a Scotch Brite or wire brush. Blow off and tack rag thoroughly. Apply a coat of self-sealing clear lacquer, or clear sealer and let dry in its normal schedule.
Once dried, scuff with an aggressive Scotch Brite or paper, so the glaze bites in pretty deep. As far as what glaze to use, you could use the MLC Amazing Glaze 3 or one of their Wiping Based glazes.
If you choose to use the Amazing Glaze, make sure it is the A.G. III or if you only can get the F55641 Amazing Glaze 1, make sure that you have catalyzed your clear vinyl sealer 1% with Care Catalyst, or that you allowed your clear pre-cat self sealing lacquer to dry for 12 hours. The Amazing Glaze 1 (F55641) is very hot, and will bite into an uncatalyzed vinyl sealer, or a pre-cat lacquer that hasn't dried for 12 hours. The Amazing Glaze III can be used over anything (wouldn't recommend H2O bases) Campbell offers.
I personally prefer the Amazing Glaze, because you can fog it on the entire piece and swing the two base colors, as well as come back and smoke the edges of the project, without leaving a lot of glaze on the project. With a wiping glaze, you would need to leave a good bit of it on the areas where the substrate was exposed, in order to get the dark look on the cherry. The color I recommend for the glaze is MLC Van Dyke brown. This will mute the brightness of the base colors, and bring them back to the muddy look on your samples. Try to wipe off some areas (in streaks) pretty clean, to give more depth. Don't kill all the vibrance from the base colors, a little pop here and there will give more character. Make sure you let the glaze hang in the crackled areas, as well as your hard edges on the blistered parts. Follow the proper drying schedule for the product you have used.
Only if your glaze requires a vinyl sandwich, I would proceed with two final coats of clear. Again, follow the proper dry and sanding schedules between coats. I personally use a dull or flat coat, to make the worn look more believable. Glossy clear coats make it look cheesy in my opinion.
