Q.
We have to install a kitchen on top of existing tile flooring that has some kind of radiant heating underneath it. We would like to install toe-kicks first with a laser level. Does anyone have recommendations for how to tie a 2X4 like sleeper to the tile floor?
Forum Responses
From contributor C:
What type of radiant heat is in place - is it tile over a slab with embedded tubing? Is the tile bedded in thinset over plywood and a staple up radiant system between the joists? Either system allows a marginal amount of fastening depth, and it really is the "safe" fastening depth that controls the fastening method used.
Another issue that comes to mind is how secure does the toe base need to be? It sounds like you're installing cabinets with no toe-kick notch. This seems to be more prevalent in the west than east, where factory cabinets are made with built-in toe-kicks.
Here's an approach that could avoid the need to fasten the sleeper to the floor at all. The 2X4 sleeper is scribed level to the floor, "tie-backs" (2X4's that run back and get fastened to the wall/sill plate) are installed to hold it in place, the cabinets are set on top of the sleeper and fastened to the wall, and the screw through the cabinet base into the sleeper. The cabinets won't be going anywhere after everything is assembled (and the counter will help "unitize" everything as well). This really isn't much different than using adjustable feet.
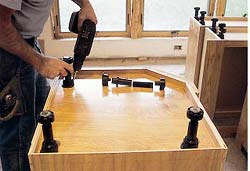
Which begs the question: have you considered switching to adjustable feet instead of toe bases? When the cabinetmaker I installed for switched to adjustable feet, it was a happy day for me. I never once wished I was using the platform system or toe board system, and I made *much* better time on my installations. I've included a photo below of the adjustable feet I use.
All that said, a refrigerator end panel would have to be approached differently, since it might be all on its own at the end of a cabinet run.
The thought of levelers seems a novel idea, although I have not had any experience with them. I don't know that the use of levelers in conjunction with a loose toe would nullify the benefit of the leveler. With my method, I would level the base (with or without levelers) and simply screw it to the back wall, shimming at the wall as well to keep my kick straight. You can then slide your boxes right onto that secure base. A few screws to secure your boxes to the wall and you're done.
To install that free standing refer panel, I would use a metal angle bracket on the inside of the opening at the wall and run a bead of clear silicone around the bottom.
If you need to skin the toe kick after leveling, try the Quickscribe. It follows the floor as well as it follows walls.