Keeping Faces Flush with Pocket-Hole Joinery
Clamping and drilling techniques that will keep pocket-hole-joined pieces from slipping out of alignment during assembly. December 6, 2006
Question
I just purchased a Kreg pocket hole machine for my face frames. Purrs like a kitten. The only problem I'm having is keeping the joints flush. I've tried clamping the pieces together, then driving the screws, clamping both pieces to the bench together, and clamping both pieces to the bench separate, but I can't seem to get them very flush. I get at least a 1/32 lip every time. Is this normal? What is the best way to accomplish a nice tight flush joint without a face frame table?
Forum Responses
(Cabinetmaking Forum)
From contributor W:
Does this help? You can get the clamps for $10 at Harbor Freight.
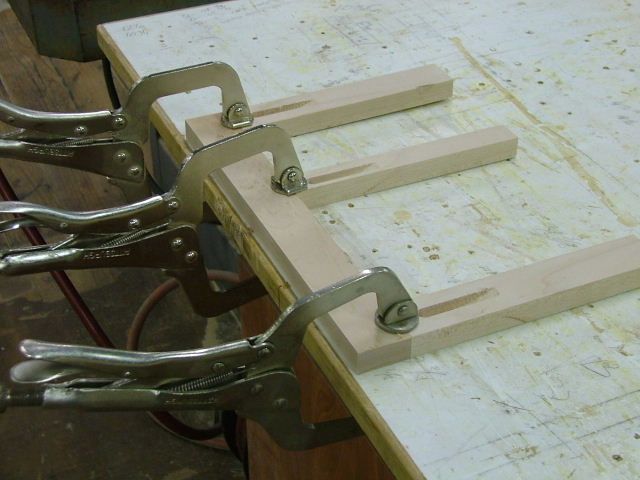
Click here for higher quality, full size images
From contributor L:
When you drill the pocket hole, don't let the smaller portion of the bit make a hole in the piece you are drilling. The best hole is one that just starts to dimple the edge of the wood. When you do it this way, the screw helps keep the two pieces aligned. You need a good amount of force to keep them from slipping the 1/32" that is happening to you.
From contributor B:
Having the pieces tight against each other is the most important thing. I think that most, if not all, the misalignment comes from the vertical separation of the exit from one piece and the entry into the next. If the two pieces are snug, the screw leaves the first piece at the same height that it enters the next. This assumes you have nice, square pieces that fit together well. I hold the joint tight and then secure it with the Kreg clamp that came with my pocket hole jig. It works pretty well. Sometimes a little sanding is required. When joining panels, I just offset them a 32nd and the screws bring them right into place. I have done this with some face frame pieces too. I know that some people get it close, then just run the completed face frame through the wide belt and it all comes out perfect!
From contributor A:
Unfortunately, you are describing the exact reason why many of us use the Castle router system (Castle/Portercable). The angle on those Kreg jigs is very steep and tends to pull 1/32 even when clamped.
From contributor J:
Kreg offers face clamps that are like vise grips with about a 2" circular pad on one side. It's the only way to go until you can afford a frame clamping table. I'm sure you can order them online for under $15. I used them with a lot of success until I got my table.
From contributor E:
I know contributor A is just giving his advice, but don't be discouraged by it. I've used Kreg and Ritter (they both drill the same hole) for over 10 years, and if clamped correctly, you won't have any offset of the joint. Plus, you don't have to wait on two cycles of the machine to drill and rout.
From contributor P:
The Kreg Bench Klamp is pretty good. It's a 10" x 10" steel plate with a vise grip style clamp attached. $55. I use a Festool Multi Function Table with quick clamps to build my face frames. Allows a lot more flexibility when positioning face frames and clamps. The clamp face should always span the two pieces being attached. If the clamps are tight, the joint will never slip. You can run into problems if your FF stock is not milled exactly to the same thickness, though.
From contributor F:
You could buy a Castle pocket hole machine which will solve the problem. It's the high angle that's causing the problem; a lower angle gives better results.
From contributor K:
Buy some of the Kreg clamps and keep working with them. You'll get the hang of placing the clamp and adjusting the tension so the joints don't move. One thing that helped me tremendously was making sure all my face frame stock was exactly the same thickness. Also, I have a piece of 1/2" plywood that I throw on top of my assembly table and build my frames on top of it. I place the bottom leg of the clamp under the plywood and the top leg over the joint just like you see in contributor W's photo above. That seems to work a lot better for me than having the top and bottom legs of the clamps just on the frame itself. I'm lusting in my heart after one of the framing tables but don't have the space for it. I have to admit, I've gotten pretty fast with my plywood and clamps.
From contributor M:
I've had the same problem with the Kreg jigs. I think it occurs when the joint is separated slightly when running the screw. Two things I figured out that helped were: 1 - Position the face frame clamp so that the handle is perpendicular to the joint, not parallel. The heads pivot so that when the clamp is perpendicular, is will squeeze both pieces. 2 - Try running the screws with the high speed setting of your drill. It seems to me that it gives the self drilling screws a little more "drilling action" and they don't tend to separate.
From contributor N:
Whenever I make a joint, I try if at all possible to add a clamp which squeezes the two parts together. I find if I don't do this, the joint separates slightly as the screw comes through, and that's what causes the alignment issues. It's tricky to do this with face frames, though, because what's needed is a long clamp that squeezes the rail onto the style (as well as the other clamps already shown).
From contributor W:
If your joints are pulling apart when you assemble, it means that the pilot hole is not large enough and the screw is threading inside of it. Get a bit with a larger pilot or use screws with smaller threads and it will solve that.
From the original questioner:
I solved the problem! Like an idiot, when I set my chop saw back to vertical, there was a small chip of wood between the stop and the adjuster screw. This threw every cut about 2 degrees out of square, causing the rail to be drawn past the stile when screwing. The bad news is I cut every face frame member for an entire kitchen that will now have to be recut. Oh well - lesson learned. I would like to thank all of you for helping me out. P.S. Short maple pieces for sale :)