Question
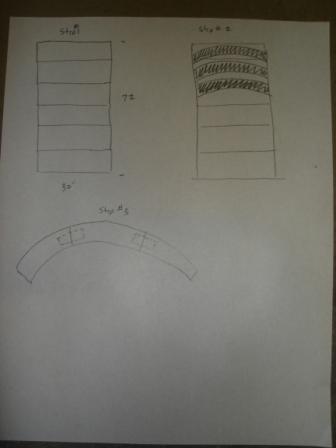
Through the years we have set up our moulder 2 different ways for running crown moulding. (I will refer to the moulding as it lays running through the moulder.) Some of the time we ground our top knifes to include the bevels on the top outside edges of the crown moulding, so our side knives just have the bevel for the bottom outside edges. And some of the time we included the bevels on the side knives for the top and bottom outside edges, so our side knives have a V-shape. We have tried to determine which is the best way, but so far it seems that it is pretty much a wash. We are leaning a little toward the bevels on the top knife as being easier to set up. Of course we sometimes have exceptions, due to limitations of the machine, that determine this. What have you found to be the best way and why?
Forum Responses
With our experience with crowns, we've found it easier to use the side heads designed to accommodate a variety of crowns, doing the bottom (hidden) cut. The top head would do the bevels (entire top of profile). This allows us to have single head change, and some side head adjustment, if we do a run of multiple crowns. We've also found it easier to blend where the cuts meet. We have our machine set up with axial constant, and our prints have exact measurements, so setups are quick and we usually have a 1 stick setup, then we're making money.
As far as holding the profile down from the top head, we use a simple custom-made pressure plate to be able to make contact with the two most outside high points of the profile. If you only have a single right head, you must make a knife that is capable of the angle cut along with the straight to be able to dress the entire side. This custom-made pressure plate has been a real asset. We use it for everything. It's very simple and safe. We do not run axial constant, all you need is the ability to measure your tools axial. We use sample pieces to set with. It normally takes 15 minutes per profile. We try to run our crowns back to back. We tried at one time to run profile from bottom and run the straight with angles in the top head. What we got was a large inventory of various bottom knives and templates.
With the side cutting the single angle, the top head can be positioned to cut the rest. When I set a crown, I lower both sides' cutters down a little. This will produce a small flat on both sides. This allows me to make sure that the top profile is exactly where I want it. I then raise the side heads just until they blend. This way the moulding is held secure against the fence of the moulder. Otherwise, the wood can move under the top head.
This was an article in a back issue of "The Profiler", the Grinderman's Association newsletter.
Dave Rankin, forum technical advisor
Comment from contributor A:
I don't like setting up side heads, tweaking until it blends, etc. I put a lot of weight on whether a particular job can be done equally as well with fewer heads, whether setup time is significantly decreased, and how I will get fewest culls and rejects.
For any normal crown (or bed mould or inside corner) up to about 5" or so wide and 1 1/4" finish thickness I run good face down and profile with the last top and bottom heads.
Here is the thinking: Good face down = better yield with scant material. The exposed profile always cleans up when cutting with the bottom head, just like t & g.
Profile with top and bottom heads = 2 head changeover, much easier and quicker than a 3 or 4 head change when profiling with the sides. Plus I typically have more horsepower per profile length on the last top and bottom compared to the sides.
I lift up the feed roller after the last bottom head so as not to impart shine on the finished (down) profile surface, and run an OSHA-approved chaser stick to clean out the last good piece of crown.
Leave straight knives on the side heads, just change the top and bottom, rock and roll.
Some like to make the bevels on the top and bottom knives blend a little away from the right hand fence. Whatever works. I don't use the movable left hand fence after the last bottom head at all when running crown.