Machining raised panels
Addressing workpiece movement and tear-out problems. April 9, 2003
Question
What is the best way to machine raised panels? I am having a problem keeping the narrow side of drawer front panels parallel to the fence when machining the profile. As the panel is pushed through the shaper cutter, it seems to move a little when transitioning from the in-feed fence to the out-feed fence, thus ruining the panel. I have adjusted both fences so they are parallel. Does anyone know of a way to eliminate the panel movement and keep the machined lines running straight?
Forum Responses
(From WOODWEB's Cabinetmaking Forum)
Weaver has a coping jig and tenoning fence that would likely be of help.
From contributor B:
Make a sled - basically a square of 3/4" MDF (+/- 15" x 15") with a fence of 3/4" hardwood (4" x 15") screwed on top along one edge. Add a hold down clamp screwed on top of the hardwood fence.
Raise your cutters 3/4", and the sled rides against the shaper fence carrying the part, which is clamped to the fence, through the cutter.
From contributor S:
Raise two (or more fronts) at one time.
Glue up a blank to include multiple drawer fronts (in width). Raise the end grain on both ends of the blank, rip, raise the long sides of your two drawer fronts.
This technique also works great when coping rails for five-piece cabinet doors, i.e. cope two ends of your rail blank, split and then stick. You get two rails of the exact same length = square doors!
From contributor D:
I made a solid fence that runs all the way across the in-feed and out-feed fences and cut through it with the shaper cutter running on top. Not only does this keep the panel from pulling in, it keeps blowout to a minimum.
From contributor R:
Contributor S's method is the easiest and contributor B's idea is the safest. Maybe you should consider always using a rub bearing with your panel raising bits unless you use a back cutter in conjunction with panel raiser, in which case that is not an option. Then I suggest you shape all drawer front ends first with the use of a miter fence.
From contributor J:
We now use an Aigner fence that has a thin bridge on the bottom with the panel cutter on top, without the power feed for ends of very narrow panels. Weaver also has the same sort of thin fence that bolts on and is very inexpensive. With the Aigner fence you can raise top and bottom. Contributor B's idea would work and is safe. An additional setup, though.
From contributor C:
I would put a bearing rub collar on the bottom of the cutter. It would control the depth on the ends as well as the long cut. On the safety issue, I think the sled would be the best in the short run (aside from the change in setup). There are some air-operated ones that work quite well. Other options would be to get a sliding table for your shaper or something such as a Unique door machine.
From contributor T:
I use contributor D's method. I have a Delta heavy duty shaper and I take off the factory fences and bolt on a solid one, push it onto the spinning cutter, then back it off a bit so it's not rubbing. Clamp a feather board above the cutter so the board can't lift and get ruined. For narrow boards (e.g. drawer front ends), just back it up with a squared piece of 3/4" plywood. Left hand on the board and ply, right hand pushes the ply. No kidding, though - lose the split fence. You won't believe how easily it works with solid.
From contributor O:
I'm with contributors T and D. I use a scrap piece of lumber and engage the cutter through it. The "tongue" that's left rides on that piece of lumber. Plus, if only raising the face (and not back cutting), it's much safer with the cutter down below the panel. I like using a scrap piece of MDF to reduce blow-out when doing end grain.
I'm not sure I agree with contributor B's idea. Wouldn't you then have to change the setup for running with the grain? I guess you could make the sled long enough for both, but that seems awkward. I like to run all four edges of my panel while on the machine. I don't run all the end grain cuts, then come back and run with the grain.
From contributor N:
Contributor S, I like the idea and never thought of doing it that way. I don't see any problems with the drawer fronts. My only question would be with the doors. Do you ever have problems with the coping area getting ripped out while jointing the edges after they have been ripped?
From contributor S:
No, we don't have a problem tearing out any of the cope joint after ripping the blank. The coped end is perpendicular to the jointing cut (long edge of your rail, with the grain).
I know this is off the point of the original thread, but�
When feasible, we always try to face joint, plane, shape or mill multiple small parts in one blank. One, it's always safer to shape a larger piece than a smaller one (more control) and two, it makes for less handling throughout the entire process. So for coping door rails, we'll take a rail blank that is sized to length, and say 2x finished width plus an extra 3/8". Cope both ends, stick both sides, rip each piece to width +1/32, then joint the sawn edge of each rail one pass to finished size.
We don't have quite as good success with stiles, though. We used to stick two sides of a blank and then rip/joint them to size. But the ripping tended to relieve stress on long stiles and they'd twist and bow. Not good for a flat door! So we generally stick those pieces individually or in long lengths and then cut them to finished length.
From contributor J:
My argument for running the panel raiser on top is that on very narrow panels the support is better, especially when shaping the long way on say a 4 or 5" wide panel. All the table rings can be used. Also, with the cutter on top your fit to the groove is always the same, even with material thickness variation. On a dedicated or NC shaper this is a real plus.
Cutter on top is a little harder to guard. A simple disk larger than the cutter can be used or an Aigner Centrex type guard.
From contributor O:
Another reason I like the cutter on bottom, especially when running by hand, is that any "slip" of the material not laying perfectly flat on the table doesn't screw up the panel. Just run another pass. Do that with the cutter on top, and you've ruined the panel.
I think many of the differences are between how the panel is fed (by hand, power feeder, etc.).
From contributor N:
Right, I copy you, contributor S. Doesn't sound like it's an issue then. I wasn't talking about jointing the end grain - sorry if I caused confusion there. I just had images of the edge of the copes (particularly the little material left from the cove to correspond to the round over) getting torn out when you first put it to the jointer knives (in other words, the 1/32 jointing step after you have ripped to width - hope I am making sense here). Sounds like you have had no problems from your experience. I look forward to trying it.
From contributor L:
Explain this to me. If I attached a straight fence with my panel cutter on top, I don't have anything left to run the panel against accept 1/4". Am I thinking about this the wrong way, or is 1/4" enough?
Also, I am having a hell of a time running oak and maple stiles without getting a lot of chipping on the thumb nail portion. I use a 1 horsepower feeder set on the slowest feed. Any thoughts on how to reduce tear-out along the grain?
From contributor O:
I suggested using the straight fence, but with the cutter on the bottom. I wouldn't run the cutter on top.
You probably already know this, but before running a part, look at the direction the grain meets the edge. The "angle" that the grain meets the edge should be pointing towards you (if you're standing on the in-feed side of the shaper), or with the direction of the cutterhead rotation.
I also like to joint the edge when doing sticking cuts (taking a slight amount off the edge of the piece). I also use a solid fence and plunge the cutter into the fence. My solid fence will be jointed halfway down the board, to allow for the jointing of the edge (that establishes my depth of cut). This basically gives a zero clearance that many of us like to use on table saws. This will also reduce the tear-out.
From contributor R:
Contributor L, you say that you are getting a lot of chip-out on your rail and stile sticking and that you are running your power feeder at the slowest speed. I was wondering how slow your feeder will go? The slowest setting on my feeders is 6.5 fpm and if I try to run my sticking profile any faster I am guaranteed to get chip-out on certain species such as oak and especially maple and hickory. I know that there are a lot of feeders where the slowest speed is 13 fpm and that is just way too fast. But then there are a lot of people who swear that they can run that profile at up to 26 fpm. What speed do you use?
From contributor L:
I have a Delta 1 horse so I believe it is 13 fpm. Does everybody else have the slower feeders? I can't imagine they do but it's not working for me the way I'm doing it.
From contributor J:
Cutter on top, I would not use a wood fence. I am talking about two after market products - Weaver or Aigner. They both use a thin metal bridge on the bottom. Or top, bottom or middle with the Aigner.
As far as chip-out on sticking cuts, if your cutters are good quality, take at least 1/16" off the edge at in-feed, and are supported well, you should have 98% tear-free in most timber. Don't take the edge and you will always have tear-out at the groove. Think of using the shaper like a moulder and take the whole edge.
The Aigner accessories are high-end and very adjustable. The Weaver is very simple and requires some drilling and taping into the shaper table but works well. It is best suited for a dedicated shaper.
From contributor R:
That is absolutely correct about taking off up to 1/16" on your sticking cut. There was a discussion here a few years ago concerning that particular problem and that is when I began to take that 1/16" deep cut, which in combination with my slow feed speed gives me flawless profiles on tear-out prone woods. Certain woods like pine and alder I can feed as fast as I want.
From contributor O:
If you aren't "jointing" the edge on the shaper, that's going to make a big improvement.
From contributor N:
What about making two passes with very hard, grained woods to reduce chip-out? Any of you do that with your shaper, or does that defeat purpose? Might as well just get a router table set up if you have to make multiple passes, I am guessing. I have always done cuts in one pass with about 1/16 "jointing," but considered multiple passes on some oak that was causing me problems. Anyone do two passes?
From contributor C:
Sometimes I climb cut the first pass and forward cut the second. Usually only with a squirrelly grain pattern or when my cutters need to be changed. I have a Unique machine so this does not add to the time.
From contributor L:
I just finished running a set of 15 doors and tried the jointing process suggested in this thread. Zero tear-out on my maple stiles and rails!
The comments below were added after this Forum discussion was archived as a Knowledge Base article (add your comment).
Comment from contributor A:
In reference to tear out, be sure to keep your cutters sharp. I run different woods and never have a problem and the feeder is always set at 22 fpm. I use Freud insert cutters for everything.
Comment from contributor T:
It's interesting to me that nobody has mentioned anything about cuts per inch (cpi). This is perhaps one of the more important factors to consider when sticking parts. To figure cpi, you would take your feed rate (feet per minute) divided by your rpm (revolutions per minute) times cuts per revolution (3 cuts on a 3 wing cutter) devided by 12 (inches per foot). To shape wood successfully and efficiently, you would want to have 16-20 cpi on most hard woods. Any more than that and you will cause premature failure with your cutters and that's when you will begin to notice extensive tearout. Less than that and you will likely have too much space between cuts (knifemarks). I climb cut all of my sticking parts before cutting to length and it only takes one pass. I run my shaper at 6000 rpms and feed at approximately 80 fpm with a 3 wing cutter. This means that I am getting just under 19 cpi. I then have shapers with left and right handed coping sets to cut the copes. (I also have five shapers.) Anyway, much like a moulder, cpi is more important than fpm.
Comment from contributor V:
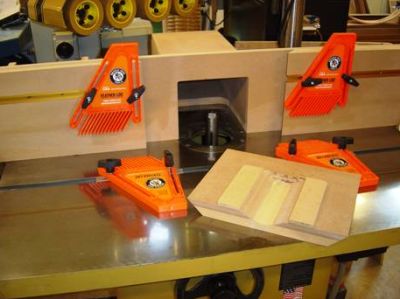
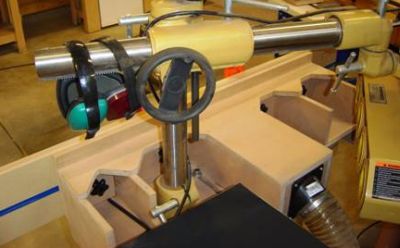
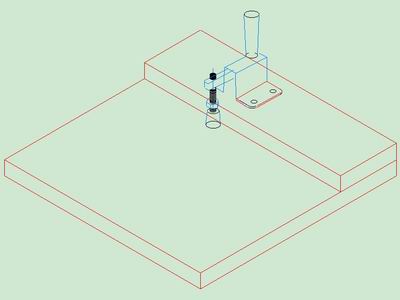
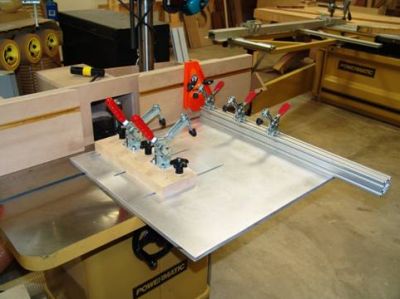
I constructed a shaper sled from 0.5" aluminum plate (24" x 24"). The fixed fence is a 30" long aluminum extrusion that can hold several clamps and an adjustable stop, and another adjustable fence with two clamps that can slide to snug material between the fences to as small as 3" width. It works with material up to 19" in width. The extra weight of the sled stabilizes it, reducing vibration and producing smoother cuts. The aluminum plate is flat within a couple of thousandths, and rigid. All those clamps really hold the material flat against the sled, and that is far better than using feather boards, like I used to. The only downside is the extra weight. The entire apparatus weighs in at about 25-30#. The cost to fabricate was about $200, but well worth it given the additional margin of safety. I have never felt comfortable using a conventional miter and the fence to do coping work. With an adjustable stop on the fixed fence, I get perfect results every time. It can be fabricated with carbide router cutters at slow speed, but if you have access to a mill, that is much faster and easier. I have also abandoned the manufacturer supplied fence system. It was junk. The adjustable fence system I've made is far superior, and includes multiple zero clearance inserts for specific cutters and setups. Here are some photos:
This is the shaper fence system I made from MDF. The two fences are adjustable from side to side, and can be used with or without the zero clearance inserts. The photo below includes a fresh insert prior to use.