Moulder Tweaks and Modifications
A post on stabilizing the open end of a moulder turns into a long thread on shop-rigged moulder modifications. April 30, 2009
Question
For years I have owned and used a W&H molder. As I have acquired more cutters, they have become larger and more complex. With the larger cutters there is more chatter (not mill marks). I have come to realize the problem. It is so simple that I have overlooked it for years. It is an open ended machine. It has support only on one side - the other is only supported by the strength of the castings and vertical rails. By using the larger cutters, I have started to overwhelm the machine.
I got the electronic variable speed motor for the W&H and expected to get a very smooth finish while using it on a very slow feed. However, I still got a lot of chatter. For months now I couldn't figure out what it was. I tried to make the feed rollers exert more pressure by putting shims under the spring pads. This helped, but not enough - still way too much sanding of large moldings. So as I was making a 5" cove crown a few days ago, I decided to try something. I always do this molding in two passes. The first pass hogs 90% of the wood and the second pass I lower the unit 1/16". When I did this I also put a block between the feed motor and the table. I clamped it so that it would lock the open end and keep it stable. Well, that little act made all the difference in the world. I went from a very chatter-filled molding that required 10 minutes of intense sanding with 120 grit, to a relatively chatter-free molding that I could sand with 150 grit in about 2 minutes without a lot of pressure. Made a difference in priming (poplar, paint grade). The first coat of primer was pretty smooth and only required a quick, light sanding instead of the more aggressive sanding that I would usually have to do because of the use of 120 grit paper.
So I let my secret out. I hope someone else can try it and tell me what they think.
Forum Responses
(Solid Wood Machining Forum)
From contributor A:
It turns an open ended moulder into a closed end moulder. We have been running 5+ moulding on the W&H for years. We've had similar problems on particular setups. We've been using a Woodmaster for the wide knives for a few years and there is no chatter regardless of cutter width, because it is a closed end machine. Thank you for this insight.
From contributor R:
I have a Woodmaster in my home shop, and a W&H where I am currently working. I've known for some time that the W&H had the cantilever head issue. We recently installed the variable speed too, and still had the chatter issues. I'm grateful to you for sharing a simple but elegant solution - I'll have to try it out. I did work out a clever little spring hold down on the outfeed. We had a sloped molding to run and the outfeed rollers had nothing to really hold the stock down.
From contributor B:
We've done thousands of curved and straight mouldings on the W/H over the years and have never had a significant chatter problem. The key to this is in the feed roller pressure as the original questioner mentioned he's modified with shims. Instead of shims, though, the answer is longer and somewhat softer pressure springs pushing down on the ends of the feed roller housing. This, however, is not the only part of the equation.
You also need to grind a 1/8" x 1/8" slot in the roller housing where it rests on the down limit stop pins. This will allow the longer springs to push the rollers lower. Most people I've spoken with who run the W/H professionally have made this modification. Indeed, you can now buy a "multiple pass" modification kit from W/H that I believe includes these modified parts.
Don't let anyone kid you about single passes, though. The W/H will not make a chatter-free moulding of any significant profile configuration in a single pass. We run a minimum of two passes on very light cut mouldings (a heavier first pass and a final approximately 1/32" deep pass on very slow feed speed), and 3 to 5 passes on deep and wide cuts. Sanding is a pain and we have enough of that to do even if the mouldings come out very smooth. Time spent on a slow feed final pass is well invested.
From the original questioner:
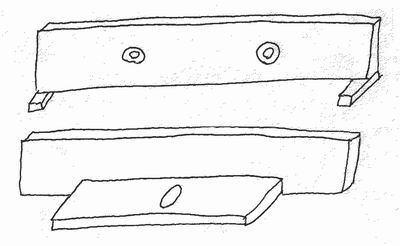
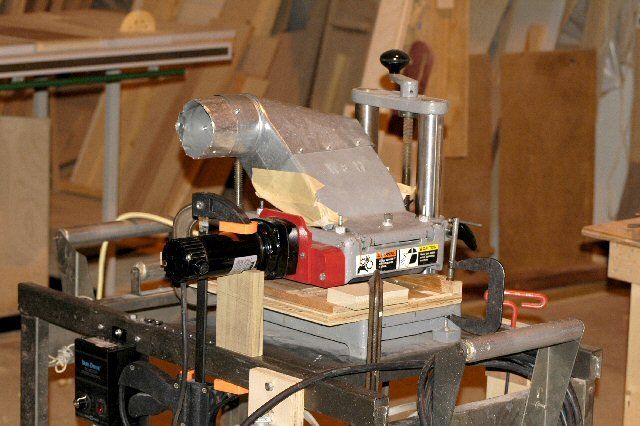
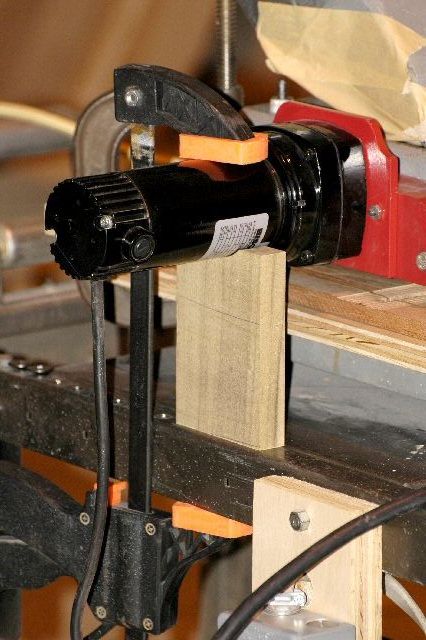
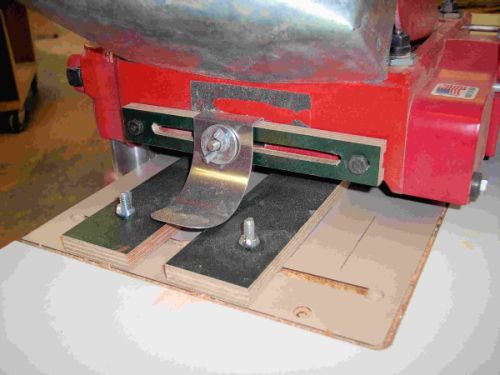
I wouldn't call it a significant chatter problem, but anything to do to eliminate more sanding is always helpful. But it is chatter and it shows in the paint or stain if you do only a light sanding. I am tired of wearing my fingertips off sanding a few hundred feet of moldings. With this modification I am able to do a light sanding with 150 grit in 1/5th the time it took me before. Most of the problems I have are with my 5" cove crown and my 6 3/8" 6/4 baseboard. Both of these cutters take a significant bite of wood and could never be done in one pass even at 2 ft/min. The 2HP motor gets too hot. Either way, I have some photos of the setup...
Images courtesy of Leo R. Graywacz Jr.
Click here for higher quality, full size image
Click here for higher quality, full size image
Here is the new jig I made. It is adjustable to accommodate all sizes of moldings.

Click here for higher quality, full size image
And on the machine:
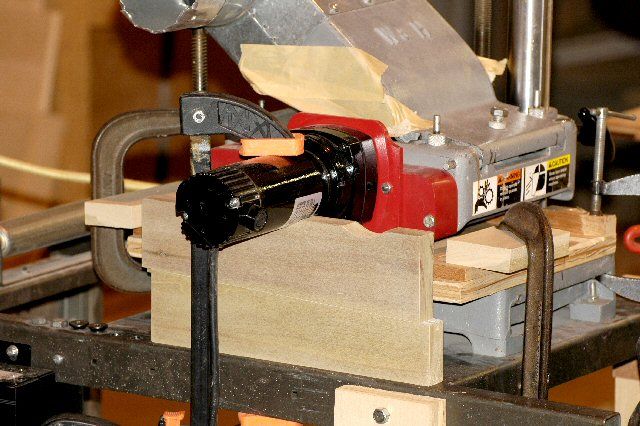
Click here for higher quality, full size image
From contributor R:
Very slick. I especially like the sliding wedge solution you developed. I just built a custom cart and work station for our W&H. We are going to be running some big panels and needed more support all the way around. It also raises the machine to a more comfortable working height.
From contributor A:
You need to get that slick wedge block made out of injected molded plastic. There is no way the thousands of woodworkers who own W&H's will buy one made from wood. $19.95 plus shipping and handling. Very creative shim design, kinda like one of those little ones the machinists use on Bridgeport milling machines.
From contributor R:
Here's a photo of the hold down I built recently for a W&H. It is a piece of spring steel stolen from a Bessy corner clamp, hooked over the plywood block. The plywood block has a t-slot milled in the back, to allow for lateral adjustment. The wingnut can be tightened or loosened to adjust the pressure of the hold down.
Click here for higher quality, full size image
From the original questioner:
Thanks Ralph. Nice simple design.
From contributor T:
Great informative post. I was wondering if everyone feels that the variable speed is worth the cost. I know that the infeed upgrade was a much needed improvement, but I wanted some opinions before investing 500 bucks.
From contributor B:
Definitely worth the investment in saved time sanding, especially for radius work. Get the one from W/H - much more substantial than the others that are available.
From contributor R:
I just added the varidrive to the one in my photo. Variable speed feeding is always a huge improvement - it allows you to tailor the cutting action.
One note, in adding this one, I wired it completely separate from the main 220v power. It means plugging in a 220 and a 110 cord, but allows for feeding setup pieces and samples into the machine without the head turning. This makes setting up much easier.
From the original questioner:
Ran a smaller molding (2") for the first time after the new lock down setup. Smooth as glass. Seems to work great. I used the tapered jig as a lock. I will be trying the grinding of the roller arm soon. Looks simple to do. I can do it in place with a Dremel and a diamond bit. Cuts into the cast pretty well. Thanks for the tip. Will there be any problem if the arm tilts too much? I'm thinking about the chain falling off because of excessive tilting. Or is the arm too stiff to have to worry about this?
From contributor B:
There shouldn't be a problem with the chain. Don't forget about the longer/softer springs though. Also, make sure the spring post thumb screws (with the post hole in the center) are all the way down so the spring posts can't fall out the bottom when the roller frame is all the way down.