Optimizing Frameless Cabinet Construction for Materials Saving
Cabinetmakers kick around design ideas for minimal materials use in a frameless cab. May 27, 2008
Question
We are trying to optimize the design of our frameless cabinets, and the suggested go-to model is shown in the picture below. Parts are CNC cut and eCabinets is the design software. The model is from the True32 manual, and is all of 3/4" panel stock, except for the 1/4" back. Stretchers and the nailer are 4" width, and as can be seen, the back lands onto the nailer with a 1" lap. Staple fastening there. While shown as a drawer-over-door cabinet, the same scheme is proposed for all drawer stacks, whether done with 3 or 4 drawer boxes. Your comments are appreciated.
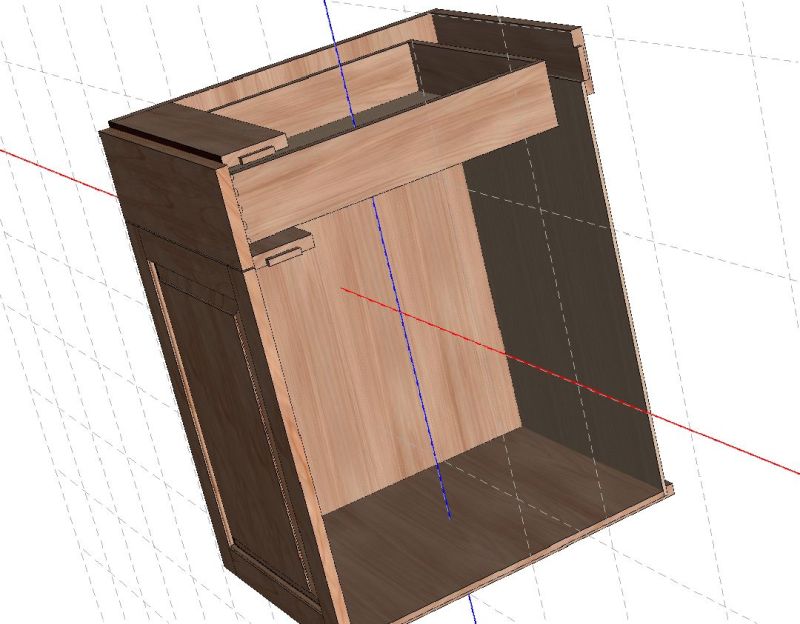
Click here for higher quality, full size image
Forum Responses
(Cabinetmaking Forum)
From contributor R:
Looks almost typical. I might add the back upper stretcher, drop your nailer 3/4" from the top of the cabinet, run the back up to the stretcher and staple from the rear. No visible fasteners then, and you make a drawer stack the same as a one door base. I could not imagine you would make a door base this way and show the staples?
From contributor D:
I would put a stretcher at the top back and a nailer at the bottom back and bring the back up to the top. The top stretcher will serve two purposes, 1. Give you something to fasten countertop to and 2. Give you a place to fasten back and top nailer to. Bottom nailer is for when installer decides to screw cabinet to wall at bottom; he won't tear the back off completely. Drawn in Cabinet Vision.

Click here for higher quality, full size image
From contributor M:
Go to a 3/4 back with blind dadoes and lose the nailers. Makes for a bombproof box at no more cost. The cost of the nailer and handling/installing it is more than the difference in the material.
From contributor A:
I never got the idea of adding all of those nailers. If you are building gobs of kitchen cabinets with cheap labor it might make sense. We build custom cabinets on a scale where higher labor costs always wins over material cost. The time it takes to cut all of those nailers and install them. Why not use solid 1/2" backs?
From contributor R:
I guess everybody has different opinions and their reasons for why they do what they do. I've always liked using nailers in the back, 4" wide (min). 1) It helps with installation of uppers - simply fasten a cleat level on the wall, hang, tie units together and then fasten to studs. The cleat adds extra shear protection in the Y axis. 2) It helps make up for any discrepancies in the wall surface. 3) Adds some additional space for any weird narrow items, i.e. wiring, etc. The nailers are usually secured by 2 1/2" screws through the 1/4 back and into the sides and top and bottom of uppers, with the same procedure on the bases with the exception of 2" screws instead.
From contributor J:
You just get used to things. I have always done it just like contributor D.
From contributor L:
Since you are running on a router, why don't you add a top stretcher at rear and notch it so the back is captive? Build the box on its end and drop the back in, drop the other end on nail/screw/staple and flip the box. The back stretcher top and bottom, helps a whole lot and a ton of off-fall can be used up. I threw together a set of cabs with 1/2 backs once and then a set of 3/4 backs once. Never again - the installer screamed bloody murder to help him, and then I felt the weight.
From contributor J:
I am with contributor L. Using up off-fall is a green thing to do. Every so often one of the guys will just rip it up into 3.25 lengths by 19.5 for toekicks and longer for stretchers.
From contributor B:
I have used most of the methods described above and they all have merit, but I have to say that the French cleat hanging method for uppers is a thing of beauty if and only if the walls are straight and plum. I also would have to go with the 1/2" solid back because it is by far the fastest method and definitely thick enough without being too heavy. As for using up the fall offs, that doesn't work for me, as I only use plywood for top rails and toe kicks, never melamine.