Organizing Drills, Drivers, and Bits
Groping for a labeling method to keep track of different driver bits in different tools. August 31, 2009
Question
Does anybody have any suggestions on how to label these drills in a way that you can easily identify what kind of drill tip is for a particular drill motor? An idea that has been raised, but not yet tried, is get some of the liquid rubber that you use for dipping plier handles and screwdrivers into. The thinking is that if we could get white rubber to bond to the black rubber on the drills, we might have a good format to better label whether it is a square drive, countersink, Phillips tip, and etc. As you can see, we make some use of color for this purpose. I am hoping there is a more succinct method out there. Has anybody tried to bond rubber to rubber? Does anybody have a method that works for them?

Click here for higher quality, full size image
Forum Responses
(Cabinetmaking Forum)
From contributor O:
Just get some self stick labels, (the ones with the real aggressive adhesive), stick them on the back of the grip area, and write with an indelible marker. When you can't read them anymore, stick on another label.
From contributor Z:
I only use square drive bits. The only screws that I have not been able to find in square drive are the Euro Screws.
From contributor L:
How about painting a symbol and the back of each motor for each tip? A square with a number 2 in it, a cross for Phillips and etc.
From contributor E:
Standardize your screws. I do like contributor Z and use square drive if at all possible. In one of the trade magazines a while back a company was profiled on lean practices. They looked at the screws being used and they standardized the screws and realized a large gain.
From the original questioner:
Standardizing screw heads would be a great solution except that I can't do it. I use too many different types of screws. Confirmats take a different head than Euro Screws. Number 6 screws are usually Phillips tip. We also use vix bits and countersinks. The reason we have a half dozen drills in play is because we need that many. I like the paint idea. Does anybody know of a paint that would bond to rubber? Could maybe this be done with an epoxy type paint? Failing paint, I think contributor O's idea might have merit.
From contributor L:
I have many PC505 sanders, each with a different grit paper. It used to drive me crazy that I could never guess which sander had what paper so I glued a small piece of white Formica to the top of each and pencil in what grit it has. Now I can mark them, or change these descriptors at will. It might work with your drills, too.
From contributor B:
You mean you don't have the color codes memorized?
From the original questioner:
You are right about color for some things. The purple tape, for example, makes it easy to distinguish the 14 volt batteries from the 12 volt ones. For the rest of the project I think I would prefer a more complete labeling like a picture of the tip and etc. You might however have a viable idea here. Maybe white electricians tape on the handle would be the way to go for producing a canvas upon which to draw the label?
From contributor J:
I haven't tried it on rubber, but liquid white out is amazingly durable.
From contributor Y:
I took a tip from electrician�s screwdrivers - I use a sharp screw point to scratch in plastic, or your smallest U or V gouge in rubber to cut shallow grooves, and like ole-time scrimshaw rub in some white paint. Don't carve too deep on the rubber grip, or carve it on the back of the motor head. I like BIN white primer since it is formulated to stick to just about anything.
The symbol you scratch is the shape of the screwdriver tip. One x is a #1 Philips, two xx (overlapping like a '#' sign) is a #2 Philips , one straight line is a thin flat, two straight lines is a little thicker flat, a single outline square is a small square drive, double outline square, etc., you get the picture. Granted you can't change the symbol too often, maybe a little black paint, then carve a new symbol beside it. They only need to be 1/4" high to be easily seen.
From contributor S:
As I see it you are already using the answer. Use electricians tape. There are a lot of different colors available, just designate a different color for each application.
From contributor V:
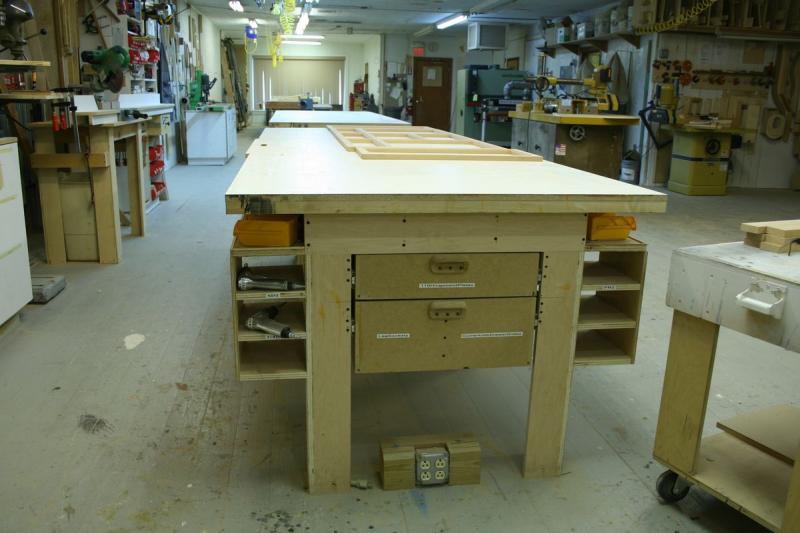
It seems to me that the only time that it isn�t self evident which tip is the drill is when they are placed in your storage board (if they are laying out on the assembly bench it is obvious which tip they contain just by looking at them). So in addition to actually labeling the drill, you may want to work on your storage area as well.
You could label the board where the drills are placed for storage and add spaces or dividers for different types of bits. I would keep all Vix bits together and sort by size (I use two different sizes regularly). If you use more than one size Phillips bit, these would also be stored together, otherwise I would store all my driver bits together (in my case I use a #2 phillips bit and a #2 robertson, or square drive, bit for just about 99% of my fasteners). Then I would have a place for unusual bits such as the countersinks and special sized drills like a 5mm bit. As long as the drills are returned to the proper place your guys will know exactly which drill has which bit by its location and also by its label. You might also try spray paint on the back of the drills to label them.
From contributor P:
Your guys really can't tell just by looking at them? I agree that storing them with the bits visible would help. Alternate: enlarge the holster board by 100% so the drills aren't so crowded. Outline each holster hole with the correct color tape, then hot glue an example of the correct tip with the proper label (large, nicely printed label) to the wall above the holster. Eventually they will learn what is what, and this also makes returning the right drill to the right place idiot proof.
From contributor T:
These are some really good ideas. I hadn't really thought about standardizing locations for the drills. When you think about it a bit it does make sense to always know the vix bit is on the left, especially when you are approaching it from a distance. A quick glance will tell you whether it is where it's supposed to be or not. If it is not in the holster you can immediately start scanning the area around the work zone. These holster areas really do need to be concise because there are several of them around the shop and the storage spaces with close proximity to where they are needed are also somewhat concise.
I think I am going to experiment with a combination of color, labels and standardized locations. This is part of a 5S program. I neglected to photograph the sustain part. The drill motors that currently have colored tape on the handle also have the specific bit fused to the chuck with colored electrician tape. The tips are still changeable but you have to want to change them bad enough to break out a utility knife. This usually ensures the tip will stay where you want it when you want it there.
From contributor D:
Put you labels on velcro strips. That way if you change drills for any reason you can also change labels.
From the original questioner:
Velcro is a good idea. Woody recommended finding a self adhesive label with really aggressive glue. As I recall, velcro starts out with some really powerful glue.
From contributor T:
You've a liking for color coding. You might want to start hiring more women. 5 to 10% of males (one claim suggested some limits in white males up to 20%) but only 1% of females have color blindness issues. I'd think an icon of some sort might be better anyway.
"The drill motors that currently have colored tape on the handle also have the specific bit fused to the chuck with colored electrician tape." Do you handcuff assemblers to the bench too?
From the original questioner:
Handcuffing assemblers to the bench would be too restrictive. The lean approach is an "invisible fence" around the district. You can get these with a built-in audible kanban to signal when you are getting too close to the fence. It's actually more humane than handcuffs, (after you get used to it, of course).
From contributor C:
Since you're into colors, you can get VetWrap bandages in a multitude of bright, pretty colors at any good vet supply store. You could draw on it with a marker, you can remove it when you want to change it, you gain some non slip feature, and you add color to your life all at the same time.
From contributor K:
Modify what you have. Color code a strip across the gun holder with the proper bit displayed with a printout on it, then put just the coordinating color tape on the gun. Just keep like colors/bits next to each other.
From contributor G:
Joel is correct. Color blindness is probably way more common than you think. You may have color blind employees and not even know it. Those of us who are color blind don't make a habit of letting everyone around us know about it. Maybe we're embarrassed, indifferent or afraid to let others know. Either way I don't think color coding is the way to go.
From contributor M:
Heat a driver tip and press it into the plastic on the back. Then it�s branded.
From contributor T:
Attach the replacement to the back.
From contributor Z:
A lot of good suggestions here, but I want to know how you keep track of all the batteries and how many drills or employees you have. I am presently working on my own, but have had up to four employees and keeping track of which batteries are charged can be a challenge. I tried the Fastcap go/nogo red and green velcro buttons, but most of them were lost in a week. Although i keep a separate installation box with drills and batteries, inevitably they would be removed and we would get to the install with three drills, and several batteries that were all drained. I use the Bosch lithium�s in the shop now as they are really light and recharge in 30 minutes. Primecell has been my best source for rebuilding the batteries. You can get square drive 5/8 screws as well as panheads from quickscrews or hardware resources.
From contributor O:
Liquid "white out" works very well. You can even get it in a "correction pen" which makes it easy to write with.
From contributor M:
Don't use electrical tape on the handles, because when it gets hot out they get sticky. The next thing I have to say is location, location, location. If all the spots for drills are usually filled, then you should be putting a drill back where it belongs. As you said, Phillips can always start from the right, etc. I am assuming you are doing all of this to speed things up. If you have to look at the tip of the drill each time you go to use it, then you are defeating the purpose of having a system. Color can and does serve well, so if you can come up with a way to paint that doesn't wear off, maybe that�s the way to go.
From the original questioner:
I hadn't thought about electrical tape getting gummy when it gets warm. The battery drill stations are part of shadow board concept I want to standardize around my shop. It's more than a minute saver, it's a momentum issue. This is what I am thinking about for drill bit icons: If anybody can add to or improve this idea I would sure like to hear it.
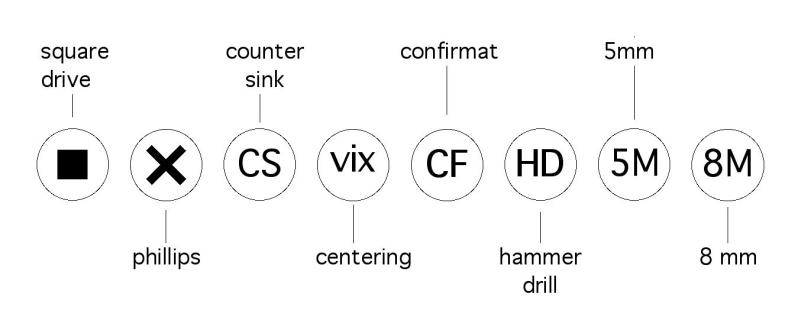
Click here for higher quality, full size image
Sean Benetin
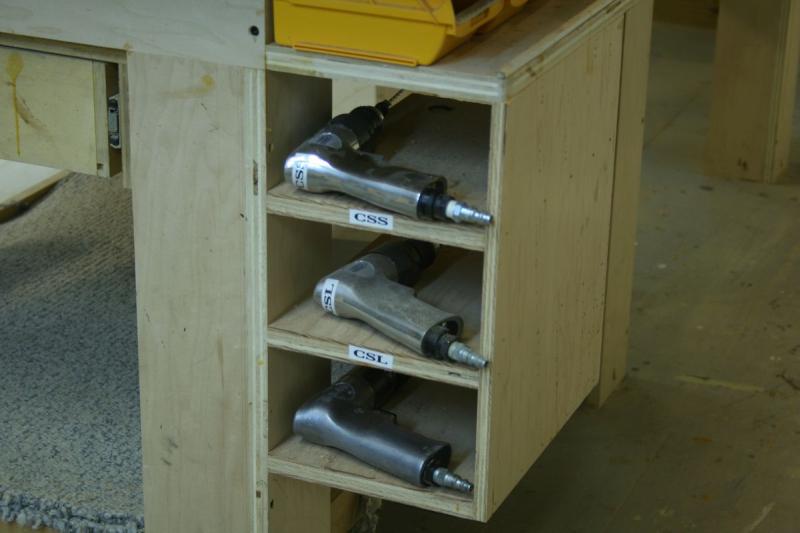
From contributor B:
CSS-Counter Sink Short
CSL-Counter sink Long
SD1-Square Drive #1
SD2-Square Drive #2
PH1- Phillips #1
PH2-Phillips#2
1/4d- 1/4" Brad point Drill
PS-Pocket Screw
Unlabeled=universal/special
Click here for higher quality, full size image
Each bit at each station has dedicated gun setup for whatever operation is being done. Air coils above benches along with task specific hardware.
Click here for higher quality, full size image
From contributor W:
Since all of these come with a quick change end set up all of the drills with a quick change chuck. Line up all of the bits face up in front of the station in rows.
From contributor B:
Why don't you use a quick change chuck and have one drill? Or have two a drill and a driver? You have lots of drills for efficiency but there are so many it is inefficient.
From contributor T:
My drill storage board is up high enough I can see what bit, drill, countersink bit that are in the drills. I run about five drills usually. I don't like marking or stickering my tools.