Reasons to Dado Face Frames
Stiff structure, ease of assembly, and clean joints are all good reasons to dado face frames to accept carcase edges. February 26, 2007
Question
What advantages are there to dadoing your cabinet sides into your face frames? Is it to help with alignment when applying them? I don't see where it adds any significant amount of strength that would warrant the extra effort.
Forum Responses
(Cabinetmaking Forum)
From contributor J:
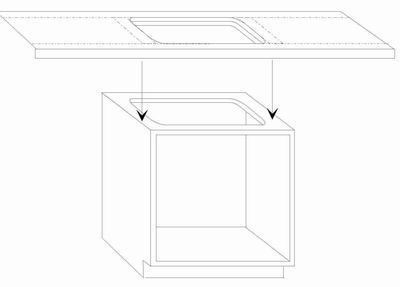
I dado the stiles only. As you mentioned, it really helps with alignment of the case sides. Also, if the job will have finished plywood ends, I cut the dado 1/4" wider so the plywood can slide into the dado. That makes a nice clean end that doesn't have a ragged plywood edge butting up to the back of the frame. The alignment and the finished end panels, in my opinion, make it worth the extra effort. I have a dedicated router table that I use to cut the dados. I'd like to get a table saw for the same purpose.
From contributor X:
In my opinion, it's to hide the crack if by chance the face frame pulls away from the finished end and to allow for some rigidity in the cabinet. Next reason is to align the face frame with the cabinet.
From contributor H:
For alignment, strength, and to hide any cracks from the frame pulling away from the box. We dado the frames for sides and shelves. The sides are inset 1/4" from the edge of the frame. We have a router table just for this purpose, although I would like to get a table saw with a power feeder to cut the dados in the stiles and then use the router just for the rails.
By doing this, we're able to assemble very quickly and easily. Think more of attaching the box piece by piece to the frame instead of the frame to the box. We start with the frame face down on the assembly bench and run a bead of glue around all the dados/grooves. Then we take one side, place it in the frame and staple from the outside (at an angle) into the frame. I had to modify our staple guns in order to do this, as the guards wouldn't allow it to fit up into the corner there. Do the same for the other side. The sides are also dadoed for the shelves, so just slip the shelves into their dadoes and staple through the sides into the shelves. On an upper cabinet, the top shelf can be stapled into the frame the same way as the sides. On the bottom shelves, and any shelves that are flush with the frame, we will shoot a couple of small pin nails through the frame into the shelf, mainly to hold it in place until the glue dries (these are easily filled with a bit of color putty, and can rarely be noticed).
After the sides and shelves are in, it's just adding the nailers and back and toe kick if it's a base. Cabinet interiors are 1/2" melamine, so we cut the dadoes with a 17/32 cutter so they slip together nicely.
For finished ends, we just glue on an 1/8" skin with spray-on contact cement. The only thing shot directly through the frame are the 2 or 3 brads for the bottom shelf. No clamps, no headaches trying to align anything, it's strong, and it looks great.
From contributor D:
If you are using 3/4" ply, are you using a 3/4" dado? I've done dados on 3/4" in which I dado out the stiles and rails with 1/4" router bit then mill the ply down to 1/4" tongue and assemble as you suggested. It works well for alignment but I did have one instance where a small tweak cracked the face frame. This was done with a CMT matched router bit set. Just curious if you are dadoing 3/4".
From contributor J:
Yes, the dado is 3/4" wide and 1/4" deep. Actually, the dado is 23/32". I use the router bits for undersized plywood. As I mentioned above, if it's a finished end, the dado is wider so the plywood skin can slide into the stile.
This is the most headache free way I've found to build framed cabinets. The dados really help me. I haven't clamped anything in ages. I finish my frames detached and use 3/4" pre-finished ply for my case work. I pocket screw everything together that I can: case sides to the frames; tops and decks to the rails and to the backs. (I use 1/2" backs.) Everything indexes off those dados.
From contributor Y:
Use a 1/2" dado. Cut a 1/4" rabbet out of the 3/4". One cut and you're done. No trying to figure out center or anything like that. If you use 1/2" non-exposed sides, the same dado will work for all of your cuts. You'll have a 1/4" scribe on the non-exposed ends and have a nice flush fit on the 3/4" exposed ends.
From contributor U:
I use a tongue and groove system. Takes a bit more time, but it sure works nice. I also Kreg jig where the cabinet sides are not exposed. It definitely helps line up the face frame and with my system, when I cut the tongue, depending on which way I flip the plywood for the box, I can set it to be flush with the face frame or flip it and have an 1/8 or whatever reveal without moving the router. Works awesome.
From contributor R:
The older I get, the more 1/2'' I use. If I use1/2'' box, I dado everything. I got some 3/4'' the other day for 18.00 per sheet. I believe with 3/4'' plywood all you need to do is glue and clamp to face frame. The last cabinet was 12ft long wall cab with 2 shelves 100% 3/4'' construction. We loaded it up lifting on the face frame, and after a 60 mile rough ride, it was fine. The dado helps the glue not run all over as it stays in the groove, helps in alignment, but makes box dimensions more critical. I can build a cabinet that will last 100 years if I want to, but that would not be good for the cabinet business as a whole. Make them last 20-30 years and they have forgotten who built them, and will need new cabinets from the cabinet man.