Reproducing a Grooved Vanity Door
Thoughts on imitating the look of a reeded door panel (made with tambour mat screening in a hinged door panel). September 23, 2006
Question
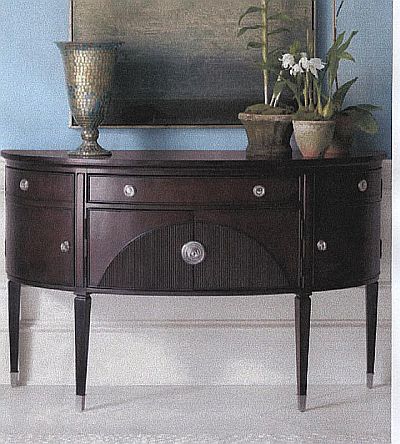
In this photo, there's a kind of semicircle on the two middle doors that has a grooved sort of texture to it. We've been asked to design and build a vanity that incorporates this texture, or something similar. Does anyone have any ideas on how best to do this?
Click here for full size image
Forum Responses
(Cabinetmaking Forum)
From contributor A:
It�s hard to tell by looking at the picture if the grooves are regular or random. One way to do grooves is with the Festool planer and a special planer head. If it's a heavy raised grain effect, you can sandblast the wood, which blows out the soft wood and leaves ridges where the grain lines are.
From contributor B:
Vertical grained wood and a wire wheel will do it also.
From contributor C:
This looks to me like there's reed inserted on those doors � sea grass or bamboo type texture pinned inside that trim molding.
From contributor D:
I believe that is a heavy brushed finish. I have seen timber framers do it as well as outdoor furniture people as well. I know Makita makes a specialty tool just for this application. I have seen it, but do not know what it is called. It has a special random abrasive wire brush that creates the texture. It may not be worth buying if you only have one piece to do. Maybe a hand scraper, spokeshave or a handplane with a custom blade could do the trick for just one vanity.
From the original questioner:
Thanks for the input! I hadn't thought about sandblasting. It would have to be a pretty large-grained cedar or something like that to produce the grooves as deep and wide as the picture. The funny thing is, I've done samples of VG fir that I wire wheeled the bejeezus out of, but I didn't even think about that.
From contributor E:
I may be wrong or the memory banks may be faulty but this reeded surface is in many original examples of this style of sideboard. It would in fact be a tambour door, not unlike the lid of a roll top desk and would be composed of moulded (reeded) strips adhered on to a heavy fabric (canvas) backing and in turn running in a groove in both top and bottom of the opening thus providing flexible slide away doors that disappear into the back of the sideboard. Look for someone who supplies tambour components for a source of supply.
From contributor F:
The picture you posted is a 1930 half moon sideboard made in Grand Rapids, MI. The doors and drawers have a cockbead edge and the front center doors have a tambour inset that is part of the door itself, and then trimmed with a half round across where the solid mahogany and tambour meet. The tambour can be easily made with 1/2 round material, I would guess 3/16 to 1/4". The legs are notorious for snapping off where they meet the carcass. I would make the leg from top to bottom all in one. Laminate two pieces of mahogany with a solid 5/8" (minimum) oak dowel center. Advise the installer to screw the piece to the wall in at least 4 places with #8 x 2-1/2" screws.
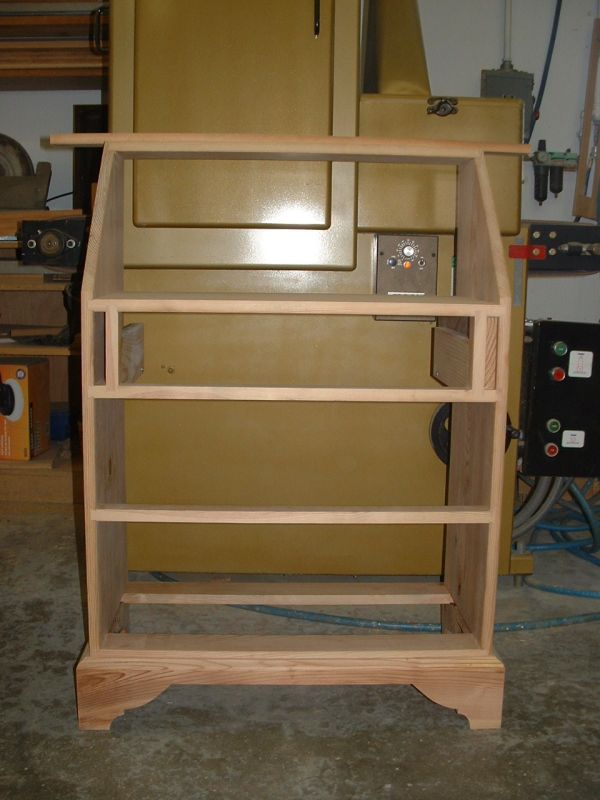
From the original questioner:
I just met with the client. I had prepared a sample of VG fir, aggressively wire-wheeled, with an espresso-colored finish. It looked great, but I thought it was probably rougher - more organic - than she was looking for. But the vanity we're making is actually more of a contemporary rectangular pedestal, with brushed stainless wrapping the top and bottom. She decided that contrast would look nice, and I agreed. So that's how we're proceeding.