Router Table and Lift

Designs and ideas for a smoothly functioning router workstation. December 9, 2004

Question
I find myself using my router table more often lately (mainly raised panel doors). I have a Porter-Cable 7519 (3.25HP, variable speed, plunge) router. I also purchased the PC aluminum table. Finally, I bought the adapter kit that allows me to adjust the router height with a knob from under the table (as long as I hold the plunge arm up).

I've noticed several issues with the table.
1) The aluminum leaves marks on the wood, which then require subsequent sanding.
2) The fence has a dust collector, but the majority of the sawdust seems to dump out under the table onto the floor and all over my shop.
3) It is very hard to get the wrenches in either over, under, or over-and-under the table to change bits.
4) I would like a slightly larger table.
5) The vertical adjustment with the adapter knob is quite awkward.

I've looked at the Mast-R-Lift and the Router-Lift so far. I also noted that the base on my router cannot be removed from the router itself. (The base on my Makita comes off with no problem!) Is a new router purchase necessary?

Yes, I know that a shaper might be a better choice, but it is not an option at this time for a number of reasons.

Does anyone have suggestions? The amount of production time I am losing due to bit changes and resanding is not conducive to profit-making.

Forum Responses
From contributor S:


I built a 3' x 4' router table with an MDF top. Bought a router plate to drop my PC in. Works great for RPs. The doors slide nicely on the MDF, and the large table means I don't have to worry about my panels falling off. I also installed a couple of t-tracks and made up a quickie plywood fence. On top of the fence I mounted two Board Buddies to keep the material down.

I looked at router tables and thought that they were both too small and too expensive for what they were.

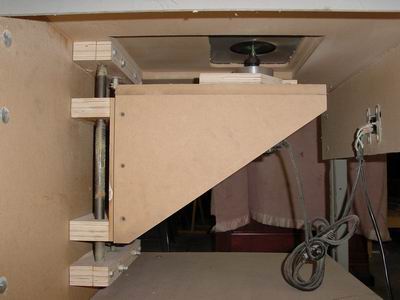
Oh, I forgot, I also made a router lift from a Shopnotes magazine issue a few months back. It works great.


From contributor G:
I built my own router table and use MDF with plastic lam on each side to keep it from warping. I use a 3.25hp Dewalt plunge router. No problems. Build your own dust collection system using your shop vac and some fittings from Home Depot. Works great. Changing bits is no problem - lift out the router, change bits and go to work.


From contributor S:
Here is a picture of my table, FYI. I found the bench table legs at an auction for 2.50 each. Other than that, it is MDF. The top is two layers with a continuous hinge across the back so the upper layer can hinge up. Seemed like a good idea at the time, but I have never had to raise it.

Here is another view of the back. You can see the hinge I was talking about. The hole in the table is for raising and lowering the router. I can raise it plenty high enough to change the bits from the top.

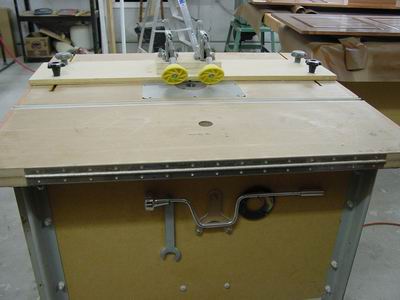
Last pic. This is the router raiser that I mentioned from Shopnotes. Works great. I have used this for about a year and have never removed the router. Built the entire thing in a weekend.


From contributor K:
I don't know how much you paid for the PC table, but most out there are overpriced, like you said. If the marks you referred to look like pencil lead, you should use a paste wax on the table. If it's scratching your wood, you may have an issue with the insert being flush with the table.

I also built my own about 12 years ago. I also used MDF, but built a 4" high fence that slides on T tracks. I bought a phenolic insert for about $30. I also built a nice storage unit underneath for bits/jigs, etc. Building your own is the way to go. I bought a VS Freud 3 1/4 hp plunge router for $199 (I think it's an E2000 and still sells for the same 12 years later). I have never had a problem with it and it was half the price of anything on the market with that hp at the time. Anyway, the plunge feature makes it easier (space wise) to get a wrench underneath to change bits. I've seen stuff like in the pictures above, and these days it's all the rage to be able to remove the whole router for changes. I've never had the need to. In fact, I have never removed the router in 12 years! In any event, you gotta build your own, man.


From the original questioner:
Update: After taking my router out of the table this morning, I determined that I have a Porter-Cable 7539 (not 7519 as I thought) with an integral plunge mechanism. That means I cannot remove the base and use the Mast-R-Lift router lift.

When I replace my current setup, I will definitely be building my own table and cabinet. That will give me a larger top, customized dust collection, and built-in storage for router bits. I was trying to save some time and trouble by using an existing router lift and one of my existing routers. However, after taking a closer look at my 7539, I do not believe that I can raise the router high enough to easily change large bits. Even if I use an offset wrench for the bottom nut (closest to the router motor), there is very little room around a raised panel bit. A 7518 3.25HP VS Fixed Base is probably the way to go.

Contributor K, the paste wax took care of the marking problem. Thank you. Also, waxing the threads on my existing height adjustment mechanism greatly improved the ease of operation. I'm hoping that the wax lubricant will not attract lots of dust.

Contributor G, thanks for the reminder to laminate both sides of the table top.

Contributor S, thanks for the pictures. You've given me some ideas. By the way, I could not find the ShopNotes issue you mentioned. Their website does not list very recent back issues. Anyway, I think your pictures will suffice.


From contributor S:
I'm sorry, I should have double checked first. It was in American Woodworker, March 2004, issue 106. I made a couple of modifications after I made it. The screw on tee-nuts on the top and bottom of the lower rack are shown as screwed in from each side. They worked loose, so I through-bolted them to each other, no problem since. Also, the acorn nut shown on top of the rod did not work. I used regular nuts and drilled and pinned through each. There is a place called Metal Supermarket - they're franchised all over - that sells small lots of metal. I bought the two rods for $3.00 each. It is designed to accommodate dust collection, but I did not follow through on that part. Wish I did. Make sure the hole for the router clamp is not oversized too much or your router will move a little.


From contributor J:
How much did you folks pay for the 'weekend project' router tables that all of you like so much? After you paid for the router, router lift , and other material, you put in a weekend or so building it, why not just buy a shaper? Save time and money! This isn't taking anything away from your equipment. I'm just curious why not call it a day and buy the shaper and move on to the business of business.


From contributor S:
I actually enjoyed building it. I had a slow weekend, so why not?


From contributor K:
First of all, I built my table out of scraps. Paid about $30 for the insert. I built mine in one day. Presumptuous of you to assume that we don't own shapers, as I do own one. The router table got me through a few years when I didn't have enough money for a shaper and I still use it every day. Wouldn't trade it for anything. It is like owning two shapers, but I leave the heavy duty cutting to the shaper and lighter stuff to the router table. I made my share of RP's on the router table. I was so proud I had done so when watching Norm (the man, the myth, the legend) on TV one day when he announced a new way to make RP's using a router table. I'd already been doing it for about 5 years. Not too often you get the drop on that dude! :-)


From contributor S:
I too own a shaper. I use it for heavy stuff, but try to make some box joints or dovetails with it. There is a need for both in my shop.