Sink cutouts in post form tops
Woodworkers share their favorite methods. April 3, 2002
Question
Here's a situation I've encountered many times, and I'm fishing for other ways to tackle the chore:
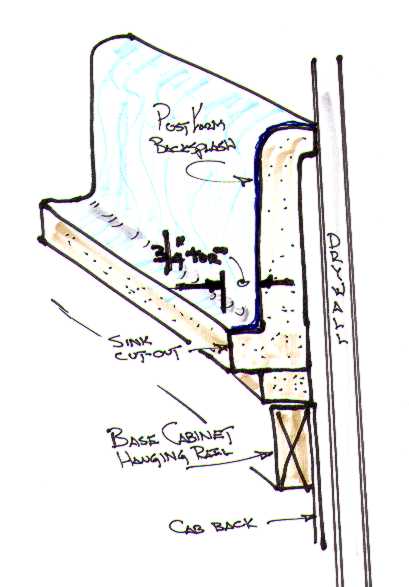
Standard kitchen scenario: postform top - double bowl stainless sink - 36" sink base. In this situation, I've always struggled with the sink cutout at the backsplash. There's only about 3/4 inch of counter left at the backsplash, and the backsplash is always crowding the saw so it can't be held level. Cutting from the backside is an option, but it means wrestling with the counter. I usually make do with a slightly beveled cut on the backsplash side, but was wondering if there's a trick I'm not aware of. Here's a sketch of what I'm trying to describe:
Forum Responses
We install miles of postformed counters and you're right, cutting sinks after they're installed is a pain. We try to cut sinks first with the counter turned upside down. If you have to cut sinkholes with counters in place, get a doorjamb saw. It's a circular saw that will allow you to make cuts right up to the back splash if you want. Up to 3/4" would be easy for this tool.
From the original questioner:
I've seen pictures of those saws, and they sure are scary looking. I think they may be made by FluSaw (or something like that). If I'm thinking of the same saw, it's basically a circular saw with a blade mounted outside of the guard.
I try to always make cutouts before I install tops. In the event that I would have to cut close to a splash, I would use my jigsaw as a bayonet saw (without the base plate). If it's a critical cut or I just can't get in close enough, I cut it as close as possible and then finish the cut with a grinder (a 36 grit sanding disk). I won't screw off the top until I have the sink and it's cut out first.
I agree with the above. We almost always cut the postform tops before final installation. Circular saw for the long cuts, then jigsaw out the corners.
From contributor R:
I always make the cutout after the top is installed. I use a Bosch jigsaw with a T119BO blade to make the cuts on the front and 2 sides. For the back cut next to the back splash I use the jigsaw with the same blade and a Bosch close quarter cutting guide installed. I have done it this way for the past 8 years. I like cutting after the top is installed because the sink can be placed exactly where it goes and I can trace around the sink. There is no chance of a measuring error and the jigsaw works great.
From the original questioner:
Contributor R, your approach sounds interesting. Can you explain the close quarter cutting attachment? I use a top handle Bosch, and it's the side clearance of the barrel/armature housing that makes problems. Is there something I'm missing? How does the attachment sidestep this issue of barrel clearance during the cut?
From contributor R:
The close quarter attachment is from Bosch. The part number is 2 608 135 048 for the 1581 and 1582 saws. There is another model for other Bosch saws. The attachment replaces the standard foot plate. When the attachment is installed, the foot plate is 2 1/4" farther from the saw and is about 5/8" wide.
From the original questioner:
My best recollection is that the body of the saw gets in the way (a small footprint table wouldn't help there). I haven't pulled out the saw yet, but if what you're saying is that the body of the saw won't crowd out a cut 3/4 of an inch from the back splash, then I'll get it and check it out. Maybe I'm using an older/fatter model.
From contributor R:
The cut is made at a slight angle. The attachment foot plate is 2 1/4" below where the standard foot plate would be and is 5/8" wide. 5/16" on each side of the blade. The mounting plate on the attachment is 2" wide, 1" on each side of the blade. The saw sets up high enough so as not to cause a problem. With the 1" width of the mounting plate to one side of the blade setting 2 1/4" above the countertop and the cut 3/4" from the back splash, the cut would be angled approximately 7 degrees.
I haven't seen the need to cut tops after installation - assuming top dimensions are calculated with scribing in mind. If strength is an issue, rout all four corners from template in shop, leaving only 6-12 inches of straight cut left for job site - for the matter of stainless cutouts, rout the back stretch completely if possible. There's normally a little side to side movement for the sink to get it dead centered. I would be lost without a down-cutting Bosch. Although I think you would find that the back cut could be made with an up-cut blade from the bottom side with top installed.
While I agree that cutouts are best done before installation, the problem I sometimes have is clients who won't make their kitchen sink selection till after the cabs and countertops are installed. It used to be an ordeal for me to do the cutout after the tops were installed, but not anymore. I've found that Bosch's 'In-line' jigsaw (model #3294EVS) is the way to go. It'll easily cut up to within 3/8" from the back splash. I still use a 1-1/4" holesaw to do the back radius cutouts at the corners. No jigsaw I've found will navigate the back radiuses also. Bosch also offers a flush cutting powered handsaw that would do the cut as well. It seems to have plenty of potential for us cabinet installers. Also, I've found that the inline jig has many other uses in cabinet installations. The inline is basically a downscaled version of a reciprocating saw, but it's not as brutal and it's a lot gentler to use, especially on laminate c-tops because it won't mar or scratch the surface.
How about this? Cut as close as possible with jigsaw or whatever, then with a lipped straight edge, finish up using an offset router with a down-cut bit. I haven't done this before, but will the next opportunity I get.
From contributor P:
I use a sawsall with a metal cutting blade. It works rather well.
From the original questioner:
A long time ago I used a sawsall, and all I can remember is that the shoe of the saw was in the way, and I "free-handed" it, holding the saw well above the counter (the blade was long enough to still penetrate). I also remember that it was tough to keep the cut on course. How do you keep the shoe from getting in the way?
From contributor P:
Yes, you have to free hand it. With the shoe off the surface of the countertop I find that the blade has enough bend to it that you can angle the saw away from the back splash just enough and with a steady hand cut the back of the sink. If you're worried about rubbing the saw along the back splash, place a couple of layers of duct tape on the back splash. This will keep you from scratching it.
Why do you cut all the way to the back? We cut out so the bowl fits the hole, then drill the holes for the taps. This also helps hold down the sink. Lots of room for jigsaws.
From contributor L:
Before I make this cut I usually use a 1-1/2" hole saw to cut the four corners of my layout. I then make a rough cut as straight as possible and as close as possible to the splash, sometimes even using the splash as a guide. This gives you a parallel cut to your finish line and about 7/16" away. I make the other three cuts tangential to the outside edge of the four holes, then remove the excess. I now have enough space to use my router with a slot cutter to cut the back up to my finish line. I have a horseshoe 1-1/4 inch build up that easily attaches to the base of my router using longer screws. This in fact turns your router into a very fast flush cutting circular saw. Using the splash as a guide or base, the router will only allow you to go about 1-1/2 inches away from the remaining arc of the corner holes. After removing the strip left after the slot cutter, use a belt sander to remove the remaining corners. Sounds like a lot, but it's cut, cut, cut and sand. Depending on the job and the material, I sometimes lean the jigsaw and cut as close as I can to the line.
From the original questioner:
Contributor L, your router jig sounds very interesting and useful. I took a crack at a very quick sketch, and have included it below. Am I on the right track as far as illustrating what you describe? Am I right in thinking that the "flushness" of the cut is limited by the cutter wing arbor? I'd also be interested in hearing what type of slotting cutter you use.

From contributor L:
The sketch is pretty close to my first jig. The jig I use now for additional safety has a handle similar to the handle of a circular saw cut into it. This would be where you have the center screw. This jig is actually a one inch block sandwich to 3/16 plexi following the horse shoe, but with a smaller internal circle that forms a good gliding surface and a semi guard for the blade. The bottom ends of the horseshoe are not flat but have a small radius at each corner. The handle is not of much use in very tight situations. The arbor does extend about 3/16 beyond the blades, which means it's not a flush cutter but will get you very close. The blades are 1/4" and 1/8" approximately 2-1/2" in diameter. Unfortunately, I don't have a blade now and I am not sure who makes it.
The comments below were added after this Forum discussion was archived as a Knowledge Base article (add your comment).
Comment from contributor A:
For a really close straight cut near the splash back, how about using a biscuit joint slot cutter (Lamello type) to do the upper surface part of the cut? Quick, close and neat? The lower part could be hacked out in more brutal fashion and cleaned up with a router perpendicular to the splash back.
Comment from contributor D:
If you can find one, the old Craftsman scroll top jigsaw would cut within less than an inch by turning the head 90 degrees and pushing the saw sideways. The shoe and the head of the motor were about even in front of the blade. I personally never saw a need to leave less than 7/8 to 1 inch at the back of the cutout.
Comment from contributor M:
Find your center line and cut the sink from the bottom. I would suggest making a template for a standard double bowl screw or clamp it to the top and cut it with a router with a 1/16" guide.
Comment from contributor N:
I use a Bosch jigsaw to cut my sink cutouts after the top is installed. I make the front and side cuts, then I screw a block into the cutout on the right and left cuts to keep it from falling when I make my final cut. On the back cut I just take the baseplate off of my jigsaw and free-hand it. It works great.
Comment from contributor C:
In our operation, we never make the sink cutout before installation. This is critically important to ensure that the sink is centered on the cabinet to which it is being installed. Also, this policy gives our customer more time to shop for plumbing fixture and change her mind right up to the time of installation.
As for the cut-out, we use a 15/16" drill to make a hole at either the right or left front corner of the cut-out, then go cut from the hole to the right front and right side, then cut the left side and rear, in that order. In order to make a close rear cut, our Sabre saw has a narrow shoe.