Slabbing and Drying Big Logs
Preventing cracks in Monterey cypress. April 18, 2004
Question
I have some 6'bh x16' logs of Monterey cypress. I have been milling them into 6x6 and smaller. I am going to buy a slabbing attachment for my Lucas823. What's the best way to slab to prevent cracking? What is the most effective way of treating the slabs during drying? I'd hate to mess these timbers up.
Forum Responses
(Sawing and Drying Forum)
From contributor D:
I don't think you can prevent cracking.
From the original questioner:
I'm trying to make tabletops. The slabs are an average of 5' by 12' long. I will probably cut them 5 inches thick.
I was thinking of Anchorsealing the whole log except for the ends, air drying it for a year or so, then putting it in the solar kiln. Any thoughts?
From Gene Wengert, forum technical advisor
I am a little confused, as you talk about drying slabs, which are rounded on one face and flat sawn on the other, and then talk about messing up these timbers. Do you want to know how to dry slabs or how to dry 6x6 timbers or how to dry 4/4 or 8/4? In any case, you can dry them without cracking if you dry them slow enough and very carefully.
From the original questioner:
I want to slab these large cypress for tables, and I don't want to muff them up. What's the BMP for slabbing, drying and processing? I will be making slab tables. End grain slabs and long grain slabs. I have 6 over 5 foot diameter x 12-16 foot logs.
From contributor I:
That Monterey cypress makes good table slabs. I think you should Anchorseal just the ends of the logs, as that is where you will most likely get checking. Slow air drying is the best plan. Once the slab is air dried, it should be okay to finish off in a solar kiln. Avoid having the pith of the log in a slab or it will split for sure. I have cut a few 3" thick x 3ft wide slabs on my Peterson by rolling the logs over and they are currently drying in an open shed. Apart from some minor checking on the ends, they look good.
I plan to make a clip-on slabber for my mill with a large chainsaw / ripping chain. My idea is to be able to open up the log with swingblade and take a few boards off, then switch to slabbing. Then as I get down to the pith, go back to boards around the heart. A few more slabs, then last boards from the bottom slab.
Oh... and check the weight of those slabs. A 3" slab of that size is a 4 man lift when it's green!
From the original questioner:
Years ago I learned why God gave man the brains to invent forklifts, so I bought a loader to lift what I couldn't. The wood is lovely. I'll try to post some pictures of it later. What about bug proof deck sealer for the faces?
From contributor B:
I would coat the ends with Anchorseal and leave the faces open/stickered and air dry slow.
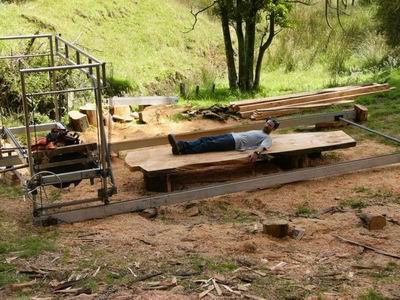
From contributor I:
This is one of the slabs. My buddy is having a rest on it to give an idea of size.
From contributor N:
Nice looking slab. What's the grain like?
From Gene Wengert, forum technical advisor:
Slow drying is critical for these slabs. They will often warp a little bit. I would not try to dry them with the bark on. End coating gets my vote. I would put a little end coating in the area around any knots, too (as well as on the knots). I would spray on a fungicide to avoid blue stain... Not all fungicides will kill blue stain fungi, so you need one approved for wood. If you really want the best quality, you will not trust these to air drying, but will put them in a kiln that is cool and humid. A DH kiln is one possibility, but plan on a long residence time.
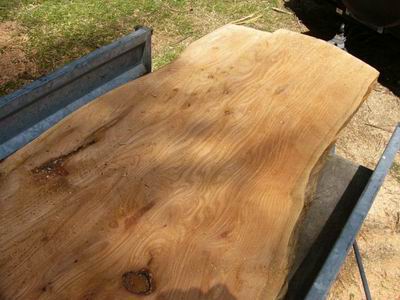
From contributor I:
This is a closeup of the slab which shows the grain. As you can see, it's not perfect, has a large knot that will probably fall out, and some ingrown bark which is common on these trees. Some may say that these add character ;)
I have some smaller slabs which are much better quality, only a few small tight knots.
Slow drying is the best idea, but macrocarpa seems to be fairly resistant to fungus and stain. It is commonly used for outdoor furniture and fences and will last for years. I would expect a slab like that to crack badly if it was left in the sun, however.
From contributor N:
The grain looks superb to me, especially the knots, and is the kind of grain my customers expect from me. I can't be doing with tight/straight/perfect wood - give me second or top cut every day and I'll be happy :-)
From contributor S:
Stay away from the pith. I have milled a bit of Monterey cypress. It is one of my favorites. The trees can vary quite a bit from each other. The wood is brittle and will tear out or split without much provocation. If it does split, you can always fill it, and claim it has character. The luster is beautiful with an oil finish.
From the original questioner:
Thank you all for your info. I have started the budget for the slabber and am looking at the Bailey's dehumidification kiln. Should be able to squeeze a PH260 Logosol planer out of the deal.
I have no electrical service, so I have to figure how to run all this with a diesel generator.
I wonder if I can use hot coolant through a heat exchanger to heat the kiln?
Okay, back to the drawing board. Wonder what other types of kilns would work?
From the original questioner:
Would it help if I relieved the bottom of the slabs prior to drying? Thinking of skil saw cut 1.5 inches deep in the back of the 3.5" slab� Would this reduce movement? An old timer told me to relieve the backs of flooring planks to prevent cupping. What do you think?
From contributor N:
Don't slice into the back until you dry. Most things above 2" I sticker at 18". If the grain is wild I come down to 12" spacings with a lot of weight. I use heavy duty ratchet straps every two feet (overkill maybe, but normally flat boards). Start a detailed kiln log (including air drying). After a few loads it becomes second nature, but it's more than handy for sorting out problems when you got the info.
From contributor P:
I also have a Peterson. I got an Alaskan mill 42" bar, open the log up with the Peterson, then slab down a way. Back to the Peterson, past the center stuff, then when ready just put the Alaskan back on top of the flat surface.