Question
This value stream diagram is a graphic representation of all of your shop activities. Every single icon on this page represents a cost. (Notice how the meandering line at Station 3 looks just as significant as a purposeful path when viewed from this lens.)
Green dots represent the things you actually do to change the shape or color of the board. These are the only activities that the customer actually pays for.
Red represents a cart. Every time you have a cart in the system represents two times that you have to handle the board. You have to put it onto the cart and you have to take it off the cart. (If you want to test the significance of this waste, see how long it takes you to pick up and put down 10 boards.)
Arrows represent distance between work stations. The farther you have to travel between work stations, the longer things will take to get done. Arrows also represent aisle ways. This is real estate that you pay for but could probably better be used to hold a machine that will make you money.
About three years ago Modern Woodworking Magazine ran an article on a company in Idaho called Woodland Furniture. This company was growing 30% a year and was faced with having to relocate to a bigger building in order to keep up with their customer�s demand. They couldn�t, however, afford the outlay and disruption this would entail.
They brought in several gurus who advocated all kinds of solutions, but one guy recommended a Lean Thinking approach. He reasoned that at their current rate of growth, they could probably stay in the same building another 5 years.
Prior to implementing a pull system, a piece of furniture took 4 to 6 weeks to get through the pipeline and had to travel 1.3 miles to do it. Today they can ship that same piece of furniture in 3 to 4 days and it only has to travel 1000 feet to make all the steps happen.
A value stream map effectively helped them make a small building bigger. This not only lowered their macro costs, but it impacted the micro ones as well. They made more money per piece of furniture and were able to ship and invoice quicker.
Below is a before and after comparison of shop flow in my building. Notice how the first value stream map sort of looks like a plate of spaghetti? It used to be a lot worse.
Compare the differences in transport costs simply by moving the drawer box station closer to the saw. We were also able, during this kaizen, to relocate the edgesander so that it was in a more direct path between slide saw and door hanging. The cost of door hanging itself was also reduced because we didn't have to move the wall cabinets so far in order to hang the doors on them. (We have a special rack for plumbing and leveling the box prior to door installation.)
An unintended benefit to consolidation was a massive increase in contiguous floor space for storing completed kitchens. Storage has become a bigger issue as we get quicker at building.
This is about the fifth kaizen we have undertaken in the last two years. The building we are in has a lot of structural impediments to good flow, so we are somewhat limited in our goal for optimum layout. We are working now on a way to make the outfeed for our S4S planer feed more directly to the Tigerstop chop station.
A good book about the concept of value stream mapping is Jim Womack's "Lean Thinking." Another one is "The Lean Manufacturing Challenge" by Kiyoshi Suzaki. Suzaki's book talks more about the actual composition of work stations within a cell and has more concrete examples to help give you clues. He also talks a lot about fixturing and foolproofing jigs.

Forum Responses
(Business and Management Forum)
From contributor S:
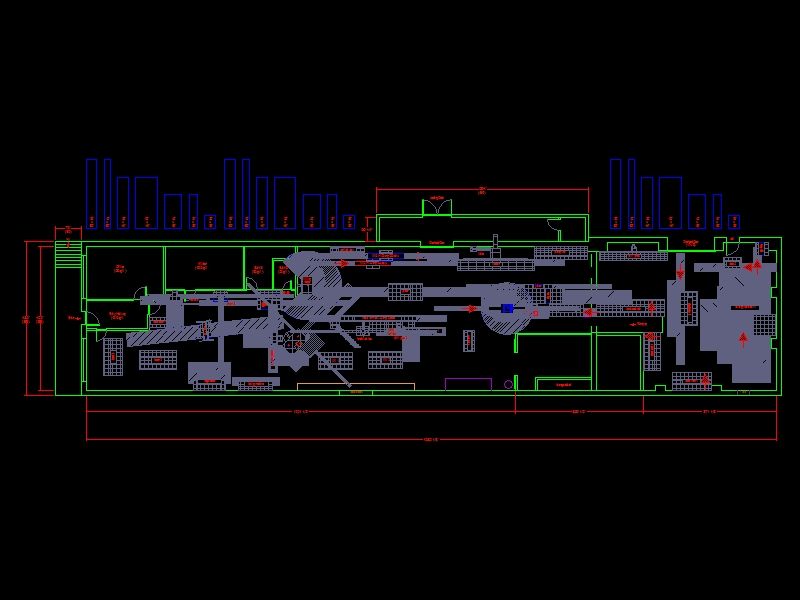
This is a jpg of one early vision we had of shop layout that we used when creating a value stream map. The grids represent fixed units (machines, tables, etc.). Grey area represented usage areas. The blue units above shop represented scaled size of parts running through shop. We kept finding ways to improve so instead of flow on computer, each unit was placed on a separate sheet, cut out and plotted on scaled floor plan by hand. It was very easy to rearrange the shop with cutouts. In addition to this, I created several spreadsheets that broke down each process and work cell in the shop. By plotting in scale it was easy to identify areas where parts were difficult to move. It also showed wasted steps.
We were able to add almost 50% more machinery and workstations than we had right off the bat. Every single big bench we had has been thrown out now. In its place are smaller "pods" with dedicated purpose. There is more open floor space and projects fly through the shop. Still making changes and improvements, leaving more room for dedicated machines. It is funny... The more we add, the more room we acquire. Still nowhere near close to being finished.
When mapping shop out, remember to think in 3d. Drawing on paper makes it tough to decipher which stations can be overlapped in height. We were able to jamb a bunch of machines together, saving huge amounts of floor space, when we actually started to move things around. Still wish we had 10k square foot. The narrow, long layout does not lend itself to the best usage, but we do what we can with what we have. Location of loading docks, spray room and two different levels didn't help, either.
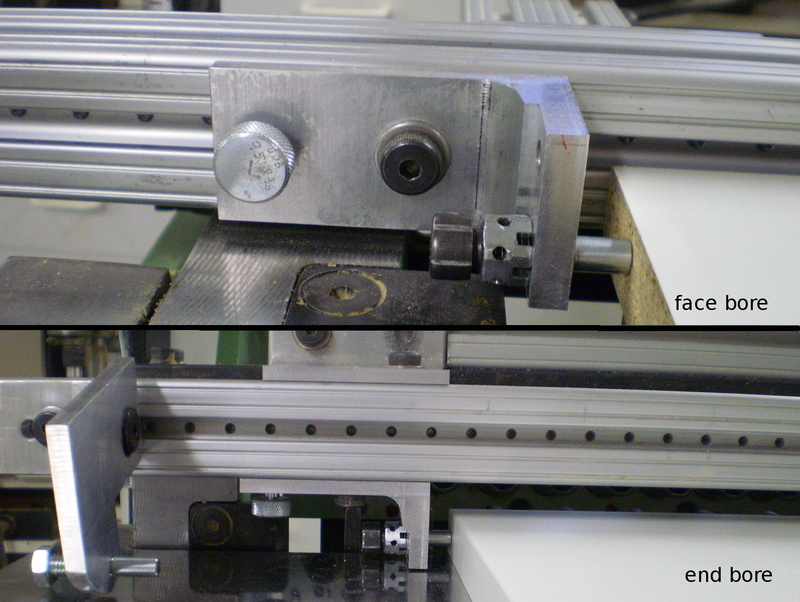
The scissor-lift work benches have also been a real estate creator in that they give you high and low work benches within the same footprint. Ours have wheels on one end and a dolly on the other. We also make a lot of use of overlapping machines. In several locations, product from one machine passes over a table for the next.
Almost all of our machinery is on a pallet that has been designed to approach from all sides with a pallet jack. This has eliminated the "monument" from our work flow. We no longer optimize machinery layout for worst case scenario. On those rare occasions when there isn't enough distance around a machine, we merely move the machine. The pallet jack cost about $400.
The comment you made about "the more machinery we add, the more space we create," has always amazed me. Each time we add a machine, we do a consolidation, and the net impact has always been more contiguous open concrete.
We are about to propel this concept with some custom machinery. Our drawer bottoms are all 1/2 inch thick plywood with 1/4 inch rabbets. I have a machine in mind that will remove one tablesaw, one shaper and two powerfeeders from this district. The new machine will consume an additional 6 x 30 sq inches of floor space over and above the bench we currently use to assemble the drawer.
We haven't even discussed the implications of consolidating work zones on training on supervision. Better training and choreography will raise profits enough that there will be more to spread around.
I'm thinking that I will soon be able to raise wages by half and decrease costs by half. This seems like kind of an outrageous claim, but I will offer an example. It used to take our most experienced guy 45 minutes to change shaper profiles from an ogee pattern to an ovolo. Matching male-female cutterheads used to be the most complicated setup we had. This can now be done in under two minutes by a complete neophyte. The only difference is that we need any test boards and we are always more accurate.
In the past couple of years we have been migrating to retail only. Sometimes there will be a contractor involved but we always work out the final details direct with the end user. We no longer allow someone to stand between us and the client.
The drawer we are selling these days is made out of pre-finished apple ply and pocket screwed together. Our emphasis is on the exterior of the cabinet, the part the customers really care about. Apple ply arrives pre-finished for about $25 per 12 x 96 rip. Once we are done fabricating, it goes into the cabinet, no side trip to the finish shop. It's not the finest drawer I have ever seen, but then again I have not yet, to my knowledge, lost a sale over it.
I don't want this to turn into an outsource discussion, but I would like to make one point. Unless you do drawers for a living, you can not beat price and product by outsourcing. We do a lot in house. Turnings, carvings, and drawers are outsourced. So I ask what formula you use to justify doing it in house? Which of these two criteria does it meet; higher quality product for the same price, or lower production costs?