Question
I've done some finishing with washcoats before, but now I've got a large cherry kitchen coming up and I have a couple of questions.
I'll be using my vinyl sealer cut 1-2. I know how much of the washcoat that is sprayed on affects the absorption of the stain. How do you do it? Do you normally put on a good wet coat or just a quick pass? I can spray the washcoat on with a 1.3 or 1.5 tip. Which would you recommend?
What do I have to watch out for in order to get it even on a large job like this?
Forum Responses
From contributor D:
We make our washcoats four parts thinner, one part vinyl sealer. We also add dyes into our washcoat to shade the wood as needed before staining.
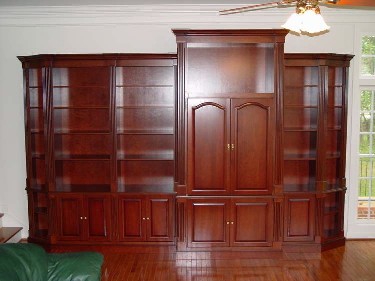
What finish are you planning on the cherry kitchen? Depending on the finish and products you use, you may or may not need a washcoat in the schedule. The cherry entertainment center below is typical of the look that's often requested in my area - no washcoat is involved though glaze and toner are.
I'm rather new to dyes and have had some problems with not getting the whole piece to be totally consistent. Sometimes I'll get lap marks. I've tried to turn down the pressure, widen my pattern, etc, but with not much luck.
The company who has started doing all of my finish work says part of it is experience.
- Sand to 150
- Spray and wipe ML Campbell's WoodSong II cherry stain. The color "Traditional Cherry" is a little redder.
- After an hour, one coat of vinyl sealer. Let dry and sand smooth. Remove the dust.
In the picture below, the cabinet on the left is stain only and the one on the right is glazed and toned. The glazing and toning adds a lot to the finish.

I use either a gun connected to a pot or a cup gun to spray dyes and toners. I don't know what pressure I use; I set my supply pressure to 80 PSI and control the air at the gun with a "cheater valve." The valve controls the amount of air to the gun but doesn't display a pressure. I just adjust it until I get good atomization for the current fan width with minimal overspray.
For dyes and toners, I have the settings a little lower than I would for a topcoat and move a little slower and more carefully to ensure even coverage. It does take some practice.
Here's a gun I have connected to a pot showing the cheater valve.
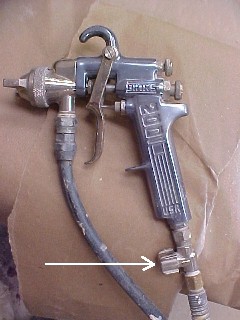
Connected to a pot, I've had good success with the gun in a variety of situations ranging from finely controlled patterns to wide open production panel spraying. It seems pretty versatile. If your gun is leaking at the nozzle, I'd clean and lubricate the needle where it goes through the packing, make sure the packing nut is not too tight, make sure the needle spring is still strong, check the nozzle for blockage, or replace the needle/nozzle if it's worn or damaged. The gun shouldn't leak. It's a huge pain when a spray gun leaks; especially with a toner.

I'll have to look into switching my ways of doing dyes.
Thanks for the thoughts on the wash coat - that will help me.
The photos you included showed off your beautiful finish. Even the plain stained wood was nice. I started a thread some time ago about 'Amazing Glaze' and you put in some thoughts there also. I have attended a finishing seminar about ML Campbell finishing products and it seemed that it would be too hard to me to work with their glazing system. I wasn't sure that a dry glaze would be what I wanted, and their system for their standard glaze was too labor intensive. They required that you isolate the liquid glaze with vinyl sealer. Sherwin Williams doesn't require this, so after I seal with the catalyzed sealer, sand and glaze, I can go right to the CV topcoat.
Are you happy with the ML Campbell stains? It didn't look like it was blotching very much at all. Do you treat your cherry special? I have read in some old threads of problems using the Woodsong 2 stain. This made me leery of changing over to it. What has been your experience?
I really liked the service offered from my local ML Campbell dealer. I was considering switching everything over to them, but had these questions about the products. 80% of the finishes I do are glazes and I didn't want to get a bunch of problems.
Your work looks great. How long have you used their products? What products do you topcoat with?
On my first set of cherry cabinets years ago, my customers wanted the color Autumn Blush offered by Kraftmaid. We ended up getting it from them but had to buy it in quarts, as this was the only way they'd sell it to consumers. $25.00/ quart, but the customers picked up the tab. It was beautiful stain to work with, easy to wipe and didn't blotch at all. Very deep color. I'd love to get hold of a line of stain like that. Still looking.
For sealers and topcoats I'm using Chemcraft. I like them a little better than ML Campbell, though Campbell's products aren't bad. I've used a number of pails of their vinyl sealer and Magnamax and they did a good job; the Chemcraft is just a little better in my opinion.
The Kraftmaid stains are probably made by Lilly. I've used a number of them and they do a nice job. The three Campbell stains I listed work pretty much the same as the Lilly stains; the "Walnut" is also a stain that doesn't blotch much but I wouldn't use it on cherry - works fine on maple. Some of the Campbell stains seem to be a pigment/dye combination (their mahogany colors for example) and they work well on woods that don't blotch (e.g., oak and mahogany).
I think Mohawk has a similar line of stains as well. ICA is another stain line that gets good reviews.
As long as I don't run into any compatibility issues, I don't have a problem picking and choosing different products from different suppliers. It seems like they all have their strengths and weaknesses. Some of the independent suppliers do the same thing; they sell one brand of stains, another brand of dye, another brand of glaze, and another brand of topcoats.
If the stain you're using has blotching problems, the dye, washcoat, stain routine is a good approach. I use it sometimes to get custom colors and the unique look it provides. A light, even wet coat of the dye seems the most critical part of the operation.