Staining Resin-Based Composite Moulding
Composite trim has its own little quirks for finishers. Here are some tips on technique. May 13, 2009
Question
I have some resin-based composite crown that I'm using atop a large arched top display case. The rest of the case is being stained with Target Coatings antique maple. On the crown I'm using a gel-stain (Minwax's chesnut). The crown has a coat of primer on it. I'm having issues getting a dark enough shade on the crown. It doesn't soak the stain up so I'm just moving the stain around. At this pace I'm going to have to put 20 coats on to achieve the shade and consistency I need. What am I doing wrong? Surely there's a better way to do this.
Forum Responses
(Finishing Forum)
From contributor S:
That�s the nature of Minwax gel stains. Even on wood they tend to slide around on the surface and cake up more than they absorb. Not that I think it's a bad product, I love it for many things. But if you read then you can get different consistencies by stirring, shaking until it liquefies or using undisturbed as a solid gel. If you need to go darker you may experiment with another color as a base coat and top with maple. The problem with too many coats of gel stain is that it is just a surface colorant (why it's great for fiberglass doors) but getting it to cure and allow anything to bond to it can be a bear if applied too thickly.
From the original questioner:
Are you suggesting that I use a darker primer and then use the gel stain on top of it? According to the manufacturer the primer that's on there now is especially porous, although I'm not seeing it. I've been wiping the stain on with a rag but thought about using a brush tomorrow to see if that makes any difference.
From contributor V:
You'll generally get better results with a brush when graining. My usual system on a resin cast molding would be to base coat with a color lighter than the light grain colors in the final look and then grain with a darker gel stain (often modified for the exact results I seek). Third step would be a veiling coat of transparent color (often done as a speckle spray and applied until the right overall darkness is achieved). Final step would be a clear coat that also establishes the desired sheen.
I like a short stiffer bristled and thinly bristled brush for graining. Chip brushes are not too bad though I have others that I usually favor, and I sometimes use a fan brush. Practice lowering the brush and lifting it while stroking so that the ends of the strokes naturally feather. Also twist and/or spin the brush as you stroke to get complex grain patterns. I will sometimes stutter (start and stop) the brush for a faux curly grain. For certain grain looks I will grain at a slight diagonal to the molding direction and then finish off with light strokes along the axis. This cuts the grain into dashed lines. It�s better imitating oak or ash type grains. With a resin molding you are basically painting plastic. Some have a decent grain texture which can be helpful but most of the look comes from the artist. Practice is key as exact mixes and products on a given substrate require slight alterations of technique or thinning etcetera to get the desired looks. I often use sponges or paper towels or torn cardboard on flat surfaces (like table tops) but it is hard to beat a nice brush for profiled moldings.
From contributor D:
I would suggest that you apply this stain via spray equipment as a shading process. Although it is a gel stain it can be thinned enough to spray. The problem you will have with your current process is that you need to wait at least eight hours for each coat of stain to dry before applying the next coat. If the first coat of stain hasn't dried the next coat will soften and pull the first coat, often making the new color lighter than the first.
Waiting that long for a coat of stain to dry will add much time to this project, while spraying (shading) will eliminate the potential to pull the color and you can often come very close to the actual wood species you are trying to copy. A tip - add a little color at a time, you can always go darker, lighter is another story.
From the original questioner:
I tried brushing the stain on today and it took better but I had a really hard time balancing between putting it on too heavy and not having enough. The primer underneath is the color of vanilla pudding and the gel stain I'm using is the color of coffee. This has been really frustrating. I'm kicking myself now for not just going with wood in the first place. The ironic thing is that the moulding without the primer soaks up the Target Coatings stain that I'm using and it looks great. I ended up stripping off the coat of primer on one piece of the moulding with the intention of staining it with the TC stain. I also thought about spraying it with a coat of primer that is closer to the color of the stain I'm using or the color of alder (the wood that the rest of the piece is made out of). Is there any reason I couldn't put a new coat of primer on, sand it flat and then apply the stain on top of it? Or would I need to put a coat of shellac on top of the primer?
From contributor M:
Like contributor V was saying, start with a base color a little lighter than the lightest color of the piece of wood you are matching. I like to use artist oil colors for my glazes as they are much easier to work. All of the "carved" sections of this cabinet are resin.
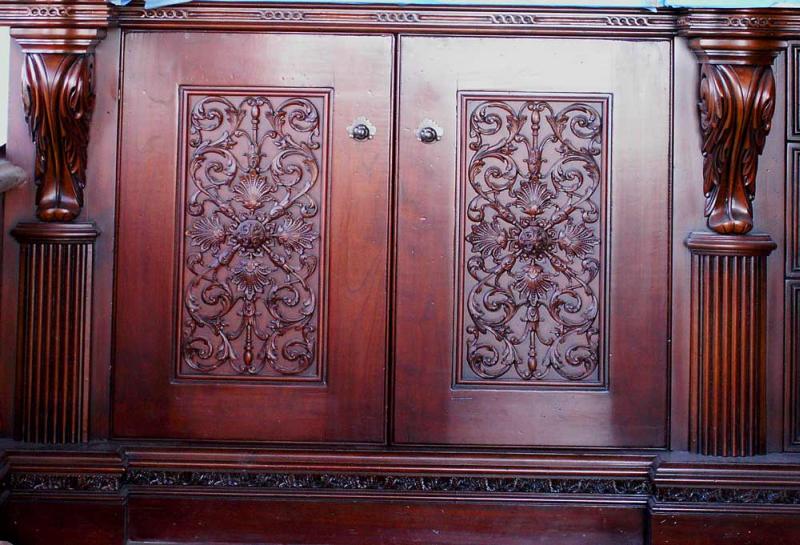
Click here for higher quality, full size image
From the original questioner:
That looks great. I wish mine would come out looking that nice. Do you mix the painters oils yourself until they match whatever stain you're using? I'm open to anything at this point. I've all but given up on the gel stain. It looks bad and I can't get it to match the Target Coatings stain I'm using. At this point I'm planning on putting a different shade of primer over the moulding but I'm still on the fence as to what I'll do after that. Is there any reason that I can't put a couple of coats of dewaxed shellac over the primer and then use the stain over that? I'm topping it off with the Van Dyke Brown glaze so I can blend things in at that stage. What do you think?
From contributor M:
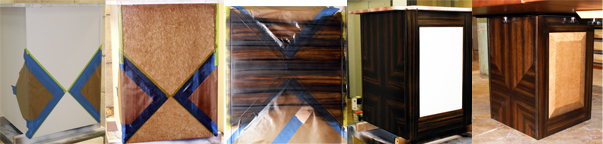
Here is a step sample I did on resin.
1. White primer
2. Base color lacquer (lacquer tinted with 844 Degaussa UTC)
3. Burnt Umber artist oil color glaze
4. Seal glaze
5. Van Dyke Brown and Black glaze in recessed areas.
6. Seal glaze with thinned topcoat tinted with Mohawk Brown Mahogany penetrating dye stain.
7. Final topcoat.
It seems like a lot of steps but it goes really fast. You can add a lot more faux detail if needed but usually this is enough on a crown molding.
Here is one with a little more faux brush work. The first glaze is a "scumble" effect with the brush and then graining a little airbrushing and toning. The "raised panel" is just airbrushed shadows on a faux birdseye.
Click here for higher quality, full size image