Question
I'm having trouble finishing birch. I talked with my supplier and he mentioned a conditioner that I mix myself. He said to start out at 7 parts thinner to 1 part lacquer. That didn't work because my dark stain didn't soak in at all. I ended up finding 13 parts thinner to 1 part lacquer to work pretty well. It doesn't seal and stain the way I'd like, though. You can still see all of the fuzzy features that birch likes to show.
How do these made-to-order cabinet places with solid faces and doors get their material to stain so evenly? There must be a way for the small shop to succeed in this battle. I am sick of working with birch and the never ending sanding? Then I apply the stain and see that my sanding was a waste of time. I buy natural yellow birch. Would white or red birch make a difference?
Forum Responses
(Finishing Forum)
Birch is a pain and if you're going to successfully finish it, you have to go to a multi-step finish schedule like those used by the factories. I start with glue size, sand with P400, then spray an alcohol dye stain (very carefully and in multiple passes) and then come back with a wiping stain. You also might need to tone after the first couple of clear coats. Any time you try to use a cheaper wood to simulate a more expensive one (alder for cherry, birch for hard maple) you've got to work harder at the finishing. There is no free lunch.
Here's a typical schedule:
RO sand to 150, block sand lightly with same grit.
Stain with dye stain such as Trans-Tint, in an NGR base. Spray to establish a base color, and don't wipe, except where you overlap too heavily. A little retarder in the stain helps you see the color longer - it goes light as it dries, but the color comes back when the next coat of sealer goes on.
Wash coat optional, depending on finish desired.
Stain with a pigmented stain to develop the grain, spray on "just wet" and wipe down thoroughly.
Stain with vinyl sealer, medium coat, and sand with 320 sanding sponge. I really like the 3M gold colored sponges for this.
Glaze and wipe. I spray the glaze in with a detail gun and wipe down pretty hard. This softens the overall look and takes away the "new" look.
Coat with vinyl sealer reduced 50/50 with thinner.
Tone as needed to adjust color, and topcoat with the product of your choice. I have had very good results with DuraVar and Chemcraft products, but I don't know how catalyzed polyurethane would hold over vinyl sealer, and also haven't tried catalyzed sealer with the glaze.
I think one of the secrets is to not flood the stain on. Heavy application contributes to blotching. I apply just to get the color I need, and adjust the color by adjusting the stain, rather than the amount applied. A box of rags lasts me a long time.
Play around with base, middle, and top colors. Some odd-sounding combinations come out looking pretty good. Usually go from lighter underneath to darker on top.
For more even coloring and depth, spray a toner over the sealed stain. (Toner - dye added to thinned finish and evenly sprayed over the entire surface).
For the most even coloring, start with a light coat of sprayed dye. Don't flood the wood and don't try to get the dye perfectly even. Then follow with the stain and toner.
I only use a RO sander and 150 grit - no hand sanding. Keep the paper fresh so the wood is sanded well.
Spray the stain and wipe. Not too much, not too little. Just enough to avoid dry spots/starved look.
Seal with a coat of whatever - I use vinyl sealer. Scuff sand smooth.
Follow with X number of coats of toner. Mix 1/2 - 1 1/2 ounces of dye concentrate per quart of thinned finish and spray the number of coats it takes to get the color/depth you want. I thin lacquer around 8:1 for toner - 8 parts thinner, 1 part lacquer.
Maybe just switching the stain you're using will be all you need to do.
Start out with a tinting toner to uniform all the woods. The tinting toner is not intended to block out the woods; it should be a translucent coating.
Then apply a seal coat, and allow to dry. Then use either a stain or colored glaze that you wipe on and then brush out. Allow to dry.
Complete the finish using your normal finishing process.
I can assure you that your pieces will always be the same, as long as you follow this same procedure.
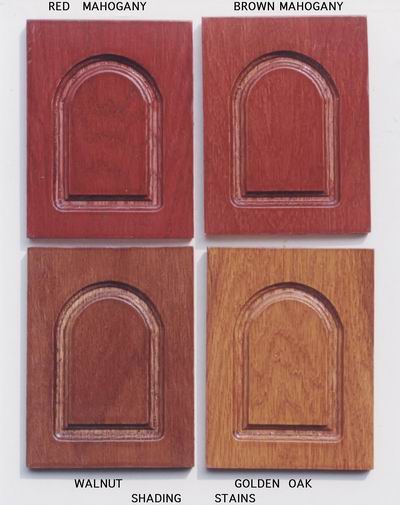
One photo shows four different colors of shading stains on the door panels.
The second photo shows the finishing steps of using tinting toners on four different woods to achieve a uniform color on all the woods. This finish is also known as a factory finish.
I simply stained with Minwax after sanding with 220, then with a clear coat of poly U.
I'll have to rethink using birch since I would rather not go through the painstaking steps noted in some of the responses.
Many people here on the forum have played with and used them with awesome results, and with the new vehicles to put the colorants into, you can do many more things with them. Go to the website and look at the stain mix system for more info.
Bob Niemeyer, forum technical advisor
Comment from contributor P:
Birch is a pain to stain. I also recommend using alcohol-based aniline die. Water based will work, but is not recommended on veneer. I will try spraying alcohol next time. I would not wipe after spraying, because wiping is what causes splotching to begin with. Don't believe that wood won't unevenly absorb dies - it will. The only way I see to avoid splotching is to spray the dye on. Dye or oil based, the wood will absorb it. I don't think you can put on enough pre-conditioner to prevent splotching. The pre-conditioner may work with spraying, but you need to apply the stain sparingly in a number of applications to get a uniform coverage. My theory is that wood is going to absorb any stain unevenly if you wipe it and put more than just barely enough on at any one time. Present-day oil-based stains are a complete failure for me. Water-based dye is not recommended for veneers, but I am trying it on some 12"x30" veneer that I worked hard on for about 30 minutes after applying with a contact cement. I'll see if that works, but I'm entirely off Minwax (or any other) oil based stain. Anybody have any positive results with oil-based stain, let me know.
Comment from contributor W:
Believe it or not a beautiful, smooth, velvet sheen will result by using pigmented oil paint as a sealer before staining. I used a standard white primer thinned to a consistency such that it could be wiped down when partly dry without the paper towel shredding or leaving particles on the wood.
Wipe it down to see the grain showing through. Next repeat the process, but this time mix in some red paint to achieve a pink result. Wipe this down as well and dry. Evaluate the amount of grain showing through. If you want less grain showing repeat the last process. Let it dry thoroughly and sand smooth. Now apply oil stain straight from the can or mix it. I used a combination of golden oak, cherry, and red mahogany to achieve a warm but light tint. There is no spraying required. Wipe it on, blend it with a cloth and lightly wipe up any saturated sections. Evaluate the results when it's wet. Let it dry and apply a second stain coat if required for color depth. Dry, sand, clean surface and wipe with a tack cloth.
For the finish coat a water based satin provides beautiful results which will not yellow, and the surface will not fuzz up at all (because of the pigmented paint sealer coat). Results: as perfect and beautiful as any professional factory application.