Question
New to me (but 1985 old), my Cehisa ep-2s edgebander isn't gluing the leading 1/4". My edgebander experience is zero with hot glue, so I'm not sure what the problem could be. So far (without any changing results), I've increased the glue spread and adjusted the fences in and out (custom fences from the previous owner). I'm getting good glue spread and everything is sticking very well except for this one area. I'm also running the power feeder so that feed speed shouldn't be an issue.
Any suggestions? I thought I would check with those more experienced as I await my returned phone call from Adwood.
Forum Responses
(Cabinetmaking Forum)
From contributor P:
I don't know how your custom fences are configured, but typically they should be in line and straight, with the entire spring-loaded gluepot assembly deflecting a little (I seem to remember 1/8"- 1/4", but it's been a while since I've had an EP-2S) when the work piece hits the roller. Great little machine!
1) Do not over tension the pressure roller. The pressure roller is spring loaded. If the spring load is too much then there will be slippage when the panel passes. A minimum pressure is all that is required.
2) The edgebanding tape must be free to move. The machine came with a tape pull back device that allowed no resistance from the tape roll for the 1st 1" or so. If it is no longer there, make sure the tape is moving freely the first inch before the weight of the tape roller comes into play.
3) Reduce the glue temperature (for PVC and wood veneer tape). Hotmelt glue sets very quickly once it leaves its heat source (roller). There are many different glues available for different speeds of applications. This machine uses a standard hot melt. Make sure you have the correct glue in the pot so when the panel reaches the tape the glue is ready to bond. This machine will work best by heating the glue at the lower setting (180-185 degrees C) rather at 200 or 210 C. Check with Adwood if there is any question as to the correct glue.
When banding with HPL or a wood strip you need to increase the temperature back to 200 or 210C. I'm sure Adwood will be very helpful when you speak with them, and they do not charge for over the phone technical support.
I'd adjusted the fences back so that the edge hits the glue roller and pushes it back about 1/4" to 3/8" and moves the pressure roller back about 1/8" to 1/4". The power feeder does a really good job of keeping everything tight. I'm getting near perfect results for 95% of the edge.
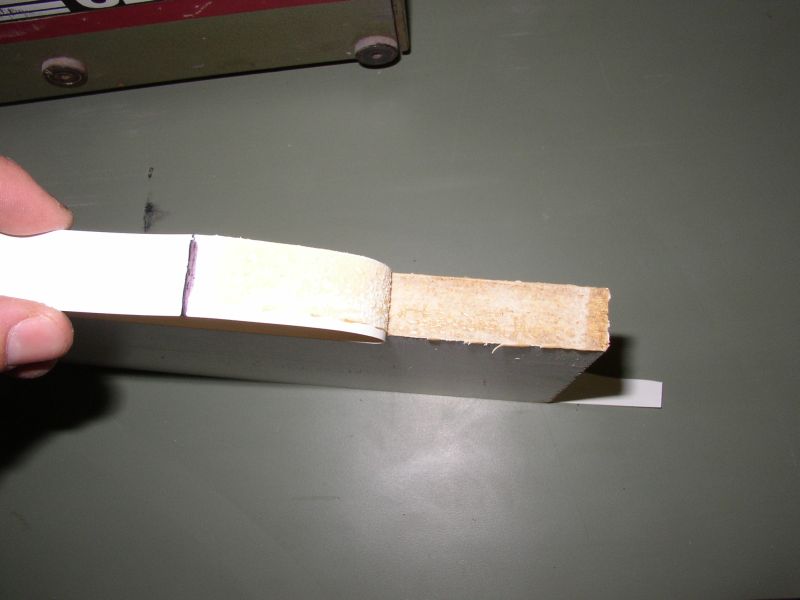
I think I'll see about moving the glue roller assembly back (via the set screw that hits the glue pot) so that the edge just touches this instead of pushing it back so far. There is glue on the leading 1/4" where the tape won't bond but I'm starting to think that the corner of the edge is hitting (and pushing) the glue roller with such force and speed that the glue ends up missing this section. Hard to explain this without pictures. I've increased the amount of glue dispensed by the roller without any improvements.
Regarding glue temp and type, I'm using the glue that the previous owner included and setting it at 200c (where he had marked to set it). I scraped the glue pot clean before I started using it. I feel (again, this is my first experience) the glue is drying as quickly as it should. I've semi ruled this out as the rest of the edge is bonding nicely.
Adwood said that the spring that pulls the glue roller hard against the panel needs to be replaced. He said that I can adjust the roller back so the edge just comes into contact with it and this will fix the problem while I get a new spring. I tried this and didn't see any improvements. I turned everything off and will go spring shopping later today.
The path the edgebanding took from the roll to the was too complicated. This meant there was too much inertia plus drag for the glue on the board to overcome as it first contacted the edgebanding, so the edgebanding would pull the glue back from the leading edge as the board moved, but the edgebanding hadn't yet.
I ran the edgebanding more directly into the final section (the aluminum angle and the adjustable height hold-downs). The two height hold downs for the edgebanding must be set carefully. If they are actually contacting the edgebanding they will cause drag, and if they are too far from the edgebanding, it will wander up on the edge of the board.
Also, the roll of edgebanding with the large center hole sits on a very small center pivot. When the board first hits the edgebanding, it tends to drag the whole roll forward instead of the roll spinning. I cut some bushings with a small hole in the middle to fit over the pivot, and the outside a closer match to the inside of the edgebanding roll.
Finally, and I think this was the eureka moment, I got in the habit of spinning the roll of edgebanding a quarter turn or so in the direction it was going to be pulled by the glued board before feeding each board. This put plenty of slack in the edgebanding so the leading edge of the glued board could pull it with as close to zero friction holding the edgebanding back as possible.
I also got a meat thermometer to check the actual glue temperature as opposed to the temperature scale on the thermostat. Setting the glue temperature within the actual temperature tolerance needed helped. A mark was made on the temperature scale of the thermostat with permanent marker so the knob could be reset to that correct point in the future.
I agree it is a great little machine, if a touch temperamental... even more than most edgebanders, but once you become aware that it is the boss, you should get many years of work out of it.
The glue pot needs to be cleaned pretty often. It seems to get a layer of hardened glue on the bottom that will insulate the new glue from the heating element.
I would still be using my EP-2S except that the motor finally let go, and a replacement is almost the same cost as the entire unit cost new.
In the meantime, do I need to worry about that 1/8" peeling up over time? I'm running 1mm PVC on melamine for a mail center/cubby holes. All of the melamine will be used as shelves.
This problem was corrected on later models by using a hollow aluminum roller, air line, fittings and copper tubing to create a directional air supply inside the roller to make it rotate. When the copper tube is properly positioned inside the roller it will cause the roller to spin. Speed is controlled by a simple air flow control. Current models use the same system.
The simple way to adapt this older machine is to glue an old plastic motor fan or impeller to the top of the pressure roller and rig some 1/16 ID copper tube, fittings and flow control and direct the air to the impeller to make it rotate counterclockwise.
You will never be able to stop the 1/8" slip until the roller is moving. Some people just give the roller a spin before they push the panel through.
After you get the roll spinning one way or the other, continue to turn the edgebanding roll 1/4 turn after each pass if you use the automatic tape return. I prefer to run the tape straight through and then pull it back to the center of the pressure roll after it is cut. This allows zero resistance and the tape will bond correctly on the leading edge.