Veneering a Large Pie-Cut Table Top
Veneering this tabletop brings up a lot of tricky issues. September 6, 2010
Question
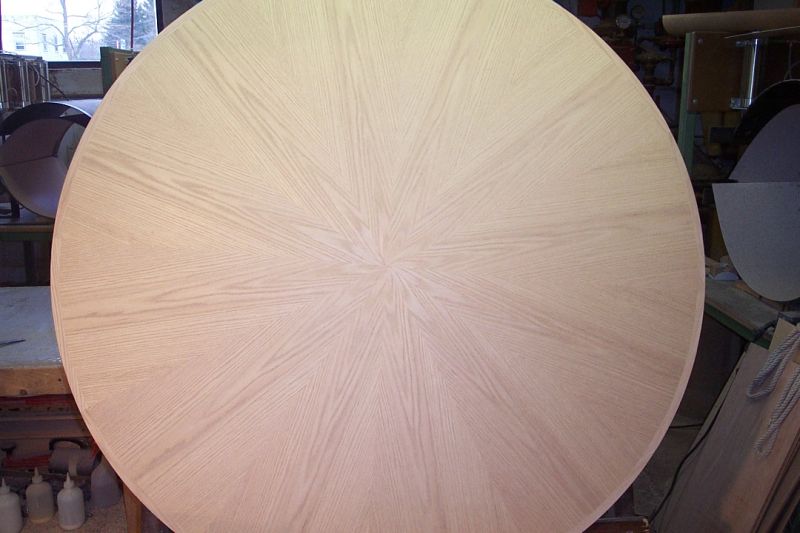
I need to veneer a top that is 96" diameter and is going to have a walnut pie cut. The top is made from 1" alder and has a 3" thick edge. Planted on the edge is 1/4" x 3" wenge. I have to put the wenge on the top first to veneer over it, which means I can't do backing veneer. I am thinking of doing the top in half (48" x 96") and joining them up once the top veneer has been pressed. I only have a 48" x 96" bag, so there is no way I can do the top in one go. How would you tackle this job?
Forum Responses
(Veneer Forum)
From contributor J:
Do I understand correctly that the core of this table is to be a 96" round made of solid alder? If so, it will expand or contract at least 1" seasonally. Imagine what this will do to the joints in your edging, not to mention the face veneer. Time to reengineer.
From contributor C:
We do these all the time. Use a flake or MDF core. If you have to use wood core, use basswood and a thick poplar crossband. Realistically, you will probably regret doing this yourself, so consider having someone else who knows their stuff do it.
Click here for higher quality, full size image
From contributor B:
Time for lumbercore or MDF; solid wood will be a nightmare. I would do it in halves and join them after. There must be a way to veneer both top and bottom, otherwise it is going to warp. Think creatively.
From contributor N:
You can make a bigger bag for very little money. You can use cheap vinyl for a one time bag, and double stick tape it together. But you've got bigger problems if you're doing it on solid. Listen to the others and abandon your plan and start over or sub it out.
From the original questioner:
How about 3/4 MDF veneer both sides, trimmed with a 45 edge after pressed for the 1/4 wenge. Veneered in half and joined.
From contributor L:
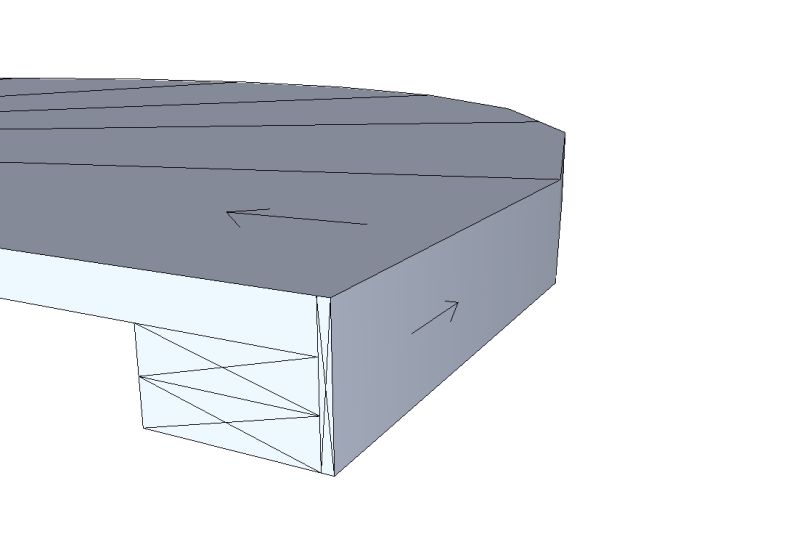
1) Press the bottom veneer, with the table in halves if necessary (use MDF).
2) Rejoin using whatever finish joining device is going to be used in the final assembly to locate the halves correctly.
3) Add edge detail, 3" tall is okay.
4) Route (?) to finish OD radius.
5) Add support block (removable) to bottom inside to reinforce tall edge while pressing (top veneer down on a platen at least 3/4" thick). It may be helpful to cut the support block radius while attached to the table core temporarily before the edge is attached (with a router and radius guide).
6) I have vacuum pressed tall OD edges like these with thinner veneer. Practice this one. Glue and use blue/green tape to hold while being pressed. Pressing in sections makes it easier.
From the original questioner:
Here is a little sketchUP section of the top. I am a bit concerned with the 1/4" wenge showing through the veneer
Click here for higher quality, full size image
From contributor J:
You're on your way. Don't worry about a 1/4" wenge edge showing through walnut veneer - especially because you'll be breaking that edge to about 1/8", presumably. What you should be worrying about is the joint in the middle of the table. This is a big table. How will you get that joint perfectly flush? Can you clamp a point four feet in from the edge? And can you get a strong enough joint? Remember, each half of this table is acting on that joint like a four-foot lever with 60-70 pounds on the end of it. You might get away with it, depending on the blocking, etc. under the table, but you're much better off doing as contributor C suggested: join substrate to full width, crossband (both sides), veneer bottom, edge, veneer top.