Wood Table End Options
Woodworkers discuss breadboard table end details, and a slick mitered-end alternative. January 10, 2006
Question
Our custom cabinet shop has been asked to make a large cherry lumber top for a desk measuring about 24" x 130". The customer does not want to see end grain and wants us to wrap the end grain with a piece of lumber about 3" wide. Our experience tells us not to glue a lumber band to end grain a piece of lumber that is that wide, because of the expansion of that wide piece of lumber. We are looking for suggestions for a solution.
Forum Responses
(Cabinetmaking Forum)
From contributor A:
You will be making a breadboard edge. Make a tenon at the end of the top and a mortise in the end board. Leave enough extra tenon room so the top can expand. You don't want to see the tenon, so stop the mortise short of each end and cut the tenon back. I would only glue and pin the tenon in the middle to allow for this expansion.
From contributor B:
I agree. It's common practice and has been around for hundreds of years. Pin the whole thing but leave the pin tight in the table top at the center, elongate the outer edge of the table and that will allow for movement of the top, and maybe glue about 6 inches of the center. I'm sure Gene Wengert, Sawing and Drying Forum technical advisor, can tell you exactly how much a 24 inch wide piece will expand and contract.
From contributor C:
I also would explain to this customer that, depending on the time of year and humidity, what was once a nice flush joint may be a little proud of the end, or not quite as wide. There's no two ways about it, that top is going to move. You don't want to try to explain this to the customer after the fact.
From contributor D:
I would have to agree that to properly do the job you would use the breadboard end with a mortise and tenon. But my experience has shown me that 24" can take a glued on breadboard. I have made quite a few low end countertops where I didn't do the mortise and tenon, and so far they have survived over 7 years of seasonal changes up here in the NE. I have also done a curly maple piece for myself with the glued breadboard end and although it has been only about 9 months, it hasn't shown any signs of stress.
If you do this, use a #20 biscuit - one about every 6" - and wherever there is a glue joint on your main top, use the joint as a center line for the biscuit. I started doing this because of lacquer. I did a job that had a 36" wide top with a breadboard end and I did it with a pinned mortise and tenon. Then I sanded everything down nice and smooth, and stained and sprayed 3 coats of CV. After the piece was installed I noticed that on the joint between the top and the breadboard end there were little pieces of broken finish because of the movement of the top against the breadboard end. I would prefer to do it differently so that the finish didn't bridge the gap between the top and the breadboard end, causing this fracturing finish problem. But I don't have any good ideas how to do it. Pre-finishing would be the best way but hammering in the pins would be bad for the finish.
I have found that a breadboard end on a 24" piece is acceptable and will work without splitting the top. I would never do it to a piece as big as the 36� table I was talking about.
From contributor E:
You can glue the top up wider and longer, and cut your bands off - one from each end, one off each edge, then miter both edges and glue them back on. My theory is that it should move the same since it will match to what it was originally. If you can, check the moisture content of some of the furniture in the client�s home then check your wood to make sure there are no drastic differences. This would give you an idea of what to expect.
From contributor F:
I would mortise and tenon with through pegs at three locations. The center peg in tenon is slightly offset (1/64th) to pull the breadboard to the end grain. Make the holes for the outer pegs in the same fashion but elongate the mating holes in the tenon. This will allow for seasonal movement. Glue only at the center. Cross grain and end grain will move at different rates, therefore the finish line joint is stressed and likely to crack. Make certain that the through pegs do not hit a joint line in the top.
From contributor G:
Breadboard would have been my first response, but I kind of like contributor E�s suggestion. He's right about the same expansion and contraction, and you don't have to deal with gaps during the season.
From contributor H:
To contributor E: Am I missing something? Don't you still have end grain on your end banding?
From contributor I:
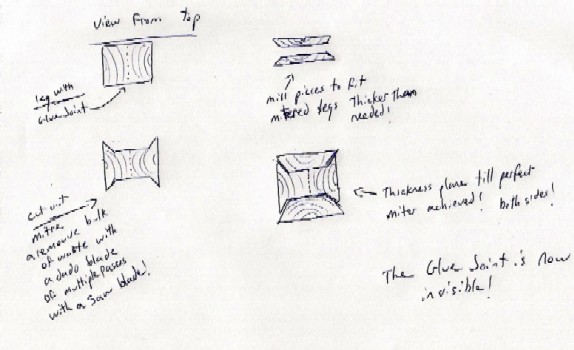
I think this is what contributor E may be talking about:

Click here for full size image
From contributor J:
If that is what contributor E is talking about, it is no different than gluing any other piece of solid stock across the end grain. It won't work. Breadboards are the only legitimate way.
From contributor E:
Thanks for the diagram. Doing the edges also makes the thickness appear the same, in a situation where you may be taking a 3/4" thick top and putting on a 1.5" edge. Some joints will allow for movement better than others, but I've seen breadboard ends, done correctly, that show major movement too. The difference in moisture content is the biggest factor.
From contributor K:
Contributor E�s method will not fail because the growth rings of the wood are oriented the same in the banding as they are in the main top. They will move simultaneously with the seasons.
From contributor I:
I understand. I assumed, as my drawing shows, that the banding was the same thickness as the top. The piece used on the end is crosscut from the end, therefore it should move the same.
From contributor J:
I must be missing something. Aren't you trying to conceal the end grain? Are you talking about cutting the edge off and using it on the end? If so, are you only attaching it to the miter? If that�s the case, the miter will fail, right? Are you cutting the end off and using it back on the end? If so, I don't understand. You won't be hiding the end grain, and it will move the same as it would have before being cut off. I understand that much, but I don�t understand what purpose it would serve. Maybe someone can clarify?
From contributor K:
To contributor J: Yes, you would be cutting the end at 45 degrees and using it on the end. The only end grain shows underneath the table top. Look at the drawing.
From contributor L:
The drawing is a view from the edge of the board, basically mitering edge grain to edge grain. Thus, all wood movement would be the same. When viewing the end grain after this is done you will actually see face grain since it is mitered into view when viewed from this angle.
From contributor M:
If you terminate an end as the drawing shows, with solid wood, you have two problems. First, it is a less than optimal glue surface, being mostly end grain. Second, the edging is very prone to splitting. If you go this route, there is a good possibility of your edging splitting during fabrication and assembly. That can be easily repaired, but when I've done this before I haven't had much confidence in the long-term viability of this joint, because it doesn�t take much force to split the edging. Breadboard ends or a veneered top are the best way to go.
From contributor K:
While it is true that the short grain on the banding piece is weak and needs to be handled carefully, this joint can work fine if it is splined together. The spline can also be made to be blind. I don�t see this method as a substitute for breadboard ends, just a technique to conceal end grain. It is a method that is handy in some situations. It does require additional reinforcement due to cut of the glue surface. This type of joinery is used in finish work to conceal end grain and is often secured with brads.
From contributor L:
If you use a spline it must not be one long spline. Use several short pieces, 3 to 4 inches long, to avoid a cross grain situation.
From contributor K:
The splines I make have the grain running with the short dimension.
From contributor N:
If you use a breadboard end, you could make your immovable connection at the front and allow the rest to slide. That way the seasonal bad joint is at the back and probably out of direct view. Here's another observation that would make Fine Woodworking readers look for a noose: Years ago, before I knew about wood movement, I built a woodworking bench like the ones we had at school in England. Those were oak. Mine was VG fir. The top is approximately 36�x 60� with a depression down the middle. The top was made from 2 x 2 with 1/2" dowels through. I then pinned the dowel ends with another smaller dowel. The ends of the bench are made from 2 x 8 VG fir routed out to fit the top contour, then glued and dowelled everywhere. I had cross-grain attachments all over the place. This bench is now 34 years old and no joint has failed, nor has it bowed out anywhere. At that same time, I made some solid wood doors with grain running vertically and a breadboard top and bottom tongue and groove and glued on. These doors came apart. Seeing what had happened with my bench, I redid them with the ends edge-glued on with dowels to keep anything from moving. Nothing has failed on those doors.