Wrapping Columns with Veneer
Tips on how to wrap architectural columns with veneer. July 23, 2007
Question
We've been asked to look at a project that has several veneer-wrapped columns that are delaminating. The owner would like for us to recover the columns. We feel a new substrate will be required as well as new veneer. However, the column base and capital details may cause problems (we have more detailed photos if someone would like to view them). We are hoping to use phenolic backed veneer with a PVA adhesive. What kind of substrate should we use? How would we clamp the veneer to the substrate? How can a vacuum clamp be used in this situation? Your input is appreciated. Thanks.
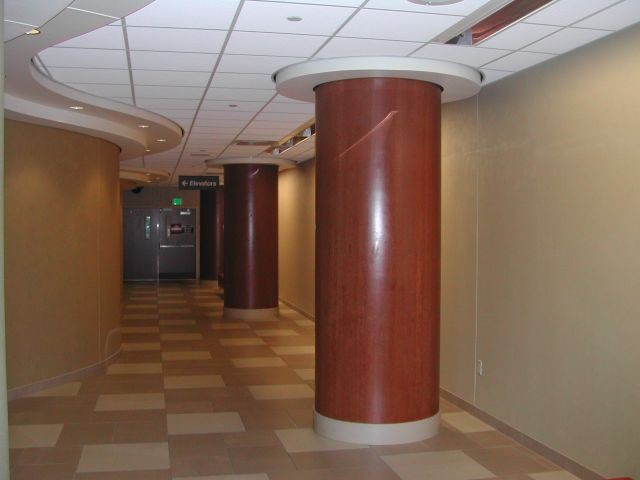
Click here for full size image
Forum Responses
(Architectural Woodworking Forum)
From contributor A:
Will you be removing the veneer from the existing columns or are you planning on re-veneering these columns in place? If you�re going to start from scratch, I would first get a quote from Cubicon before I started doing it myself. They produce columns, shapes and forms in a variety of different veneers. Their product would eliminate the chance of delamination in the future.
From contributor B:
I believe that Cubicon uses paperbacked, presanded veneer adhered with a contact cement. This would be trouble I believe. You should check with them before you commit. If they use a wood crossbanded 2 or 3 ply with a PVA glue, cured under pressure, I would trust that.
From contributor C:
What are the dimensions, and what is the veneer face wood type? I am sure that I could bag that, but that is a very ambitious project to start with if you are new to bagging. I would not think of using a PVA glue for that project. The water in it will cause the veneer to expand even if it is phenolic backed. Each column looks to be about 3' diameter X 8' tall. That means that the veneer face would be about 9.5' cir., so by the time you have rolled the pva glue on 75 ' of veneer, and that much more substrate, your open time is up before you close the bag, and start the vacuum. I like epoxy for this kind of work myself, because I have control of the open time, and there is no water in it nor anything else that needs to evaporate.
From contributor B:
We glue similar items all day long and do not have moisture issues. You must be thinking of a different procedure or maybe just speculating. The trick is to use a poplar crossband and back veneer creating a thin (3-ply) skin approximately 3/32" thick. We hot press these prior to wrapping columns or cylinders in the 36" diameter range. Then we apply them using a custom made steel band clamp.
Also, spreading 75 square feet of surface would not be out of the question if you use a good hand glue roller and 2 guys. Epoxy is great as you can retard the cure time, if you don�t mind using that material. One thing not mentioned is does this column cover a structural member? If so you either do it on site or use a split cylinder and some type of seam detail. Bottom line is, if this job is an experiment it may be best to let someone experienced tackle it.
From contributor D:
The above responses all have good advice. The choice of adhesive is going to be partially determined by the substrate. I don't see a problem with using PVA with a backed veneer. In this case, I would definitely suggest using a phenolic backer and you should definitely not use a contact cement. The real key here is getting good consistent pressure on the columns while the glue sets (30 min. or so). I've seen people do this with banding and I've seen them create pre-formed cauls that can then be banded. There's probably a way to do this with a vacuum bag.
From contributor E:
We had eight, eight foot columns to veneer and they were tapered as well. We started with poplar staved hollow core and rolled a lightweight fiber glass cloth over the column to create a good base and to stabilize the poplar. We then micro-ballooned the columns and faired them before the veneering process. We used the two part epoxy system. We then veneered in a two step process with a vacuum bag. The columns were longer then we needed so we could seal the ends with gumby tape for a tite bag. The veneer was 2 inches wider around the column so we could double cut both veneers for a tight final fit. We drew the veneer together with tape on the final glue up. That's how we handled our project although yours is a little different - maybe you can glean some ideas from this post. Good luck.