by Professor Gene Wengert
Editor's note: The following article is an excerpt from the book "The Wood Doctor's Rx," by Gene Wengert, retired Professor and Extension Specialist in Wood Processing, Department of Forestry, University of Wisconsin-Madison.
There are a considerable number of factors in the gluing operation that affect the strength, durability, and appearance of a glue joint. For convenience, we can divide these factors into three groups: 1) those factors relating to the composition of the adhesive; 2) those factors relating to the handling of the adhesive from its arrival in the glue room until it is applied to wood, pressed, and heated; and 3) those factors relating to the wood itself.
In this Chapter, we will examine how these factors affect several problems with edge glued panels.
Symptoms #1
Sunken joints are slight depressions at the glue lines in a finished panel (sometimes noted before veneering or finishing, but often most obvious after finishing). The adhesive used is water-based.
Diagnosis #1
One of the key points in working with wood is that, if the shape or size of wood changes, it is because of a change in moisture content. Follow the sequence of events in edge gluing with a water-based adhesive (Figure 41-2):

1) Glue is applied and pieces are joined.
2) Moisture in glue causes localized swelling.
3) Panels are planed smooth before swelling goes down.
4) Swelling goes down, after planing, leaving a depression.
Cure #1
The remedy for a sunken joint is to wait for the moisture around the joint to dissipate before planing or sanding. The length of time depends on the air circulation, temperature, and relative humidity around the panel, the amount of water added by the glue, and the species, but generally 7 days is sufficient. Warm air, good circulation, and controlled humidity will speed up the process of drying.
Symptoms #2
Sunken joints are slight depressions at the glue line in a finished panel, most obvious after finishing. In this case the time between machining and gluing is adequate, but the sunken joints still appear.
Diagnosis #2
Again, if wood changes size or shape there must be a change in moisture content. However, the wood around the glue joint doesn't change size as much as the rest of wood. If the wood panel is quite dry, machined flat in the dry condition, and then permitted to regain moisture, the joint will swell very little in thickness while the wood away from the joint will swell in thickness normally. The result is a depression around the joint.
Cure #2
The remedy for this type of sunken joint is to avoid lumber that is excessively dry. The lumber's moisture content should be within 2% of the EMC (Equilibrium Moisture Content) of the air.
Malady: Sunken Joints-Pseudo
Symptoms
At first glance, sunken joints-pseudo appear the same as the real thing, but closer examination shows the wood itself to be flat while the glue lines are partially open or have gaps (void or open areas). The adhesive may or may not be water based.
Diagnosis
In this case, when finish is applied to the panels or when veneers are glued to the faces, the open joint causes the finish or veneer to sag slightly into the open joint and create the sunken look.
Cure
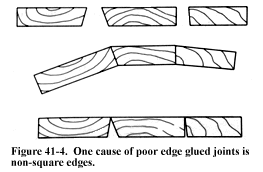
The remedy involves a little detective work to determine why the glue line has gaps - insufficient pressure, poor edges, and so on. This subject will be covered in detail in Chapter 42, but let's discuss one common cause. When the individual pieces with non-square edges are joined and pressed to hold the panel flat, gaps may develop (Figure 41-4). It is more of a problem with dense woods; softer woods can "give" a little.
Malady: Uneven Surface
Symptoms
A glued-up panel seems, some days after sanding, to have been made up of pieces of different thicknesses. Often an entire piece in the panel seems to be sunken. This sunken look may also be noted on the edge of a panel at the joint between the core and a rail or stile.
Diagnosis
There are two possible diagnoses for the above symptoms:
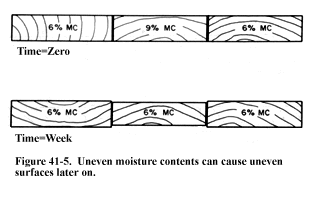
1) Assuming that when the panel was sanded or planed it was even, the wood could have changed shape only if its moisture content changed. We conclude, therefore, that the individual strips or pieces were at varying moisture contents when the panel was glued up and that these moistures were not equalized before sanding or planing. For example, in Figure 41-5, a 1-in.-thick panel would experience a noticeable thickness change of up to 0.01 in. with only a 4% MC difference. This applies equally well to a solid stile joined to a particle core if the moisture contents are not in equilibrium.
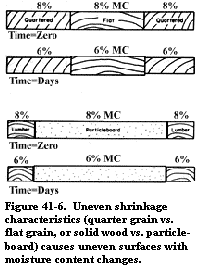
2) These symptoms can also result when two dissimilar pieces of wood are joined - flat grain to quarter grain, or solid wood to particle or fiberboard core - and if these pieces change moisture content after they are assembled. The symptoms occur because tangential shrinkage is greater than radial shrinkage (Figure 41-6). Therefore, when the moisture changes after manufacture, a thickness difference is noted because the pieces shrink in thickness at different rates.
Cure
All wood parts to be joined together must be equilibrated to the same moisture content conditions before assembly. There is, at most, a 2% leeway in moisture. In addition, the equilibrium conditions must be the same in storage, in manufacturing, and in the consumer's home or office. Again, there is at most a 2% leeway before troubles will be noted.
Malady: End Splits In Panels
Symptoms
Often within hours to a week after the edge gluing of a panel, end splits are noted, usually, but not always, at the glue line. The symptoms commonly appear in the late fall and winter.
Diagnosis
End splits develop only because wood is shrinking and the only reason wood shrinks is because it's drying . This fact compiled with the information that the end grain of wood dries fifty times faster than the edge of face grain leads us to conclude that the panels are too wet for the dry air in the plant. The ends therefore dry rapidly and shrink, while the center of the panel dries and shrinks more slowly, leading to splits.
Cure
All year round, but especially during the heating season, it is necessary to keep the moisture content of the lumber within 2% of the moisture of the air. In the winter the air in an unhumidified plant can be as low as 3% EMC. Either the lumber should be dried to lower moisture contents in the winter (typically 5% to 7% MC), or else the air in the plant must be humidified.
Malady: Cupped or Curved Panels
Symptoms
A panel, after manufacturing, cups or curls across its width.
Diagnosis
There are three possible diagnoses for this symptom, but all three are caused by moisture changes in the panel that, in turn, result in shrinkage.
1) Occasionally the grain of the individual pieces in a glued-up panel is oriented in the same direction. Because the bark side of lumber shrinks more than the pith side as it dries, a glued-up panel with most or all of the individual pieces with the same grain orientation will also shrink more on the bark side as it dries and cup.
2) The second diagnosis is a result of the finish. The finish must be identical on both sides of the panel if the panel will be exposed to cyclic humidity in use. If the finish isn't identical, the opposite faces can swell at varying rates and warp. Further, when using water-based finishes, it is going to become even more critical as water or moisture applied to only one face (or not applied equally) will result in permanent warp.
3) Occasionally panels are designed with a cleat or rail on the bottom face, running across the width. If the cleat is fastened securely to the bottom of the panel and then if the panel changes moisture content and shrinks or swells, the top face is free to move but the bottom face is restrained. Warping will result.
Cures
In the first case, the individual pieces should be varied in orientation, but more importantly the lumber should be dried initially to a low enough moisture content.
In the second case, the finish must be applied equally to both sides, especially water-based finishes.
In the third case, the cleat must be free to move slightly as the panel shrinks or swells.
Professor Gene Wengert is Extension Specialist in Wood Processing at the Department of Forestry, University of Wisconsin-Madison