Question
I have gotten most of it out, but how do I clean the glue pot? The manual said heat it up, stick two sticks in it, let it cool down, heat it up and with the non-stick coating you can pull it out. Yeah, right!
A glue salesman said to soak it with WD40. Won't this effect the new glue? How do you guys do it? Also, I heard about using an "anti-static" spray on the tooling to prevent buildup.
Forum Responses
From contributor A:
Why won't the two stick method work for you? Do the sticks pull out without taking the block of glue with them? I insert my 1/4" thickness oak sticks into the pot and try to ensure that they are in a bent position inside the glue as it is hardening. I always wait until the next day to remove the hardened glue, but the window of opportunity to remove the heating up glue only lasts for a minute or so and if I do not pull on the sticks at that precise time then I have to wait another day to try again.
A couple of years ago I was visited by a snake oil/glue salesman who tried to peddle a gallon of stuff that was guaranteed to remove all glue residue from the pot. He wanted over 75 dollars a gallon and I told him to get the hell out of my shop after I sniffed the potion and thought it smelled too much like kerosene. I am not foolish enough to pour any type of petroleum liquid into my glue pot.
The glue pot cleaner I used heats up very thin and is irritating and toxic, I'm sure, so protect yourself from breathing it. I used a fan set on low to gently blow the fumes away from my face as I worked. I used only about half of the recommended amount of cleaner, and then found that I could get by with even less. The cleaner gets as thin as hot melted wax when heated and it's best to leave the glue pot lid on while it works. Especially if your pot is in really bad shape, with crusted on, terribly old burned glue, it doesn't work quickly and there is still plenty of scraping to do while and after you use the cleaner! With the lid on, the fumes it produces actually will help soften and loosen (somewhat) the old glue and crud from the pot interior. The instructions don't say so, but I recycled as much of the cleaner as I could and it worked fine.
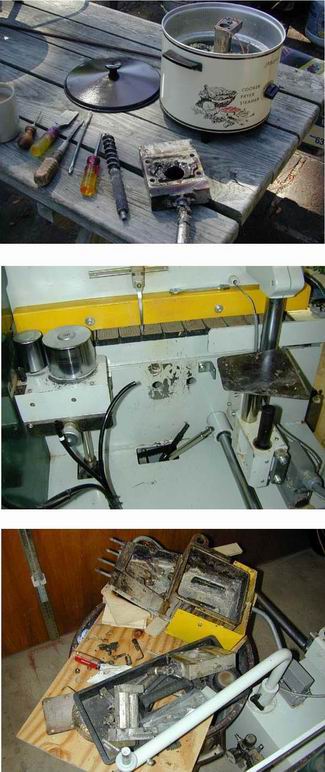
A small flame torch will be helpful to spot heat some of the smaller parts and stuck glue. Cleaning fluids like Naphtha and Acetone are helpful as well, once you get almost all the heavy glue off the parts. Small stainless steel and brass cleaning brushes are helpful as well. An old electric deep fryer with a thermostat and lid is great for soaking smaller parts in the heated glue pot cleaner! And, you can place the fryer out doors and let the parts cook until they all but clean themselves. Note: When I refer to "cleaner", I am referring to the Glue Pot Cleaner graduals, not cleaning fluids! Keep these highly flammable cleaning fluids away from hot parts!
Before you use any cleaner, you must get as much of the old glue and junk out of the pots as possible. The stick method works good and the timing is critical, as suggested. With the glue cold, start heating it and as the glue starts to melt around the edges, start pulling at the sticks - an old chisel or slotted screwdriver helps to loosen and pry the glue around the edges, to break it free. A lot of the work will be done when the pot is at or near fully heated so wear gloves and be very careful of burns. Keep a bucket of cold water at hand to dunk any part of your hands or arms that might get burned. Like a tech rep told me, it's not for if you will get burned, but when you will get burned. You'll find out that the temperature of the parts can be critical to cleaning them and/or being able to get them apart.
Scrape the pots and parts while they are still hot-to-warm to remove whatever you can. Also use whatever tools you think will help you get to all the nooks and crannies. I used screwdrivers, chisels, hardwood sticks, owls, etc - about anything that I had available. Add some cleaner to the main pot and heat it up. Add enough cleaner to be able to cycle it through the glue station. Any more than that and you are just wasting cleaner. Hopefully everything is working at least good enough that the cleaning fluid is cycling properly. I let mine run for about an hour after it reached the proper temperature for the cleaner. Shut it down and let it cool so you can start working on removing the cleaner and whatever it brings along with it. The cleaner hardens into a waxy, soap like substance and even it is no fun removing from the pot and you'll soon enough wonder how the hell you're going to get all the cleaner out of the pot! Don't worry about getting all traces of it out at this stage; you've only just begun.
Once you get out all you can that way, remove the whole pot assembly from the machine and set it up on a makeshift bench right close to the bander, where you can still have it plugged up and can fire up the heating elements when needed. If your glue pot and station is in real bad need of cleaning and heavily clogged up (as mine was) rather than waste a lot of expensive cleaner, go ahead and start disassembling everything to get them at least in condition to cycle the glue (and cleaner) though the system half decently. Using your owner's manual drawings, try and figure out how the glue pot and all the associated parts come apart. When you feel confident enough to start removing parts, remove everything you can without turning the heat on. Some of the parts might be welded together by glue that leaked or otherwise got on and between parts or simply hardened glue down into the flow system to the extent that you must heat up the glue to get the parts to break free. You can try torching the area to heat the glue that is keeping the parts stuck together. A hammer or mallet will very likely be required at some stage, but be careful to know what it is you are striking and even then, use a wood block or such to cushion the blows and keep from deforming any metal. Obviously, you don't want to start hammering away on an adjuster screw or a bearing surface. Be patient and keep referring to the parts diagrams and you will eventually get everything apart.
As you tear down the glue roller housing, check the sleeves and washers to see if they need replacing. Mine did, along with requiring a replacement of the top roller, which was worn well beyond specs. May want to go ahead and order a washer and sleeve kit before you even tear it down. The kit is basically a package of small parts that wear out after so many hours of use, generally needing replacing every year or two. It's a solid bet that if your glue station was not routinely keep clean that this kit of parts will need replacing also. Getting to these parts is about the last step in the disassembly process of the glue station.
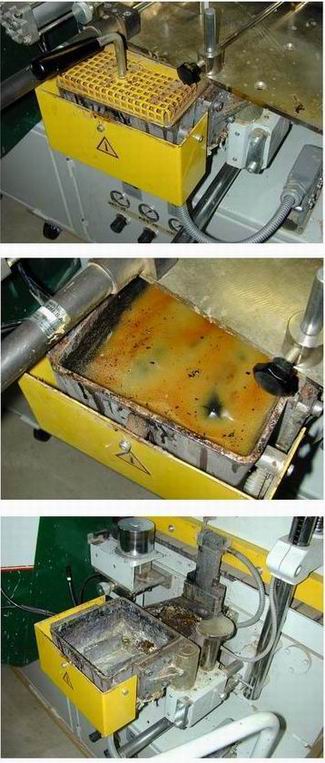
Here's a few images of what my glue station looked like when I first got it into the shop.
The first image is the glue pot and station with the pot lid on and looking just like when it arrived. Notice the gray plug at the lower right of this image. This is the plug that must be left connected when the pot is removed and set on a work bench, if you want to be able to work the normal heating features of the edgebander, there isn't much cable to get you very far away from the bander, but it is doable.
The second image is nothing more than the first image with the yellow lid removed from the main pot. What I didn't realize at first was that there is a second pot (reservoir) just ahead of this pot, which is covered by the large steel plate above the glue pot.
The third image is with this large steel plate removed and both covers removed from the front and rear glue reservoirs. I have already cleaned the main pot of most of the glue, though some cleaning wax still remains and as I found out, will require a great deal more detailed cleaning. The rear (smaller) glue reservoir has just had its top removed and you can see that it is thoroughly fouled with carbonized glue and looks to me like the cover has never been removed from this part of the glue station in the life of this edgebander. This gives you a look at what a mess this glue station was in, but much of the mess is still hidden inside the glue roller housing and within the passages. Below the pots, there are jointed steel shafts and rollers and surfaces that are covered with nasty burned on glue from what appears years of neglect!
2nd image shows a little closer image of the burned glue on and near the roller assembly. In this image, the cover for the forward glue reservoir has not yet been removed.
3rd image is a closeup of what I found when I removed the cover from the forward glue reservoir. It's obvious now that cleaning the main glue pot (reservoir) has not done much to improve the condition of the glue station in general. What you see is a heavy, hard crust of carbonized glue every bit a half inch thick, and surrounding the entire pot, with only a small remaining (clear) opening for the glue to cycle. This, along the (soon to be found) severely restricted passages inside the glue station, must have had the station working a no more than 20-25 percent of its peak performance.
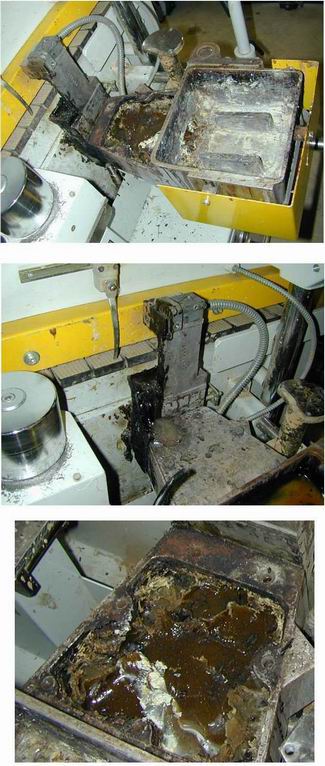
2nd image shows what the back of the edgebander looks like, with the entire glue station removed. This area, including the two steel rods (which are part of the roller and conveyer system) have been thoroughly cleaned, which took several hours of scraping and rubbing with cleaning chemicals.
3rd image shows the glue station removed to a makeshift workbench, plywood on top of trashcan. Notice that glue station is now turned around and the receptacle is still plugged into edgebander. The glue roller assembly has been removed and much of the old burned glue has been cleaned from both reservoirs.
I got a Brandt KD56 and it looks like there is quite a bit of equipment on top of the glue pot. It sounds like my next step is to find some of the cleaning granules. I looked at the applicator/roller assembly and it had quite a bit of glue hanging down from it (I would refer to it as a stalagmite or stalactite, but I can't remember which one hangs from the ceiling). In any event, thanks so much. The pictures are helpful.
He told me that hot melt itself doesn't burn. Rather, its shop contaminants (sawdust getting in the pellets, etc.) that's responsible for the burning. I nodded politely enough, but it sounded like BS to me.
Don't do that. It's really only grunt work and well within the capabilities of anyone who can turn a wrench and stand a little heat. I absolutely cannot imagine paying heavy duty bucks per hour for this sort of work. Technical work and training - no problem, and it's well worth the cost, whatever the fee.
Though it took several days for me to get the glue station completely cleaned up, it's as good as new now and I did learn how to properly service the station and even more valuable, how the glue station works and how to make the proper adjustments for peak performance. I'm sure I could do the whole job in a half day's work if I don't let it get that fouled up before servicing it. I have it on a quarterly general cleaning schedule and annually for complete breakdown and cleaning/inspection.
I use a product called StickFree 41 before each use of the bander and again at about 2 hour intervals while in use - glue roller housing; pressure rollers and their table; cut-off knife blade; copy shoes and wheels; cutter heads and saw blades; and wherever traces of glue might want to stick. I use TriFlow as a lubricant on the guide rods of the end trim and surface trim units.
There are a few other simple maintenance items to care about but it's the general lubrication with TriFlow and keeping a well maintained glue station that will determine the service life of the edgebander.
Contributor D, it sounds like BS to me too. I keep a very clean operation and a cover over my edgebander (with a custom cover my wife made) when it's not in use. The glue burns around the edges and wherever it's allowed to remain (out of motion) for very long, and a certain amount of this cannot be avoided. As far as glue maintenance goes, the more short runs you make, the harder it is on the glue, being heated and cooled and heated again. So I try and not load too much glue at a time, so as to keep a relatively fresh batch of glue (or high percentage of fresh glue) in the pot at all times. The way my bander use goes is that I try and have all parts requiring banding for the whole job ready to band and then fire up the bander and band everything at that time, inspect all panel edges for proper adhesion and edge trimming and then turn the bander off until the next time it's needed, which may be several days to a few weeks.
Contributor B, after reading your posts I got motivated to disassemble and clean. My motivation soon waned when I got to the shop. This machine advertised that it has a "pre-heater" for the coil and strips. Translation, the feed magazine is a heavy piece of machined angle built on top of the glue pot. It incorporates a system of pneumatics, rollers, pushers, etc. I removed a handful of allen screws and nothing would budge. I think that I am going to leave well enough alone. I got as much of the glue out of the pot and I'll let the tech take care of the rest.
As for the small amounts of glue for small runs... Does that work? I mean as much time as I have spent on this glue pot, I want to make my efforts last as long as possible. Do you still get carbon buildups? At this point, I am willing to spoon the pellets directly into the reservoir. No, not really. But it seems like a little routine maintenance can go a long way.
The only problem I had originally was that the glue roller rod had so much hardened glue covering it that I couldn't see how the jointed rods interacted or came apart. I had to manually heat the built up glue from the rods in order to have them separate so I could lift the feeding unit off and away from the glue station. You'll be paying the rep his hourly fee to torch the glue to soften it, which is the only way I know how to do it. Basically, the process of disassembly and cleaning is to soften and/or otherwise remove every bit of burned or hardened glue off of everything that is outside of the actual glue reservoirs. It takes ingenuity and lots of time (grunt work), and for my money, I'd rather do this grunt work on my dime cause all you're going to learn is that it's just plain hard and tedious work and not particularly technical in nature. This is purely a personal work ethic and you may find it well worth the cost of having someone else do this work, at "any" price. I'd almost guess that the rep will try and sell you a new or rebuilt glue pot and maybe more just to not have to deal with all the clean-up work. Might be worth it too, especially if they have an exchange policy to swap a used but clean glue station available, but I think you'll still have to do quite a bit of cleaning of the machine around the pot and on the drive rods.
1) Heat vaporizes the liquid part of hotmelt leaving the filler. The more heat is applied, the quicker the liquid evaporates. Most hotmelt manufacturers suggest 190C-220C. Most PVC products will bond well at 180C. If your product bonds well at this lower temperature, you have greatly reduced glue burn.
2) Most late model edgebanders are designed with a heat element at or close to the applicator roller. This element is responsible to maintain a correct application temperature at the roller. Other heating elements in the pot only maintain a lower temperature so that the liquid flows but is not oxidized. It is very important that this (top) element be operational. Most edgebanders will still run even if this element is defective. When the top element dies, it is a natural assumption to increase the temperature of the entire pot, thus causing rapid glue burn.
3) Many edgebander glue pots will hold between 2 lbs and 6 lbs of hotmelt. I have applied 900' of 7/8" PVC using 1 lb. of hotmelt. If I fill a 5 lb pot to the max, I should be able to band approximately 4500' of banding. This amount of banding is more than many shops apply in 2 months. Shops that leave their glue system on and heated for many hours will have oxidized glue when application time arrives.
*make sure the pot lid is replaced after filling
*do not leave the hotmelt bag open to dust
*use an unfilled hotmelt when the job allows
It did get better, I think. I saw how to maintain the glue pot. It is working fine now. So, after Day 1 we have a functional glue pot. It's a good thing that I did as much as I did before he got there. I like to do as much as I can, but this was a little beyond my scope. The glue was carbonized around the applicator. He said it is best to clean the pot once a month, but not necessarily "bone dry." This should keep the carbon deposits away.
Tomorrow we will be adjusting, training, and running samples.
Thanks for the previous post. I like the idea of putting less glue on - saving material and machinery. How do you gauge how much to put on? My bander has a feature where you can run the applicator opposite of the feed to apply more glue for 3mm.
To the original questioner: So far, so good. One of the things your guy will surely cover with you tomorrow will be how to adjust your rollers and glue temperature to obtain an optimum glue bond. If he somehow fails to do that, by all means, don't be shy about asking him. Sounds like the rep is right there in town with you - that's very good. Mine is a 5 hour, one-way drive from my shop. I believe the rate I was quoted was 50.00 per hour on the road and 75.00 per hour while in the shop. Of course, considering the road time, it's highly unlikely that a trip for any purpose would be accomplished in a single work day so a stay in a local motel would be added to the cost. As you can see, it could get pretty expensive to have a rep come down here to find and fix something that should be basic knowledge and which might only take a few minutes to diagnose and adjust or repair.
We got everything adjusted and began running 3mm PVC and melamine. Quite frankly I was disappointed with the glue line. I am using natural colored glue and it seems to be quite noticeable. He said that they get the same look with machines costing much more - Homag, etc. He said that the best way to conceal this is to use white glue.
Toward the end of the day, it looked like we were getting inconsistent gluing. I asked him about this and it seems like there is still carbonized glue working its way to the roller. He says that Stiles wants you to send in your glue pot for an exchange. He said that they completely disassemble the unit and cook it at 500 degrees and the carbon flakes off. The cost - $1,500. I think I am going to pass. I am going to try some of those cleaning pellets for the pot and soak the upper unit in solvent. I think that I am going to try the suggestion of heating at 180.
I am not sure if this is doing a good job or not. I have an Altendorf, so I know the quality of the cut is there. I did get the special grease guns, the manual, and the key, but did not get a spanner wrench to change the blades, a rod to change the buffing wheels, allen head tools, or a CD. Where do you get the grease for the glue pot? My manual and machine say to grease every 2 days - the tech was quite surprised.
It's pretty well general consensus that you test your glue to determine what the least amount of heat the glue requires to make a strong bond. I suppose I hedge on the hot side of this range. As much trouble as keeping the glue station clean and reasonably free of carbon, I can't think of anything much worse than having the banding start coming loose from my installed jobs. I hope you are not getting the idea that your glue pot will stay all bright and clean if you just do this or that. It won't. Once you do get it clean, you'll have to put it on a maintenance schedule and then actually do the work to keep it operating properly and efficiently. Keeping the temperature as low as reasonably possible, keeping the pot cycling glue as fresh as possible by managing the glue level and adding fresh glue pellets frequently, I think will go a long way in maintaining the glue station in top working order between maintenance cleanings.
I think putting the parts (completely disassembled) on a tray and baking them in an oven at 500, or on the cleaning cycle as suggested, is definitely worth a try. I may try that next time, especially with the glue pot. I'm thinking that the fryer full of cleaning chemicals will work better (than the oven) for the smaller parts.
Where on the glue pot is that high temp grease used? What is its specific purpose? My Operations Manual makes no reference of using a high temp grease on my edgebander. As far as I can figure, the glue itself provides the lubricant for the internal moving parts and everything outside the station (that gets heated to high temperature because of its physical relationship with the glue pot) doesn't need any lubricant, only a shot of StickFREE 41 to keep glue residue from bonding to these surfaces. The purpose of this product in not intended as a lubricant, and should not be sprayed on any heat source; rather it's a silicone spray that protects surfaces from glue adhering to them. As I mentioned in an earlier post, this product is sprayed onto surfaces every couple of hours in order to retard the inevitable glue residue from bonding to surfaces surrounding the glue pot area, not including the glue pot itself.
The only lubricant that my operation's manual refers to using is an LPS 1 greaseless lubricant (such as Tri Flow) and it doesn't go anywhere near the glue station. One of my earlier posts indicates where this lube is used.
I bought the StickFREE from Adwood. They sell it in 5-1/4 oz cans, 6 per case. I don't see any reason that you could not use a generic, silicone spray in place of the StickFREE 41. I bought the Tri Flow from Crawford Tool.
Maybe it was lack of sleep, sheer frustration, or a stroke of insanity, but I took a wire brush to it. I sure did! That "non-stick" stuff was peeling and worn out anyways, and that propane torch kept blowing out. I put a small wire thing on die grinder and got after it. Then I took some small flap wheels to smooth it out a little, and finished with a conditioning wheel - scotch brite between the emery flaps. Boy did it shine. I put it all back together and fired it up. I figured this way I won't have to be so delicate with it next time.
So what's the downside to not having non-stick in your pot? Can the aluminum react with the glue? Does it make it more difficult to clean - I think not! I wonder what damage I have/not done.
I have been trying to play around with the temperature. At 180 it seems kind of globby. As I get it at 190/195 it seems to be stringy. I got a sample of white from my distributor. It is Camplast. They say it has a higher heat resistance and it has more filler than Jowat. I thought that more filler was bad, but he compared it to contact adhesive, saying the more solids the higher quality.
Comment from contributor V:
We suggest that you use a hotmelt glue from HB Fuller known as 9250 as a hot melt pot cleaner. The 9250 usually sells for about $2 per pound, in 31# boxes. Just throw it in on top of your existing glue, bring it all up to temperature, and then flush the old glue, the char and the 9250 out of your system.