| Please read the tips below. If you still have difficulty preparing images for uploading at WOODWEB, send a message to the Webmaster. |
| How to Upload Images
Forums Forums If your image already exists on the Web (for instance, on your website or photo sharing site), you can point to the image in your Forum post, instead of uploading it. To do this, enter the URL of your image in the "Thread Related Image URL" field in the "Post a New Message" form. Project
Gallery On the next page, click the Browse button to select an image or video. In the next field, enter a caption if you wish. Click the Add Photo/Video button, and your file will appear in the box below the form. Use the same form to add more images/videos if you wish. You can edit the order of the images by entering a number in the box provided and clicking the Update button (note that higher numbers sort to the top, and each file's number must be updated for this to work). You can also edit the captions or delete images here. Below the form is a preview of what your listing will look like. When you're happy with it, click the "No More Photos/Videos - Save Project!" button to make your project appear at the Project Gallery. Sawmill
or Shop Gallery Below the form is a preview of what your listing will look like. When you're happy with it, click the "Finished with Photos/Videos - Proceed to Step 3" button. Exchanges Beside the "Image/Video" fields, click the "Browse" button to select a file. After completing the entire form, you can choose to preview your listing to review it with images/videos and make any needed changes, and then click "Post Message" to post your listing. Woodworkers Directory At the "List your company" page, next to the "Image to be included with your Listing" field, click the Browse button and select an image. After completing the entire form, click the "I agree to the terms above: submit my listing" button.
Transferring Cell Phone Images to Computer Text message
transfer Text
message transfer At your computer, open the email and download the picture as you would any other attachment. If you don't receive the message within a few minutes, check your junk mail folder. The sender's name is the cell phone number that sent the text message. Bluetooth
transfer If the Bluetooth will not connect to your computer, many drug stores have photo machines that are Bluetooth capable. Push the button on the screen that tells the computer you want to download photos. Make sure the phone is within the range the computer needs to pick up the signal. Wait for the machine to bring your photos up on the screen. Choose the pictures you want, and get a CD made with the pictures on it. SD
card (memory card) transfer Take
a picture with your cell phone, and save the picture to the EXTERNAL MEMORY. Once
saved, remove the SD card from phone and either: Cable
transfer Plug one end into the USB port on your computer and the other end into the cell phone. A prompt should appear asking if you want to open/view device. (If the prompt does not appear, the user may need to buy software from their service provider.) Once the device is open, open the "Pictures" folder (or similar), open the file, and save the image to your computer. Verizon
access to pictures
Forums, Galleries, and Exchanges Forums, Galleries,
and Exchanges File sizes may not exceed: 1 meg for images, 150 megs for videos, and 10 megs for PDF/Sketchup files. At the Forums, when an image over 400 pixels in width is uploaded, our system will display a reduced width image that links to the larger, full-size image. This is not true at the Galleries and Exchanges. Woodworkers
Directory
Reducing file size Reducing file size Most images work well at a file size under 125K (and should never exceed 1 Meg), and do not need to exceed 800 pixels in width or height (unless important detail will be lost at smaller dimensions). Aim for the highest quality at the smallest file size. To reduce both the file size and dimensions of an image, use an image editing program like Irfanview, which can be downloaded for free. Open the image in Irfanview. Choose "Image," then scroll down to "Resize/resample." Under "Set new size," select "pixels" and reduce either the width or height, whichever is greater. The other dimension will automatically adjust in proportion. Try a width or height of 800 pixels or less. Up to 1000 may be necessary for images with important fine detail (like small text). If the image is a JPG, choose "File," then "Save as" and save the quality as 80. This reduces file size but does not affect image quality discernably. Choosing
file format
JPG works best for photos, like this:
Reduce the file size of a GIF by limiting colors in the image to the lowest number that still offers acceptable quality. The illustration below was created with the minimum number of colors required.
The image will load fast since it is relatively small and composed of only two colors, but the edges of the letters are a bit jagged and unattractive. The rough edges can be eliminated by letting the image-editing software add a few more colors. The extra colors smooth the edges.
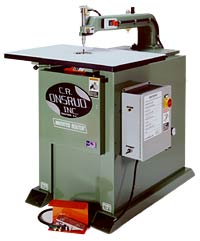
Reduce the file size of a JPG by setting the image editor's JPG quality parameter as low as possible, while maintaining a good-quality image. Notice the company logo in the image of the machine on the right. Though the file size of the lower-quality image (at left) is smaller, the one on the right is more attractive, so the extra file size is warranted.
| |
|