Microwave cabinet has aluminum door with Blum Aventos HK lift hardware.
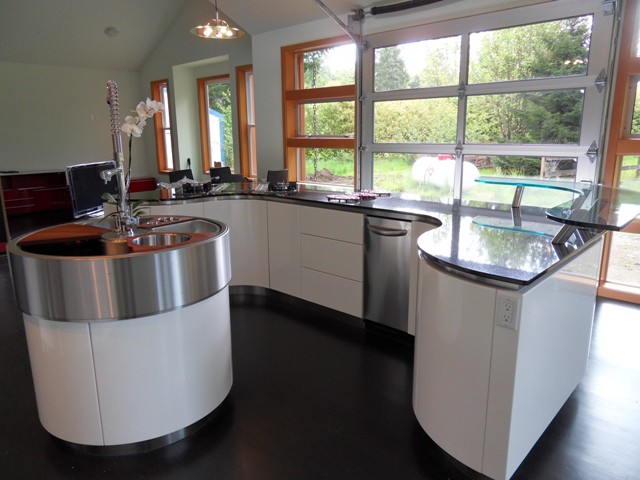
Garage style door to open up to the back yard in summer. Deck is yet to be built.

Doors are fingerpull except where impractical, so we installed Blum Tip-On touch latches. Drawers are Blum electric drawer openers.
Cabinet Doors are MDF with high gloss polyurethane finish. We wet sanded and buffed all doors and panels.
Viewer Comments:
I had no experience gluing the glass bartop to the stainless support posts. The first attempt was with a very clear silicone-like adhesive called Lexel. Unfortunately, when it cured it developed major air pockets which were visible through the glass. We had to unbolt the entire assembly, remove each post forcefully, clean each and every one of them and ultimately we went with a clear, two-part epoxy with a 30 minute working time. Overflow was cleaned with de-natured alcohol. I have yet to be back to see it after it cured- but the client hasn't called! I think I am safe. Anybody have a better system?
Chris,
This looks like a fun project. The glue that you're after is UV curing. It resists something like 1,600 psi in tension. I don't have brand info as I outsource this type of bonding. A google search should get you going.
I remember seeing pictures of a museum in Texas with a lot of garage doors opening onto a courtyard. Nice feel. These opened outwards to create awnings. I've been waiting for a project to use this system.
Good work.
Thanks Mark.
A quick Google search led me to the Masterbond website where they have a multitude of specially formulated, UV cured adhesives that are clear and non-yellowing. Next time......
That is very cool, we folks in the cornfields don't find many that would let me design a garage door into the wall. I really like the stainless accents.
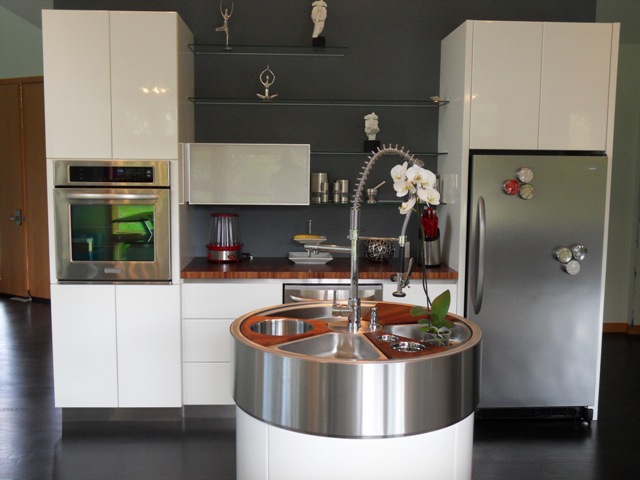
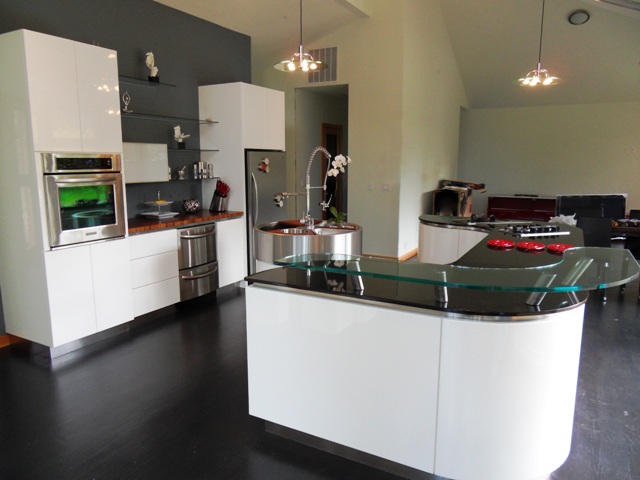
Wonderful.I love the circular sink/prep unit. One so rarely sees anything with a new look in kitchens. The open counter area without uppers and facing a light wall is magnificent. So much better than the crowded effect with the ordinary uppers... and all that light! Well done. Is the small undercounter stainless panel a dishwasher?
I just spotted it...that is a glass paneled garage door which opens the whole kitchen to the patio. Wow.
Who makes the circular sink unit or is it custom?
I haven't liked modern kitchens before, but that one is very nice. Well done.
Gerald, the circular sink unit is called a Waterstation and is made by KWC. It comes as either just the top portion, as was the case in this kitchen, or with a full stainless base. Yes- the stainless undercounter unit at the back wall is a double dishdrawer. The other unit in the island is a compactor. Thanks for the nice comments.
Wonderful work. Awesome design and great curves. I love it.
Hafele salse the u.v curing light and the adhiseve.will bond glass to metal & glass to glass
Very cool an inspiring! Would you expound some on the finishing technique and sequence, thanks.
Hi Ed,
You are right- I should talk a little more about the finish. We started with a two part polyurethane sprayed on finish. Sherwin Williams Polane is a good brand. In my experience, the longer you can wait for it to cure before polishing the better the end result will be. You don't have to wait more than a couple of days, but a week or two is better. Once the finish has fully hardened, it will hold a shine better. The next step is to wet sand the finish with 2000 grit sandpaper. You can get this at your local auto parts store. If you have heavy orangepeel to take down you might want to start with 1500 grit, but it will be harder to get the scratches buffed out later on. Use a rubber sanding block and dip it in some water, or use a spray bottle to mist the panel before hand sanding with the block. It will take the original sheen off and you will be able to see the high and low spots in the finish easily. Sand it down until you have a smooth flat surface. With some decent lighting, you will be able to see every imperfection easily and just sand it down smooth. The next step is to use some polishing compound and an automotive buffer to start removing the scratches and bringing up the shine. Once you have worked out the sanding scratches, you can switch to a polish and continue buffing to a high shine. Be careful not to press too hard in one place or "burn" the finish. This happens when you bear down and heat the finish up too much. You'll have to re-spray the panel and start over. Don't worry, it won't happen more than once!
If you are bidding a job with this kind of finish, figure on an extra half hour to one hour of labor per finished square foot for sanding, buffing and polishing and you will be fine.
Thanks Chris,
I have used SW Polane before but never sanded and polished after final coat. Thanks for taking us up a level or two!
Ed