Reprinted with permission from Custom Woodworking Business.
By Mac Simmons
On June 26, 1860, William Henry Perkin received a patent on a process that would synthetically produce alizarin, a purple or mauve-colored organic vegetable dye that came from the herb madder. His process used coal tar, which was a leftover waste residue of coal. It was from this byproduct that he was able to produce the first synthetic dye.
Perkin first did this in a laboratory. Then, after receiving his patent, he went on to open a factory where he was able to produce this new synthetic dye in volume. This man-made breakthrough eventually started a whole new industry.
Over the years, further advances in chemistry produced other synthetic dye colors that were better, brighter, clearer and cheaper than the original natural dyes.
In the woodworking industry, dyes are used in finishing for making stains, as toners for blending in different species of wood and to make unmatched colors in the same wood appear uniform. Dyes are added into coatings to make shading stains, which are color and coating applied in one operation. Dyes are also terrific for doing color touchups. All in all, they are a versatile colorant that can improve and enhance finishing, refinishing and restorations.
Dyes are sold in primary, secondary and various premixed colors like mahoganies, walnuts, maples, cherries, oaks, etc. The primary dye colors are blue, red and yellow. By mixing these colors in the right proportions and combinations, you will get secondary colors: orange (red and yellow), green (blue and yellow) and purple (red and blue).
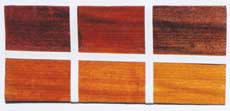
If the primary and secondary colors are mixed, it produces tertiary colors. Mixing the tertiary and the primary colors produces quaternary colors. Following is a list of some of the most popular combinations for mixing dye colors for furniture (due to variations in the color strength of dyes from different manufacturers, these formulas may need adjustments; see photo for a sample):
� Red mahogany � 1 part green, 4 parts red.
� Brown mahogany � 4 parts green, 4 parts red, 4 parts yellow.
� Dark walnut � 4 parts green, 1 part red.
If there is too much red in the color, add some green. Conversely, if the color is too green, add some red. Add yellow to mellow and lighten colors. But if the color is too yellow, you can add either red or green to darken it.
By varying this formula you can make numerous tints and shades of colors. Dye stains make excellent toners to adjust colors in woods or make unmatched colors appear uniform. Because they are so transparent, they add color that actually looks natural on wood.
Today, you can buy dyes in liquid and powder form. They are also sold in different solubles, such as water, alcohol, lacquer and oil. Some manufacturers sell their dyes in a combination-type formula, such as alcohol/water or lacquer/oil. Whichever type of dye you choose, be sure to use the proper solvent for each soluble that the manufacturer recommends.
There are several variables to consider when deciding which type of dye to select. Following are some of the different characteristics.
Starting with the water type, this dye has the best clarity and is the most transparent. It also is the most colorfast of the dyes. Since the solvent is water, it raises the wood grain and means a very slow dying process. You must allow this stain to thoroughly dry overnight before sanding and coating.
You can first wet the wood with water and a sponge to raise the grain, and then allow it to dry and sand the fibers smooth. Then, proceed with the staining. Distilled water should be used primarily as the solvent, although you can use warm tap water as well.
Alcohol and lacquer types of dyes are similar to one another. Both dry exceptionally fast, which makes them very difficult to apply by brush or by wiping them on with a cloth, except on small work areas. They work best when sprayed. Either of these dyes can be added to most coatings as a transparent shading stain, and they will not raise the wood�s grain. Denatured alcohol and lacquer thinners are the solvents for these solubles.
The oil dye is slower drying. This allows more open time, but a longer dry time is needed. Your project must be completely dry before you can coat over this type of stain. Mineral spirits are the solvent and are non-grain raising. Usually some boiled linseed oil is added to allow for easier application and becomes a binder for this stain.
In some cases you can adjust and balance dye stains by trying different combinations of acceptable solvents. This takes some trial-and-error testing. So keep a record of the formulas that you try until you find one that you feel comfortable using.
You may want to try an alternative solvent method that I use when working with combination types of powder dyes. First, dissolve the alcohol/water-type dyes in a little alcohol. Second, add either more water or alcohol, depending on which type of stain you decide to use. When using the lacquer/oil type, first dissolve the powder in some lacquer thinner. Then add the balance of either lacquer thinner or mineral spirits, depending on the type of stain you are using.
The reason for this suggestion is that alcohol and lacquer thinners are stronger and more effective solvents and will make the dye powders dissolve much faster. They are completely compatible with the other solvents when they are mixed together. I also add water to the alcohol stain to slow down the drying and add alcohol to the water stain to reduce grain raising and speed up dry time. I add mineral spirits to the lacquer thinners to make them easier to wipe, and lacquer thinners to the mineral spirits to increase the dry time. These solvents are compatible with each other. It just takes the right combinations to get them to perform better.
Once these dye stains have completely dried, they are very difficult to remove from wood. In some cases, using the same solvent that was used in the stain may lighten the color, but may not remove the color completely. Only bleaching will remove these dyes. So it is very important that you make color samples before applying these stains on your work.
Also, the color of the dry stain changes when they are coated. This is why you should always clear-coat over the stain before you decide if you have the right color. In addition, dye stains penetrate into the wood�s cells on some softwoods and spongy hardwoods, causing woods to look blotchy. And certain areas in wood can absorb more dye stain due to conditions in the shop, weather, etc.
If the wood blotches, try wiping it with a cloth infused with the same solvent that dissolved the dye. This should lighten the color and may make it more uniform. A few thin wash coats of glue and water sizing will prevent the dye stains from penetrating deep into the woods.
You should keep a record of the formula with the ratio of dye to the solvent and list the way you measured them (i.e., teaspoon, tablespoon, measuring cup, scale or any other device you use to mix your stain). To make up uniform batches of color at different times, you need to use the exact formula.
Do not judge dye colors as they are being applied, because they are very deceiving to the eye. Both powder and liquid stains may appear one color, but when they are coated, the colors look much different. Always test and make samples whenever using any dye. It will save you a lot of time and avoid problems.
Again, the color strength of dyes varies from each manufacturer, so be sure to read what ratio of dye to the solvent the manufacturer recommends. Normally, the ratio is 1 ounce of dye to 1 quart of solvent. In most cases, this depends upon the intensity of the color you want to achieve and the type of wood you are using. Generally, you will make more than one quart of stain from most dyes.
Whichever dye you choose, mix it in either glass or plastic containers and store it out of direct sunlight. Be sure to strain the stains after they have been mixed, as some dye powders do not dissolve 100 percent and you may end up with colored particles in your stains.
I also suggest that you wear a dust filter mask and rubber gloves whenever you mix any dye or apply dye stains with a cloth or sponge. (Remember, dyes are permanent.)
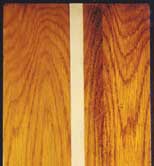
Dyes are excellent for doing furniture touchups because of their transparency. They do not block out the natural wood, as pigmented colorants will do if they are not thinned out.
(Note: Pigmented colored particles leave a translucent appearance because they do not dissolve. They lay on the surface of the wood, and light cannot pass through these microscopic colored particles. On some finishes, pigmented colorants do a better job of matching opaque-colored finishes. Also, pigmented colorants have a few white colors plus a multitude of other colors that can be mixed from them. So there is place in most shops for both dyes and pigmented colorants. See photo.)
When you are looking for clarity, you want to use dye stains to color in damages on transparent finishes, since these colors allow light to pass through at different angles. Touchups look natural and are not distorted by reflection from different lights or when viewed from other positions.
You should mix the dye with the proper solvent for doing coloring only when doing small touchups, because the solvents dry too fast. It is better to mix the dyes into the same coating or a compatible coating with the solvent, and then add the dye to get the color. That way you are adding color and coating with each application of the mixture. You should test the mixture on a piece of glass or white paper after the dye is mixed into the coating so you can see the final color before starting to do the touchup.
You can use powder dye colors to French-in color. This is a technique also known as �finger coloring,� where the dye is picked up on the finger tip and lightly smeared across the damage to be colored. It is then padded or sprayed over to seal in the color and repeated until the color is matched. The dye also can be used directly on the pad for padding in color on a damaged finish to adjust the color or make it uniform.
There are many different dyes sold today. Before buying any dye, you should determine whether it will be compatible when sealed with the coatings you will apply and whether it can be added to your coating and used to make shading stains. You also should know how the dye is applied, what solvents are used to dissolve or dilute it and which solvents will speed up or slow down its dry time.
Today, formulators have transformed ultra-micronized pigments into dyes that are non-bleeding, colorfast and fade-resistant. Chemistry has come a long way since Perkin found the first synthetic dye in 1860.
Reprinted with permission from Custom Woodworking Business.