Home » Knowledge Base » Knowledge Base Article What's New  |  Site Map 


Today's
Sponsors:


Catskill Timber Industries

Central Hardwoods

Charles G.G. Schmidt Co.

Chicago Dowel Company, Inc.

3M Corporation

5 Star Tooling

A Brazilian Wood Depot

Abrasive Resource

Accu-Right Squareness Gauge

Accu-Router, Inc.

AceCo Precision Wood Tooling

Activa

Active Machine & Tool

Air Cleaning Systems

Air Handling Systems

Aktrin Furniture Information Center

Alan McIlvain Company

Algoma Lumber Co.

All Star Adhesives

Alliance Millsoft

Allied Machinery Inc.

AllRout

Amana Tool

Ameitech South

American Fabric Filter Co.

American Institute of Building Design

American National Woodworking Knife

American Rotary Converters

Anchorbeam Timberworks

Andreou Machinery

ANEST IWATA USA, Inc.

Antique Building Materials

Anver Corporation

Apollo Sprayers Inc.

Arbor Processing Inc.

Architectural Elements

ArtCam

ATEMAG

Atlantic Machinery Corp.

Auton Motorized Systems

AWFS

B.H. Davis Company

Bailey's Inc.

Bainbridge Manufacturing

Baker Products

Banks Hardwoods

Barn Detail

Barn Door Lumber

BC Wood Specialties Group

Beaver Tools

Benz Incorporated

Berenson Hardware

Best Cabinets

BetterVacuumcups.com

Biesse Group America

Biewer Lumber

Binks

Black Bros. Co.

Blackhawk Machinery

Brazilian Direct Ltd.

Brown Wood Products Co.

Byrd Tool

C.R. Onsrud

Cab Parts

Cabinet Door Service Co.

Cabinet Pro

CabinetCRUNCHER Cutlist & 3D Cabinet Design Software

Cabinetmakers Association

CABPARTSPRO

CAD CAM for the Home and Small Shop

CADCode

Cag Lumber

Camco, Inc.

Carbide.com

Carolina Woodworking Consultants

Carter Products

Carvewright

Carving Technologies

Cash Coatings

Castle


WOODWEB DISCLAIMS any and all RESPONSIBILITY and LIABILITY for the accuracy and application of the information below. Readers agree to evaluate the significance and limitations of the information provided, and accept full responsibility for the application of this information. Read More ...

Would you like to add information to this article?
Interested in writing or submitting an article?
Have a question about this article?


Applied wainscot       Creating fake raised panels for the lower portion of walls. April 3, 2002

Question
I recently installed a wall to wall bookcase. The customer has decided they would like the lower portion of the walls to have the appearance of a raised panel, using 1/4" maple and a maple moulding applied over this. All these materials would be pre-finished with a dark red stain. What should I do with the seams? 1/4" seems to thin. Should I use 1/2" ply and rabbet the joined edges, which would give me a glue edge? Should I run the panels vertically or horizontally to eliminate more seams?

Forum Responses
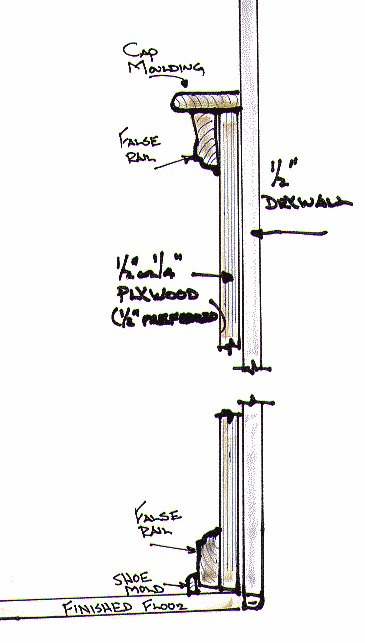
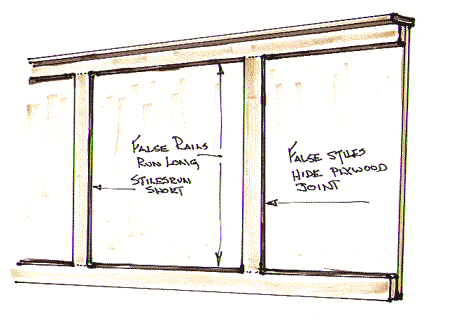
Generally, you have vertical pieces (between the base molding or bottom rail) and the chair rail or top rail. You can apply your 1/4" molding to the wall with panel adhesive, grain vertical, and joints every 4 feet or less (space evenly on wall). You can nail into the wall at the edges, which will later be covered by top and bottom rails. Then run your bottom rail across in the longest lengths possible, overlapping the bottoms of the panels. Say this bottom rail is 3/4" thick. Run your top rail/chair rail across the top, longest lengths possible. Use a spacer so it is an even distance above the top of the bottom rail. Again, top rail should overlap panels. Say this top rail is also 3/4" thick. Then run your vertical pieces in between the top and bottom rails. They should be 1/4" to 1/2" thick, so they sit back from the faces of the bottom and top rails. Back from any molded detail you put on the edges of the bottom and top rails. These vertical pieces cover the seams on the 1/4" and also cover the nails you used to nail to wall.

You can also put base molding over the bottom rail if you wish and another piece of molding over the top rail. If no molding over the top rail, remember to rabbet the bottom of it to lap over the tops of the panels and yet the top of it still hits the wall.

Another option is to cope and stick the rails and verticals, but that gets a little touchier.


Just what is a simulated panel look? It's either paneled or it's not. I believe we are talking wainscoting here. Don't waste your time with 1/4" ply - it costs about the same as 1/2" MDF, which will give you a better finish and save you time in labor. You can also pre-fab everything in the shop and then, after screwing off all the panels in about as much time as it takes to set them where they go, all you have left is a nice afternoon installing the base board, nozing and skirt. Tip: keep the grain of the panels vertical.


From the original questioner:
A simulated panel is basically the cheap way of getting a raised panel look. Many newer homes just install a chair rail moulding and below that they make a box out with a small 1 1/2" moulding directly onto the sheet rock. In this case, the customer wants a wood stained finish and they don't want the cost of a recessed or raised panel wall system. He had this done in a previous home using 1/4" ply on the wall and a small moulding to box out a raised panel effect. I have done raised and recessed panel wainscot before, but not as this customer describes.


We've done some of this type of work. I won't use 1/4" plywood for it, though, because it's poor quality and won't stay flat. Always make your veneered panel joints fall under a panel mold. (Gain vert. and the panel can be any width up to 48". You can edge join 1/2" MDF or p board core in the shop, but it takes too much time.) We always pre-finish in the shop, which gives a higher quality finished product and saves field time.


Here are a couple of quick sketches that I hope will offer a visual guide to this discussion. The sketches are generic in nature, but I think they reflect the thrust of what's being described.

I think the "worthiness" of the entire approach is subjective. It certainly isn't a substitute for true raised paneled wainscoting, but on the other hand, if the workmanship is good, it's a lower budget approach that can work in the right environment. The more embellishments that get added to this technique, the better it starts to look - but at some point, the additional work will push it into the higher cost bracket.


From contributor T:
In a multi-million dollar house I did the cabinetry for, I saw the trim guys doing a simulated raised panel with 3/4" plywood and different panel mouldings. As it was going up it looked like crap. I was moderately impressed with the finished product, however, and the savings in labor for these huge paneled rooms was tremendous, especially when you consider they kerfed plywood to do arched elliptical openings and curved walls. They missed a few basics, though, like putting joints anywhere (they used 8' rips and didn't stagger or even miter the ends) and nailing where it needed to be filled instead of where it would be hidden by moulding.

It goes against the grain of a northeastern raised woodworker trained by a boat carpenter to do this stuff, but it does have merit. You have to look at it as something that can be put up on site with a minimum investment of tools and moderately priced, consistent panel products.

I've employed the 1/4" plywood technique described with fake 1/4" x 2-1/2" stiles and rails on a 1/4" background surrounded with panel mould, base and chair rail. I had to match the existing in a house. It cost me about $100 in materials for an entire room (several sheets of 1/4" birch ply and pine mouldings) and I charged as much as real wainscot. The client was as pleased as punch.


Contributor T, you are selling the carpenters on that project way short. This method of installation is just what our craftsman of yesterday did. The difference being they usually did the cabinetry on site, also.

I agree - 8' pieces of ply are not the best for rails and really are no cheaper than going with solid. If my panel mould is rabbeted, I will miter and glue the mould into frames then turn them over and glue and nail the ply to the panel mould. A small bead of panel adhesive around the perimeter and some in the field, I then push the unit into place and nail discriminately through the mould into the rails. This makes for tight miters, ply tight to the moulding and the rabbet tight to the rails. Once the panel adhesive cures it makes a solid connection to the wall, and 1/4" ply is sufficient. This does not allow you to nail the ply to the wall first, which I refuse to do anyway, and apply the stile and rails after. It sounds involved but is actually quicker than trying to fit miters in place to walls that are not flat.


Have you reviewed the related Knowledge Base areas below?
  • KnowledgeBase: Architectural Millwork

  • KnowledgeBase: Architectural Millwork: General

  • KnowledgeBase: Architectural Millwork: Millwork Installer

  • KnowledgeBase: Architectural Millwork: Moldings

  • KnowledgeBase: Business: Project Management

  • KnowledgeBase: Primary Processing: General

  • KnowledgeBase: Woodworking Miscellaneous

  • KnowledgeBase: Woodworking Miscellaneous: Woodworking

  • KnowledgeBase: Knowledge Base


    Would you like to add information to this article? ... Click Here

    If you have a question regarding a Knowledge Base article, your best chance at uncovering an answer is to search the entire Knowledge Base for related articles or to post your question at the appropriate WOODWEB Forum. Before posting your message, be sure to
    review our Forum Guidelines.

    Questions entered in the Knowledge Base Article comment form will not generate responses! A list of WOODWEB Forums can be found at WOODWEB's Site Map.

    When you post your question at the Forum, be sure to include references to the Knowledge Base article that inspired your question. The more information you provide with your question, the better your chances are of receiving responses.

    Return to beginning of article.


    Refer a Friend || Read This Important Information || Site Map || Privacy Policy

    Letters, questions or comments? E-Mail us and let us know what you think. Be sure to review our Frequently Asked Questions page.

    Contact us to discuss advertising or to report problems with this site.

    To report a problem, send an e-mail to our Webmaster

    Copyright © 1996-2008 - WOODWEB ® Inc.
    All rights reserved. No part of this publication may be reproduced in any manner without permission of the Editor.
    Review WOODWEB's Copyright Policy.

    The editors, writers, and staff at WOODWEB try to promote safe practices. What is safe for one woodworker under certain conditions may not be safe for others in different circumstances. Readers should undertake the use of materials and methods discussed at WOODWEB after considerate evaluation, and at their own risk.

    WOODWEB, Inc.
    RR4 Box 265A
    Montrose, PA 18801

    Contact WOODWEB