Assembling Operable Louver Shutters
Here's a detailed, expert thread, with pictures, explaining how to build shutters with louvers that operate. April 2, 2013
Question
I have an opportunity to quote on California shutters and I�m having difficulty finding a way to fasten the shutter to the adjusting rod. I am aware of a clip that Rockler sells, but I�m wondering if there are other methods to do this. The factory ones have what looks like a staple similar to what is used to TV cable inside our homes.
Forum Responses
(Architectural Woodworking Forum)
From contributor U:
Staples - 1/4" crown staples. They are most commonly 5/8" or 3/4" length. We prefer using the 3/4 into the back of the tiltrod and the 5/8" shot back through the tiltrod staple into the louver. Staple spacing is based on louver spacing, so if you buy a premade tiltrod, be sure to get the correct staple spacing. If you are not set up for building shutters I would think twice prior to quoting a shutter order - just a word of caution.
From contributor O:
I apprenticed in a shutter shop that had several sorts of staplers that worked on spacer rods inserted for whatever spacing we needed. That equipment was mostly shop built, and pneumatic, with little advancing servos and staplers that shot the staples just so. It then advanced so far, then shot another, etc. We even had heavy gauge bronze staples for exterior moveable louvers. This is all very tricky if you are not set up for it. I have seen more than one first timer make panels that (finally) operated fine - until they were painted.
From contributor U:
Contributor O is correct, the attachment and operation of the tiltrod is a very tedious and tricky application. Nothing that cannot be overcome with time and persistence, even I eventually did it. Doing this under the timeframe of delivering a sold order within a limited number of weeks or days can be overwhelming. You may want to consider an operable shutter that does not use the traditional tiltrod, but an attachment that goes on the ends of the louvers to move them as one. I believe that for a shop with limited shutter capabilities, this would be easier to set up for. We just added this feature to our line and I am actually in the middle of our first order now. Of course this would all depend on the customer wanting this type of panel, as it does appear more modern and not as traditional as the panels with the tiltrod. Plus we charge more per square foot to do this.
From the original questioner:
Thank you Contributor U. I was at a local Homeshow recently and there was a dealer selling shutters and they had a tilt rod similar to what you are describing. The tilt rod had a fixed thin piece of metal that fit into a slot in the shutter. There was obviously a pin through the metal clip inside the shutter.
From contributor U:
You have to either cut the louver short and use a pin a spacer washer, or you cut out a slot in the stile to make room for the metal strip. When you use the staple/tiltrod method, you have to have a really good crown stapler, equipment or a jig for shooting staples into the tilrod at the right height, distance, and then be able to attach them to the louvers. With lots of practice you can do this second step freehand, but I suggest another jig for that too.
The newer method of using the metal strip at the end of the louver requires the drilling of a 5/64" (or larger) hole in the end corner of the louver and then cutting the slot (method I prefer) into the stile. These two steps can be accomplished using a hand drill and a special jig for drilling and a table saw. Most shops have these two items available and the setups are not near as critical as the staple method.
From contributor S:
I share the hesitance to do away with the center tilt rod for reasons of atmosphere and authentic appearance as mentioned above. The alternative side links look more like a 1950 louvered aluminum and glass "Florida window," used in the exterior balmy sunrooms. Having visited a shutter facility once I realize they don't idly pop staples in and I respect your admonition that "if you are not setup for building shutters, I would think twice".
From contributor U:
We actually ran into one of those probable problems today in building the panels with the louver device instead of the traditional tiltbar. We are pre-drilling the corner louver hole for the tiltless rod attachment, prior to assembly. This means the louvers have to inserted with the extra corner hole positioned to the rear of the panel and to the stile side that has the cutout notch. After working on another order for three days and then returning to the tiltless order, we forgot this and inserted the louvers as usual, which was wrong. My assembler says it is my fault for not reminding him, but I pulled rank and reminded him I am the boss, and his dad as well.
Both the tiltless and the tiltrod panels have pros and cons. The tiltrods have been used for I know well over 180 years, maybe longer. I am concerned that the tiltless device will have unique problems, especially since the attachment point is at the end and the very edge of the louver. There is not much wood surrounding the screw or the brad that is used for holding the rod to the louver. Staples, however, are shot into the center and thicker edge of the louver. If done correctly, any potential problems are spotted and stopped at the shop. I have very few callbacks due to staple problems, and even these are usually not the fault of the staple use, but probably due to someone mishandling or abusing the shutters.
While both methods of getting the louvers to operate require jigs or equipment, and both have pros and cons that go with their use, I was just saying that I believe the easier method for a shop new to shutters would be the tiltless feature. Contributor s is right in that this is not a traditional look and customer approval would definitely be required before going this route.
From contributor D:
I agree that tiltrods are the way to go. Tiltless features have been around for close to eight or nine years now and I am just now doing my first one. I believe in letting other people work out the bugs. I do have a designer I really like working with, and her customer who is moving here from south Florida. This is around a $10,000 order and I wasn't about to not take it. I like the contractor as well, so this was really a project that has benefits beyond the actual shutter order.
I have found that using good wood in the louvers and tiltrod (for holding the staple), using the right length of staple and shooting most of them either in person or by my son, makes a world of difference. When I had a couple of installers working for me, I also found out real quick that transporting them improperly to a jobsite is a major cause of staples working loose. I never haul panels flat. I always stand them on edge with plenty of moving pads in between them. When unwanted pressure is applied to panels and the tiltrod, the staple can be loosened ever so slightly and then work completely loose later on.
From the original questioner:
I have using my Bostitch 18 gage stapler and trying to get the right depth which is not a problem, but I am concerned about my aim and to do it repeatedly is probably the challenge. I have considered adding an extension on to the safety so that it would hold the gun at the proper height. I also thought of shortening the drive pin so that I could press the gun directly on where I wanted the staple.
Have you tried any of these methods? I share your concerns with having a pin at the leading edge. What species of wood are you using? I was thinking poplar but I also have access to European steamed beech. It machines really well and is harder than poplar so I am thinking it would hold the staples better than poplar.
From contributor U:
I actually use the same gun (Senco) for both my staple shoots. I like Bostitch, but the undersize crown always concerned me, but it is only around a 64th under 1/4" I believe? I have always pulled the striker from my guns and cut them off and then filed them square, but not so short they would drive the staple flush. Leaving the strike the normal length always made my gun ride too high over my work surface. I also use a tray underneath the gun to set the distance, both functions. I always build my shutter panel with the louvers in, then attach the tiltrod. I see where many companies attach the tiltrod to the louvers, then they use the skeleton to build the panels. I have never done this. It actually may be easier for some but seems more difficult to me.
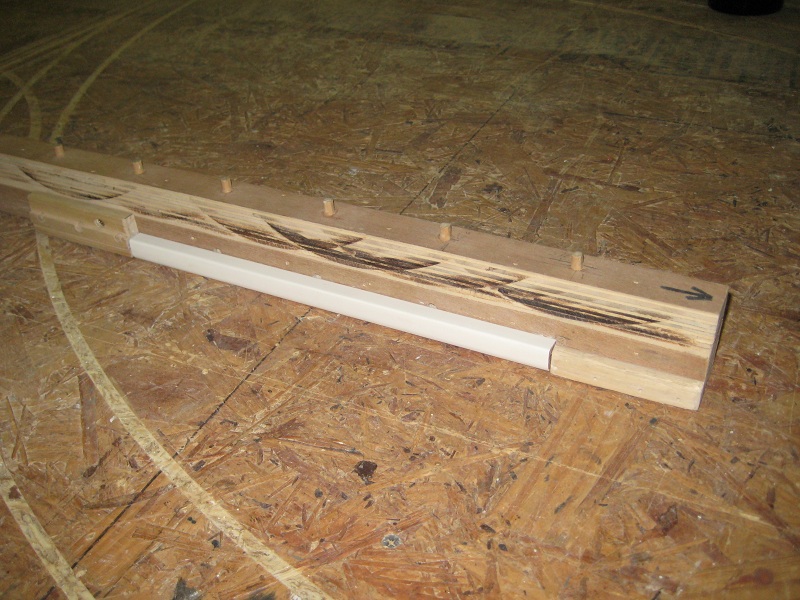
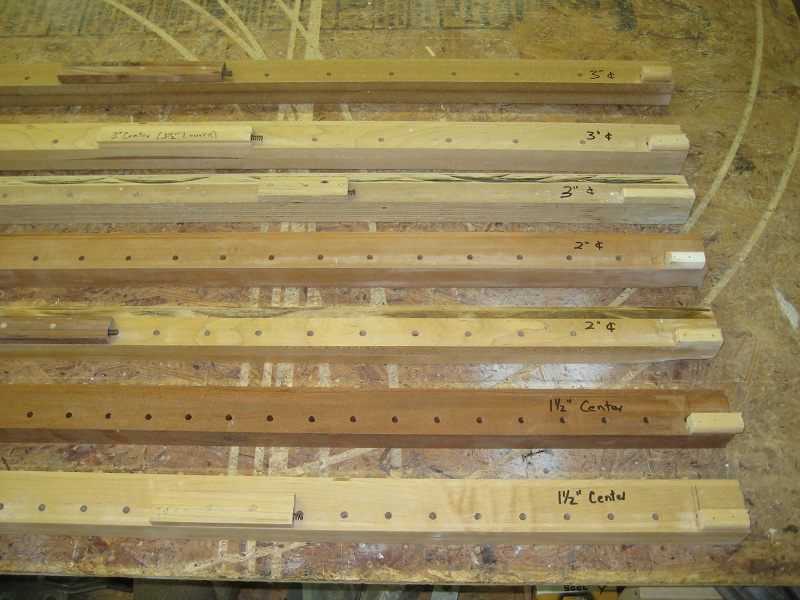
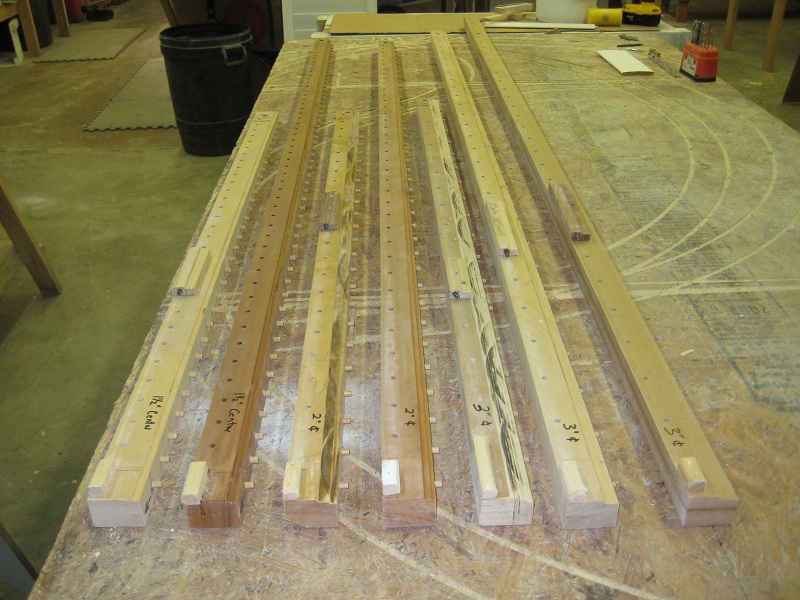
I have a few images below to share. The first jig is the one where I shoot the staples into the tiltrod. I have the setup that holds the stapler, plus a flip stop that lets me advance the tiltrod. There is a separate part to this setup. It is made like a story pole, and it has dowels inserted into the top that will rest against the flip stop. This piece will hold the tiltrod in place using the tension of a spring. The piece that holds the spring can be moved in set increments to allow for different lengths of tiltrod. I have a total of six of these that can used with the jig that holds the stapler. I have six because you have to shoot the staples on different centers due to the different louver sizes. I have two jigs for each louver size. We offer 1 3/4" louvers shot on 1 1/2" centers. 2 1/2" louvers shot on 2" centers and 3 1/2" louvers shot on 3" centers. I advance the part holding the tiltrod with my left hand and operate the stapler and the flip stop with the right hand. I can shoot the average 36 to 42" tiltrod in about 20 seconds. This jig is extremely accurate and I only tweak or toss out maybe one in a hundred tiltrods.

Click here for higher quality, full size image

Click here for higher quality, full size image
Click here for higher quality, full size image
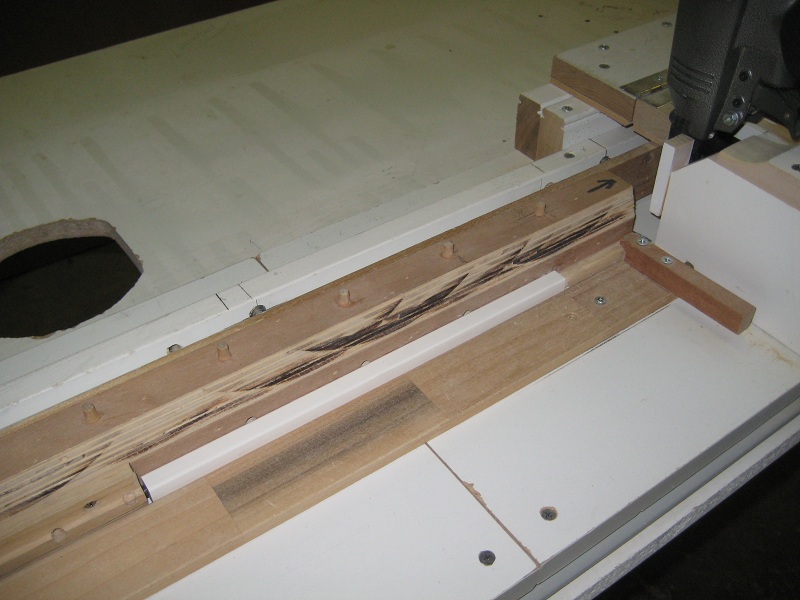
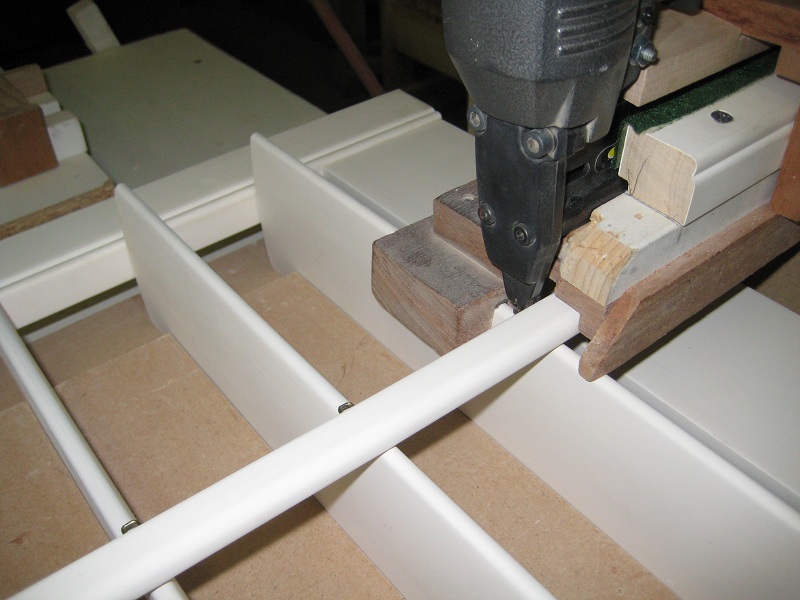
The next images show the carrier going in with the white primed section of tiltrod. I always shoot my first staple 1/2" from the end, and the jig is set to let this happen. You can see the equally spaced dowels on top of the carrier, and one as it has passed the flipstop, and then the tiltrod with staples shot on 2" centers and at the proper depth. I like to have 3/16" clearance to the inside of the crown.
Click here for higher quality, full size image
Click here for higher quality, full size image
Click here for higher quality, full size image
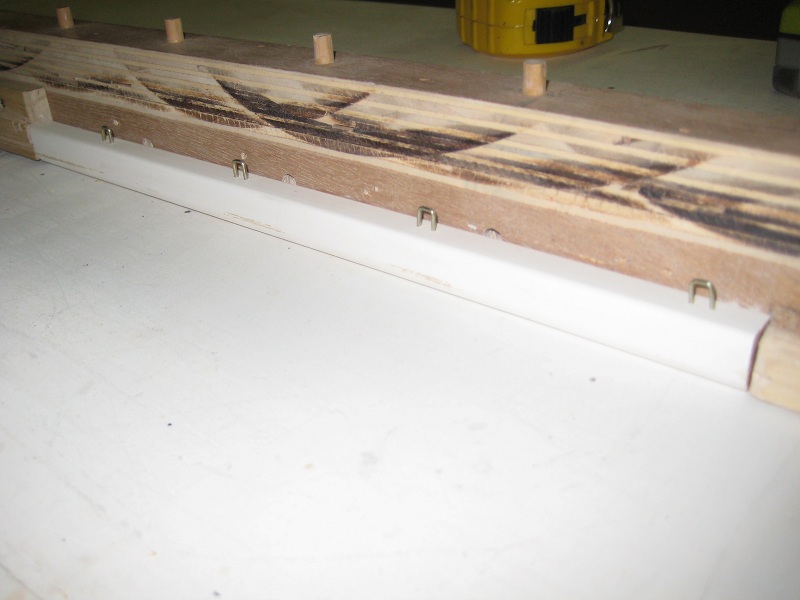
These are the carriers I use to support the tiltrod while it is being stapled. You can see the different hole spacings for the dowels that rest against the flip stop, plus the other row of holes that are drilled on the same spacing as the dowels. This lets me move the back stop that has the spring which holds the tiltrod in place. I have programmed my spreadsheets so that the tiltrod lengths are always adjusted in increments the same as the center spacing which we shoot the staples with. Such as a 2 1/2" louver order will have the louvers spaced 2" apart. The staples are also shot 2" apart on the tiltrod. My tiltrod lengths will be adjusted based on this spacing (or whatever is correct for the order) x 2" minus 1/2". So my tiltrod lengths for a 2 1/2" order will be 7 1/2", 9 1/2", 11 1/2", and so on until my maximum length is met, somewhere around 83 1/2".
Click here for higher quality, full size image
Click here for higher quality, full size image
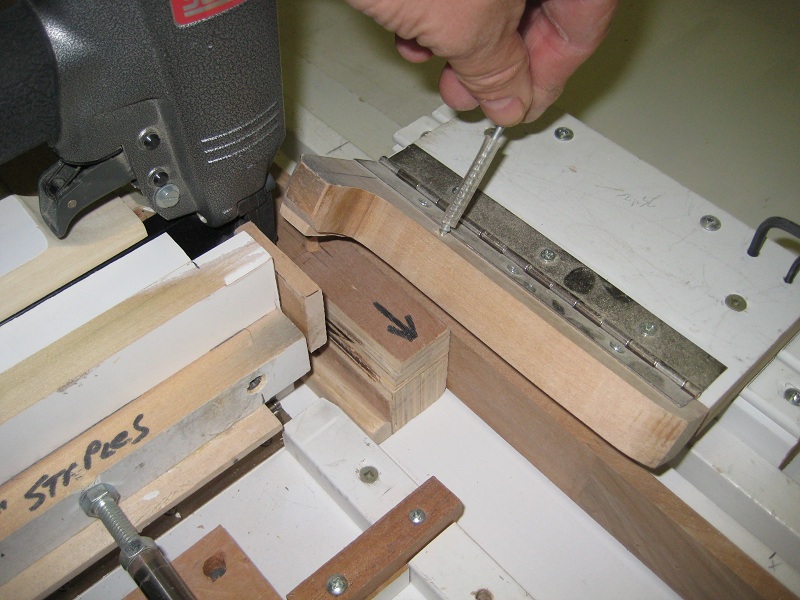
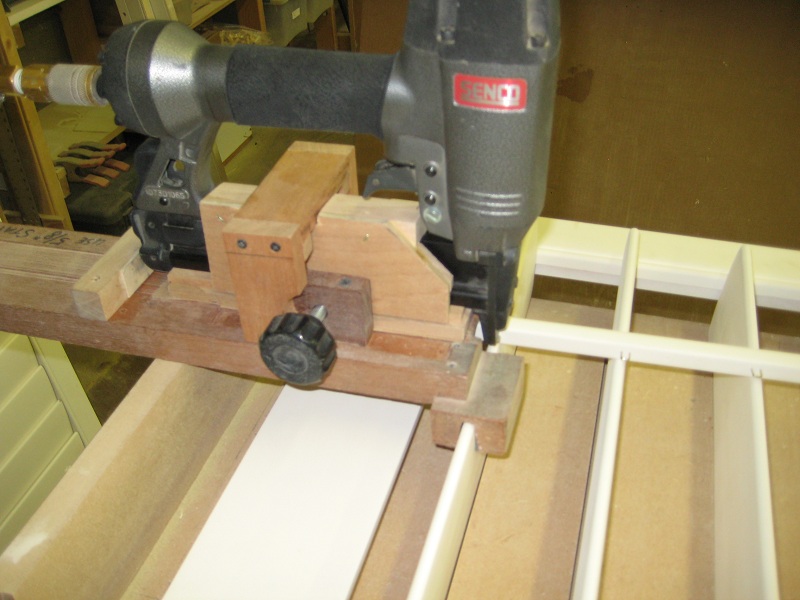
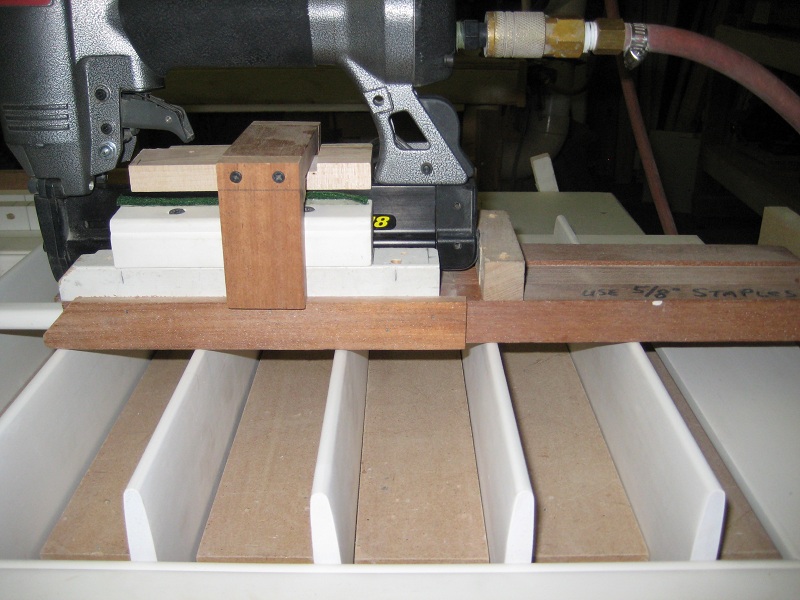
This is the jig/tray that supports my stapler while attaching the tiltrod to the panel. It has a long base, so it can ride and be stable on the plane of the louver edges. The tray that holds the panel also has a support board for supporting the jig when you first start and then work your way onto the panel. Take note that I use a nose piece under the tray that wraps the louver, letting me get very close to where the stapler should be. It is not super tight, as I like to slightly rock the louver getting the position just right. The height is predetermined by the tray and by adjusting the strike length, so I only have to focus on the vertical alignment and the louver edge. I use a T-square to mark a center line down all the louvers prior to starting this step, so I know where to position the tiltrod so it is in the center of the panel.
Click here for higher quality, full size image
Click here for higher quality, full size image
Click here for higher quality, full size image
From contributor U:
I find the hardest thing to accomplish with these jigs is the securing of the stapler. An inline drill was the trick to getting really good accuracy when making the carrier for the tiltrod. This part could actually be made from two pre-driiled stiles. Do you have an inline drill or something equivalent?
From contributor U:
One tip that may save you some time is to keep in mind that the depth of the staple in the backside of the tiltrod is key to aiding in the next step of attaching it to the panel/louver edge. If you drive the staple too deep, it makes it more difficult, as you cannot get the nose of the stapler where it will need to be. If you do not drive it deep enough the staple will rub against the louvers when they are open and closed, creating a binding situation that will eventually loosen some of the staples. I don't, but some people break or mold the back corner of the tiltrod to help. I have ground off part of the nose side of my stapler so it rides over the tiltrod.