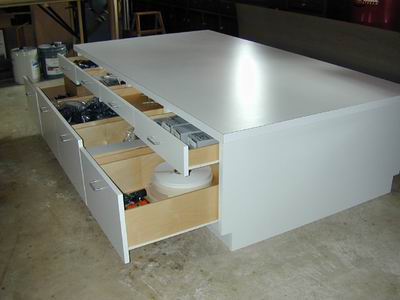
I built an assembly table after recently changing my cabinet construction to frameless. Of course, the table works as well for framed cabinets. This table is 4x7 and about 22" high, and rises to about 2 inches above my knees. Not only does it provide a flat surface for assembly, but as you can see, it provides much storage of hardware, supplies and small tools at a central location in my shop. The good folks of True32 provided the idea and inspiration for building this table.
I do cover the top with a sheet of large perforated foam (like drawer bottom or router pad foam) when I need to protect the project surfaces from damage. I buy the material from bulk rolls sold at a local fabric supply house. I like the foam better than carpet because the carpet tends to hold debris that might scratch any finished surfaces and it�s hard to find in the nap of the carpet. The foam is smooth surfaced with lots of holes that tend to shed most of the small wood chips, dried wood putty, and dried glue chips that I often get on the table surface. What doesn�t fall through the holes is easy to shake off. But the hard, flat and level surface of the laminate top is key to standing panels upright on, and having the important edges mate flush during assembly. Any give to the table surface makes it difficult to keep everything square and flush during assembly.
One option would be to stop here and attach some form of edge protection, spray the top with a moisture protective coating such as a spit coat of vinyl sealer. If the edge protection (1/4 to 3/4 inch thick wood strip for instance) was only attached to the edge of the top sheet, the top could be replaced fairly quickly and economically in the future.
The boxes are line bored to allow the slides to be placed anywhere along the 32mm spacing. The bottom (large) drawer boxes are not full height so that I can easily change drawer configuration as the need dictates by simply making different height drawer fronts. The two top center drawers are basically pencil drawers where I store rules, pencils, note pads, tape measures, marking tools, etc. The two drawers on each end are slightly deeper to allow boxes of assembly screws and other taller supplies. The set of 8 drawers on the other side of the table are 4 deep bottom drawers with 4 equal depth top drawers over them.
Comment from contributor A:
I picked up a drafting table (approximately 42 by 60 inshes). The top raises and tilts, and has a plastic-like cover that glue does not stick to. It cost ten bucks. Most commerical places are going to CAD-CAM and are unloading their old drafting tables for next to nothing.