Avoiding Glue Marks on Cope-and-Stick Doors
Here's a long discussion about how to avoid fingerprints or glue stains when sanding, gluing, assembling, and finishing raised panel doors. October 13, 2012
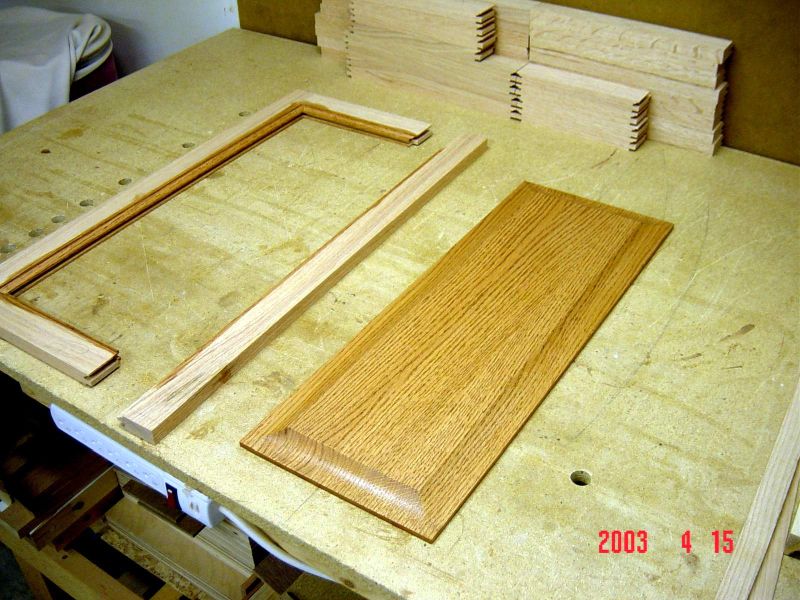
Question
We build our own doors and I want to improve our sanding techniques. We have a 37" SCMI wide belt sander that does an excellent job. We pre-sand the front profile and back of our raised panels before assembling the doors. I always tell my guys to watch out for excessive glue and to be careful when using a damp rag when wiping off excess glue from joints, because if a wet rag touches any pre-sanded part, it will show when stain is applied. And that is the issue we are having. After assembling the door, and sanding through the wide belt, cut to size, edge profiled and sanded, and palm/hand sanded; the doors have been through a lot of handling. The pre-sanded parts especially have been touched a lot and when we stain them, finger and water marks show up.
What can we do to improve this? I know that Titebond makes a particular glue that glows under ultraviolet light. How good and effective is this glue? Is there something similar to detect water or fingerprint marks?
Forum Responses
(Cabinetmaking Forum)
From contributor M:
I don't know about most people, but I keep my hands clean enough to prepare food when handling sanded or partially finished surfaces. Now that is a bit of a figurative overstatement, for the sake of making a point, but you get the idea. I also avoid cleaning off glue with a wet rag unless I really have no other choice.
From contributor C:
I always pre-finish my panels before putting them into the frames - that helps a lot. I also stain the frame insides (where it touches the panel) before gluing up with the panel in it.
From contributor W:
If you stain the profile first, it eliminates much of the problem. I do it on the stile and rail too. Just mask the cope and stick joint off. The stain will semi-seal the wood. Then assemble the door and sand. This method also keeps stain from puddling in the corners. I'm with contributor M on the wet rag thing. It just smears the glue and adds to sanding time.
From contributor C:
Here's mine.
Click here for higher quality, full size image
From contributor E:
I don't use wet rags on glue ups either. Instead I quickly shave the extra glue off with a chisel when I take the piece out of the clamps. The 20 - 30 minute clamp time is about perfect to get the glue nice and gummy so it can be sliced easily without making a mess, and also not be too hard.
From contributor O:
How you glue and assemble can result in little to zero glue squeeze-out. If you do happen to get some, scrape it off. Do not use a wet rag.
From contributor G:
Experiment with applying the glue further back from the inside of the joint so you don't get any squeeze out on the stick profile. This way the squeeze out actually spreads itself where it needs to be. We used to pre-stain but decided it took too much time and eliminated the problem at the source by not getting squeeze out in the first place.
From contributor F:
Exactly what contributor G said.
From contributor L:
As a one-off furniture maker, I also pre-finish the panels and inside edge of frame. While avoiding squeeze out as much as possible, I clean up and level with a cabinet scraper and/or hand plane.
However, I see the definite time advantage to not pre-finishing. I'm curious how you avoid the appearance of an unfinished line when the panel shrinks.
From contributor J:
We have compared the rail/stile seam on doors made with squeeze out versus no squeeze out. After staining and finishing, the doors with no squeeze out show a visible line along this joint where the stain wicks into the end grain on the rail and there is more likely to be a discontinuity of the film finish as well. The joint on doors with squeeze out is nearly invisible.
Have you guys noticed similar? Think anyone else (customer) sees it or cares about it? If a door supplier pointed it out to you, would it sway you to purchase, all other things being equal?
From contributor E:
My only thought is that if you never have any squeeze out, how can you really be sure you're applying enough glue? I'm usually pretty good with getting just a tiny bit of squeeze out and it's easy to clean up. I'd be nervous if I couldn't see a little something showing at the joint.
From contributor Y:
I think pre-finishing panels is the way to go. I also agree with contributor J about sealing the end grain with glue. You may get away with a wet rag on maple but it's a bad idea on most other woods. We also let squeeze out get stiff and then slice it off with a sharp chisel. Care in gluing will eliminate most of the problems. Though it takes a bit longer, an acid brush used to apply the glue holds down the mess.
From contributor G:
We experimented with how close to the profile we applied the glue on the tongue. We stay back 3/16-1/4" with the glue and do not get squeeze out and feel very confident about the joint strength. We have built thousands of doors with no problems.
We use eased edge cope and stick cutters to build doors. They have a slight radius on the edge of the stick cut where the panel enters the groove. This eased edge makes it easier to work stain into the groove to cover enough of the panel edge in case of the dreaded shrinkage.
Many shops outsource doors that are not prefinished. The door factories do not deal with glue squeeze out. This should tell you there must be a better, quicker way to deal with these problems. Solve the problem at the source instead of accepting it as a necessary evil.
From contributor C:
Well, I know everyone disagrees with this, but I get better results using a wet rag immediately after glue-up. Been doing it that way for over 30 years now, and never had a staining problem from it.