Question
Can anyone tell me how to make casings for a door jamb that has a radius header both horizontally and vertically? Do I need a way to follow the jamb, or is there a way to plot it on a flat surface and bend it over a form? It appears that I need to stay at 90 degrees when following both radiuses.
Forum Responses
(Architectural Woodworking Forum)
From contributor F:
Pretty heady stuff. To save a lot of typing, I'll recommend a good book on the subject of millwork with double curvature. The book is "Circular Work in Carpentry and Joinery" by George Collings. This book is quite detailed and covers 126 pages. Written in England and first published in 1886. The book on the shelves today contains all the original text plus new annotations and over 240 new illustrations by Karl Shumaker. The annotations were a big plus for me because I have some trouble at times understanding the arcane terminology in older English journals.
Visualize it all as mere radii, all in one dimension, and then the other dimension. Very difficult to describe, but once you see it, it is just a matter of doing it. I consider this probably the highest form of an advanced millworker's skills, and certainly not for the weak of heart or inexperienced.
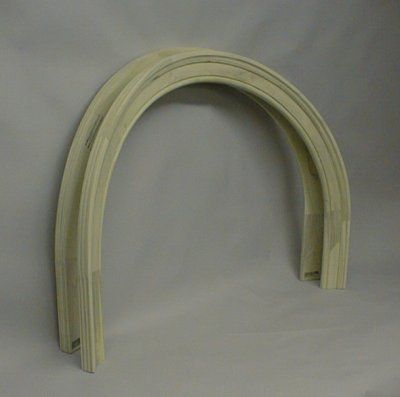
Depending on the curve and the volume of wood needed, your glue up options vary. Laminations work, but you have to deal with the visual affect of the glue up after machining. This may be undesirable when finishing real wood. I have also experimented with gluing up several steam bent pieces, then bandsawing the arch curve after. I found it easier to leave excess stock on the rough piece prior to milling the profile, then trimming that off later.
One thing to watch for - the wall radius and the arch radius must be a true radius. If the arch radius is actually something else, say an ellipse, things get much more difficult.
If this is an eyebrow arch with a low springline height, here is how you can make it. If it is a taller eyebrow, a half round or non-true radius, then this is only a beginning point, as it becomes much more difficult.
So, for a low springline eyebrow, you need to resaw boards that are as wide as the final overall height of the eyebrow. For example, if your arch height in elevation view is 8" and your moulding is 4", you would need to resaw at least 12" wide boards. After resawing enough material at about 1/8" thick x 12" wide, you need to laminate these layers at the wall radius on a form. A vacuum press is very good for this.
Once the curved 12" wide blank has dried, you can bandsaw out the 4" casing. To create the casing line, cut the casing first out of bending ply such as wacky wood. You can then lay that piece of bending ply over the laminated blank and trace its outline. This will give you a bandsaw line to follow. When done bandsawing, you have an S4S casing. If no profile is needed, you are done except for sanding.
To profile this "safely," I'd suggest a moulder such as the Williams and Hussey. Even with this machine, though, a good deal of curved work experience will be required because you are going to be guiding the S4S blank through with fixed point fences, a curved bed and a lot of free hand guidance. Not for the faint of heart. That's how we make them. We've done everything from casings to crowns using this method.