Home » Knowledge Base » Knowledge Base Article What's New  |  Site Map 


Today's
Sponsors:


Tongass Forest Enterprises

Tooling on the Web

Toolstoday.com

Touch Up Solutions LLC

Tractivity

TradeJobPlacement.com

TradeSoft

Trakware Systems Inc.

TRB Flooring Company

Tropical American Tree Farm

Tropical Hardwoods

UC Coatings Corp.

Unique Machine & Tool

University of Wisconsin

UWMO Auctions

VacDry Kilns

Vacuum Pressing Systems, Inc.

Vacuumpods.com

Vecoplan LLC

Vector Art 3D

Vectric Ltd.

Veneer Systems Inc.

Veneer Technologies Inc.

Vintage Perkins

VortexTool Co. Inc.

VyTek

W. Moore Profiles, Ltd.

W.L. Fuller

Wadkin North America

Wagner Electronic Products

WalzCraft Industries

Webb Abrasives

WEIMA America, Inc.

Weinig Group - USA

Western Dovetail

Williams and Hussey

Wisconsin Knife Works

WMIA

WMMA

Wood and Wood Products

Wood Doctor's Rx, LLC

Wood Tech Enterprises, Inc.

Wood Technology Inc

Wood-Mizer

Wood-Ply Lumber Corp.

WoodCabinetDoors.Com

Woodcraft Supply Corp.

WoodcraftPlans.com

WoodenBoat

WoodFinder

WoodJobs.com Search Consultants

Woodland Dimension Products

WoodLINKS

Woodmaster

WoodPlanet Inc.

WOODWEB

Woodworker's Supply/woodworker.com

Woodworker's Directory

Wright Timber

SK-USA

SketchList

SlipCon USA, Inc.

SnapDragon Associates, LLC

SNX Technologies

SoCalMachinery.com

South State Machinery

South Texas Moulding

Southeast Tool, Inc.

Specialtytools.com

SprayGunWorld.com

Stairguy Stairbuilding Videos

Stefani

Steve H. Wall Lumber Co.

Stiles Machinery

Stiles Shop Solutions

Stor-N-Fold Systems

Super Source Tooling Inc.

Supergrit Abrasives

Target Coatings

Techno CNC Routers

Template Services

Teragren

The Cayce Company

The Veneer Store

Thermwood Corporation

TigerStop

TigerwoodDecking.com

TimberKing

Timesavers Inc.

TMS Machinery Sales


WOODWEB DISCLAIMS any and all RESPONSIBILITY and LIABILITY for the accuracy and application of the information below. Readers agree to evaluate the significance and limitations of the information provided, and accept full responsibility for the application of this information. Read More ...

Would you like to add information to this article?
Interested in writing or submitting an article?
Have a question about this article?


Clamp Cart       Shop-made carriers for clamps. December 26, 2004

Question
I want to take my considerable collection of clamps off the wall and put them on a cart so we can move them to the work rather than lugging clamps back and forth. Has anyone built such a cart? What did you do right? What would you have done differently? Drawings or photos would also be much appreciated.

Forum Responses
(Cabinetmaking Forum)
From contributor G:
We use an old shopping cart. It has worked quite well for a number of years for pipe clamps. You can find one at any salvage yard.


From Sam Rogers:
Here is a shot of my clamp cart. There isn't much to it. It is just 4/4 poplar (chosen because I had a lot of scrap) glued and pocket screwed together. The base is a square of angle iron with casters attached (chosen because it was laying around the shop not being used for anything else). It will hold up to a six foot clamp. I really wouldn't change anything. I have been using this for about three years. This wasn't my idea - I saw something similar in a shop in one of the trade magazines.


Click here for full size image


Click here for full size image


From contributor S:
I like that scrap rack you have behind the clamp cart. Capacious but small in footprint. Real good idea!


From contributor L:
I built a cart similar to the one pictured. Only wish I had used bigger, better wheels. A cart full of clamps adds up to a lot of weight. Other than that, it works well.


From contributor T:
Jeez contributor K, you been peeking through my shop window? I just wanted to add that a heavy base is a good idea because of all the weight up high. My base is a box with about 100lbs of sand in it. Yes, big wheels are a must. I started out with 3". Now I have 5" and can actually move it.


The comments below were added after this Forum discussion was archived as a Knowledge Base article (add your comment).

Comment from Sam Rogers:
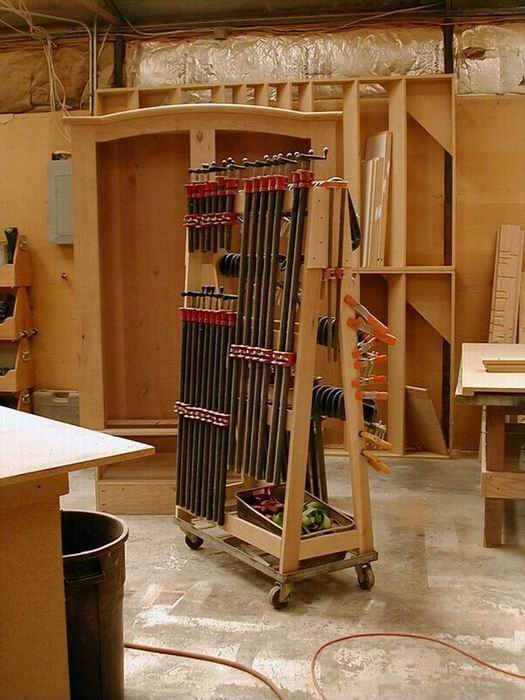
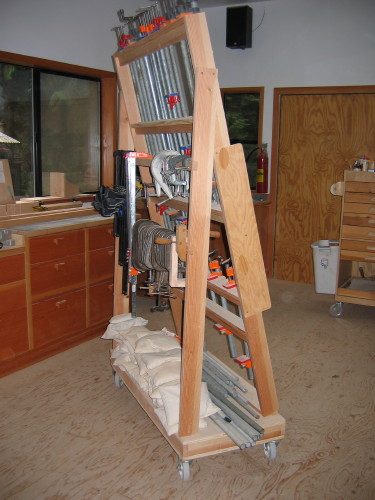
In addition to the images below, here is some information about how I made my clamp cart. Included are the Materials and Cut List and also the Tool Setup.


Item Qty Component L W D Material Notes
A 1 Base 24" 24" " Plywood *
B 2 Base support 24" 5" " Plywood * used to stiffen base
C 4 Base siding 24" 4" " Plywood * cut long to trim miters
D 4 Frame boards 5' 6" 4" 2" Pine just dimensional lumber
E 2 Top support 24" 4" " Plywood *
F 4 Casters 3" Polyurathane
G 16 Pan head screws " Stainless #14

** Notes **
1. Plywood is 3/4" or 1/2" Baltic Birch
2. Everything else used for this project is all scrap, at least for me.

Tool Setup

Set your sliding T-bevel...

First things first: Clamps are heavy! If one tries to keep this thing square to the base, by the time the clamps are loaded, it will simply fall over. Setting an angle on the frame boards drives the head weight of the clamps to the center of the cart. The steeper the angle, the more the weight approaches the center and the more stable it becomes.

So, grab a sliding T-bevel and set it to 5°. This is an arbitrary setting and it could just as easily be 7° or 10°. Even at just 5°, one can see from the picture at left how quickly the frame boards will slope away from the edge of the base over a 6' run. Just remember that as the angle increases, the tops of the frame boards will be driven closer to each other. And, for every degree of angle increase, cart stability will certainly increase as well. But, increasing the angle may also mean that either the base size or length of the frame boards will have to be adjusted accordingly to compensate. Regardless of the angle you use, set your T-bevel and lock it in. You'll be using the T-bevel for tool setup on the table and miter saws throughout the project. We'll be using 5° for the remainder of the project detail.


Click here for full size image


Click here for full size image

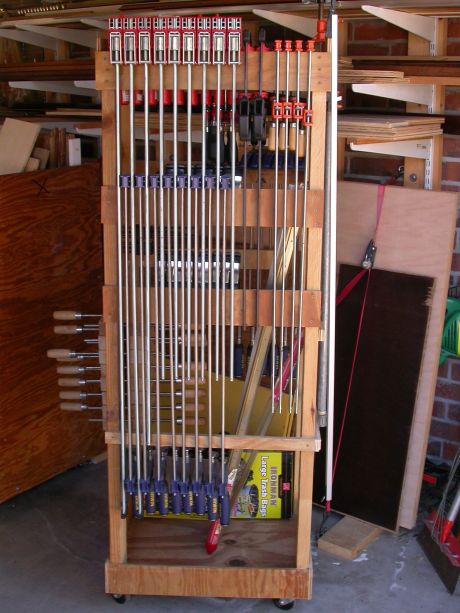
"The images in this article are provided by Sam Rogers. To see all of the steps to completing this project, visit his Clamp Cart link. Many thanks to Sam for his contribution to WOODWEB'S Knowledge Base.


Have you reviewed the related Knowledge Base areas below?
  • KnowledgeBase: Knowledge Base

  • KnowledgeBase: Adhesives, Gluing and Laminating

  • KnowledgeBase: Architectural Millwork: General

  • KnowledgeBase: Cabinetmaking: General

  • KnowledgeBase: Dust Collection, Safety, Plant Management: General

  • KnowledgeBase: Furniture: General

  • KnowledgeBase: Laminates and Solid Surfacing

  • KnowledgeBase: Woodworking Miscellaneous

  • KnowledgeBase: Woodworking Miscellaneous: Accessories

  • KnowledgeBase: Woodworking Miscellaneous: Tool Maintenance

  • KnowledgeBase: Woodworking Miscellaneous: Woodworking


    Would you like to add information to this article? ... Click Here

    If you have a question regarding a Knowledge Base article, your best chance at uncovering an answer is to search the entire Knowledge Base for related articles or to post your question at the appropriate WOODWEB Forum. Before posting your message, be sure to
    review our Forum Guidelines.

    Questions entered in the Knowledge Base Article comment form will not generate responses! A list of WOODWEB Forums can be found at WOODWEB's Site Map.

    When you post your question at the Forum, be sure to include references to the Knowledge Base article that inspired your question. The more information you provide with your question, the better your chances are of receiving responses.

    Return to beginning of article.


    Refer a Friend || Read This Important Information || Site Map || Privacy Policy

    Letters, questions or comments? E-Mail us and let us know what you think. Be sure to review our Frequently Asked Questions page.

    Contact us to discuss advertising or to report problems with this site.

    To report a problem, send an e-mail to our Webmaster

    Copyright © 1996-2008 - WOODWEB ® Inc.
    All rights reserved. No part of this publication may be reproduced in any manner without permission of the Editor.
    Review WOODWEB's Copyright Policy.

    The editors, writers, and staff at WOODWEB try to promote safe practices. What is safe for one woodworker under certain conditions may not be safe for others in different circumstances. Readers should undertake the use of materials and methods discussed at WOODWEB after considerate evaluation, and at their own risk.

    WOODWEB, Inc.
    RR4 Box 265A
    Montrose, PA 18801

    Contact WOODWEB