Home » Knowledge Base » Knowledge Base Article What's New  |  Site Map 


Today's
Sponsors:


RouterCAD

Royce Ayr Cutting Tools

RT Machine Co.

Safety Speed Cut

Sand-Rite Manufacturing

Sandman Products

Saw Trax Mfg.

Sawmill and Woodlot Magazine

Schmalz, Inc.

Schultz Forming Products

SCM Group USA, Inc.

SCM Group

SCM

SDN Contracting

Seagrave Coatings Corporation

Sears Trostel Lumber Co.

Shade Dri

Shomaker Lumber Company

ShopBot

SII Dry Kilns

Silvaris

Simantech

SIS Machinery

SK-USA

SketchList

SlipCon USA, Inc.

SnapDragon Associates, LLC

SNX Technologies

South State Machinery

South Texas Moulding

Southeast Tool, Inc.

Specialtytools.com

SprayGunWorld.com

NPO BARS

Nydree Flooring

Nyle Dry Kiln Systems

O'Shea Lumber Company

Old Mississippi Brick and Heart Pine Company

OMGA, Inc.

Omnitech Systems

Onsrud Cutter

Opti-Sand

Original Saw Company

Osolnik Machinery & Supplies

Patton Cabinet Doors

Paul Saws and Systems

People Logic Software Corp.

Pinske Edge

Pioneer Lumber Company

Planit Solutions Inc.

plastiMACH

Plogic Solutions Ltd.

Pond Cove Paint

Porter-Cable

Precision Drive Systems

Precision Saw Sharpeners

Premium Specialty Hardwoods

Pricecutter.com

Prime Estimating and Software Services, LLC

Pro.Woodworker.com

Pro100

Professional Hardware & Supply Co.

Quality VAKuum Products, Inc.

Quick Machinery Company

Quickscrews International Corporation

QuickScribe

QuickWood

QuikDrawers

Quis Machinery

R&R Drummond, Inc.

R.A.W.

R.D. Billhofer Company

Rangate

Rawles-Aden Lumber Corp.

RazorGage

Restoration Specialists

Rex Lumber Company

Riethmiller Lumber

Ritter Manufacturing Inc.

Rockler Woodworking and Hardware

Roger Shaw and Associates

Rose Machinery

Routech


WOODWEB DISCLAIMS any and all RESPONSIBILITY and LIABILITY for the accuracy and application of the information below. Readers agree to evaluate the significance and limitations of the information provided, and accept full responsibility for the application of this information. Read More ...

Would you like to add information to this article?
Interested in writing or submitting an article?
Have a question about this article?


Clamping Methods for Laminations       Cabinetmakers discuss jigs and techniques for clamping large curved laminated assemblies. July 21, 2005

Question
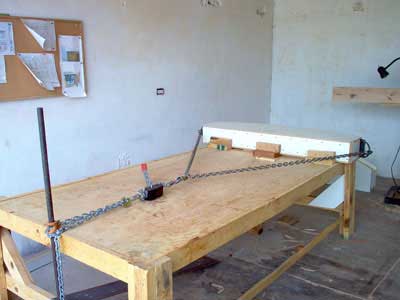
I am building two curved front vanities. I plan to laminate three layers of 1/4" x 6" alder equal to the width of the vanity, and then glue up the laminations for the doors and drawer fronts. I built a mold and thought to bend the laminations with a 6" x 1/4" steel strap connected to a come-along.

In the photo below, when I pull the strap it is deforming and the laminations are not closing up. Does anyone have any suggestions on a better way to do this or how to set up the pulling mechanism so I get good joints along the entire lamination?


Forum Responses
(Cabinetmaking Forum)
From contributor S:
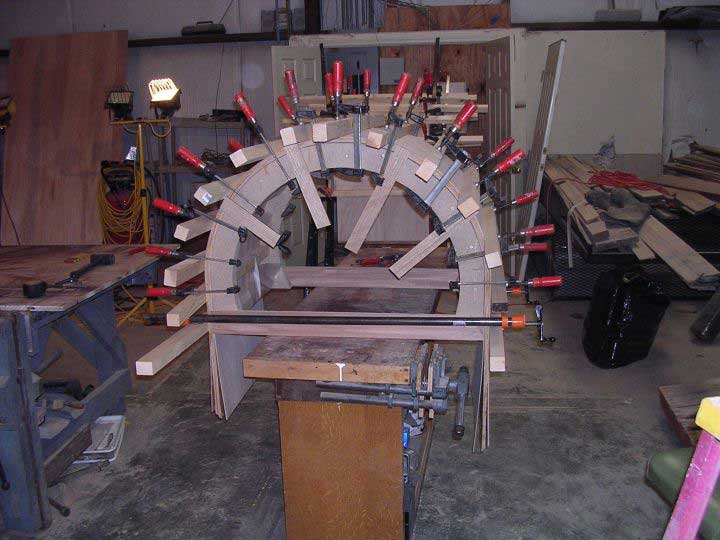
I would suggest making a positive and negative form and clamping them together. It seems like you've already got the positive form built, and all you have to do is make a negative to fit over that and clamp them together. Be sure to account for the fact that the radius changes by the thickness of your material. Make sure to oversize your pieces that you are laminating both width and length. Finish the edges of your form or cover it with wax paper to prevent the glue from sticking to it.


From contributor J:
I would say that you need to either build a negative form, or you need to clamp the wood directly to the form that you have with individual clamps starting in the middle of the form and working you way out to the ends of the form. I have also seen it done with contact cement, but I have never done this myself.


From contributor B:
Building a negative is self explanatory, but here's a picture of the second method Contributor J describes. Note that the lams are way oversized, and the form is covered with wax paper as Contributor S suggests.


Click here for full size image


From contributor R:
I have not laminated alder, but when I laminate 3 pieces of 1/4" hard maple there is a lot of spring back. I always try to laminate 3/16" or fewer pieces.


From contributor C:
I would suggest getting a vacuum bag (you won't regret it) and also using the thinnest plywood your planer/sander will allow. Also, use hard glue such as plastic resin for solid wood laminations. Yellow glue is ok for bending plywood with veneer faces.


From contributor P:
Vacuum bags are not very expensive, and once you have one you will wonder how you ever got along without one. If you plan to bend 1/4 wood, let me stop you now before you realize as I did the hard way that wood has a shape memory (spring back.)

It would be better if you used 1/4 bending plywood such as 1/4 Plascore bent over a form using a vacuum bag and plastic resin adhesive. As the bending plywood has no shape memory and the Plascore is soft, and with the bendable there will be zero spring back. Also, the veneered face can be laminated on the same way during the main bend or later.

I got a vacuum pump with 4' x 4' bag for 365 USD and I added a 4 x 10 bag for only 189. USD will work better than your strap and come-along, will have a less chance of something flying across the shop.


From contributor L:
To the original questioner: You’re on the right track, althogh your metal strap-band with the come-along is overkill, and that’s why you have the problem at the ends. When you pull the ends of the relatively rigid strap back, the sections (of the strap) near the end will lift off the curve of your form and won’t hold the laminations anywhere near tightly to the form.

I have done lots of laminated frames for 35 - 50 foot racing sloops using 3/16 inch mahogany and Alaskan yellow cedar strips on a positive form and clamping from the center out in both directions with nothing more exotic than C-clamps (lots of them, though). I used West System Epoxy but the principle will work with any glue. I did make my forms a little tighter at the ends than the finished curve to accommodate the inevitable spring back.


From the original questioner:
I ended up building a negative form, and we have now glued up the faces for one of the vanities. I wouldn't mind having vacuum bags and bending board, but I live and work in Mexico where very little is available.


Have you reviewed the related Knowledge Base areas below?
  • KnowledgeBase: Knowledge Base

  • KnowledgeBase: Adhesives, Gluing and Laminating

  • KnowledgeBase: Adhesives, Gluing and Laminating: Gluing and Clamping Equipment

  • KnowledgeBase: Cabinetmaking

  • KnowledgeBase: Cabinetmaking: Custom Cabinet Construction


    Would you like to add information to this article? ... Click Here

    If you have a question regarding a Knowledge Base article, your best chance at uncovering an answer is to search the entire Knowledge Base for related articles or to post your question at the appropriate WOODWEB Forum. Before posting your message, be sure to
    review our Forum Guidelines.

    Questions entered in the Knowledge Base Article comment form will not generate responses! A list of WOODWEB Forums can be found at WOODWEB's Site Map.

    When you post your question at the Forum, be sure to include references to the Knowledge Base article that inspired your question. The more information you provide with your question, the better your chances are of receiving responses.

    Return to beginning of article.


    Refer a Friend || Read This Important Information || Site Map || Privacy Policy

    Letters, questions or comments? E-Mail us and let us know what you think. Be sure to review our Frequently Asked Questions page.

    Contact us to discuss advertising or to report problems with this site.

    To report a problem, send an e-mail to our Webmaster

    Copyright © 1996-2008 - WOODWEB ® Inc.
    All rights reserved. No part of this publication may be reproduced in any manner without permission of the Editor.
    Review WOODWEB's Copyright Policy.

    The editors, writers, and staff at WOODWEB try to promote safe practices. What is safe for one woodworker under certain conditions may not be safe for others in different circumstances. Readers should undertake the use of materials and methods discussed at WOODWEB after considerate evaluation, and at their own risk.

    WOODWEB, Inc.
    RR4 Box 265A
    Montrose, PA 18801

    Contact WOODWEB